Use the General Annotation commands to add dimensions, hole notes, and surface texture symbols to the 3D model.
Before you begin, set the units in Document Settings, Standards tab, and then select the desired standard in the Annotations, Active Standard drop-list.
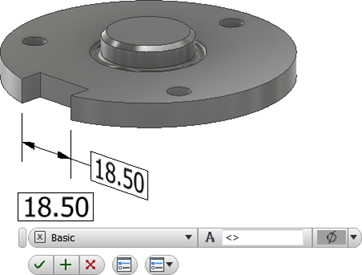
Add or edit dimensions
- On the ribbon, click
Annotate tab
 General Annotation panel
Dimension
General Annotation panel
Dimension
 .
.
- Select the geometry to dimension.
- Optionally, do any of the following and then click to place the dimension:
- Click Select Annotation Plane in the context menu, or use the SHIFT shortcut key, and then select an alternate annotation plane.
- Click Select Next Candidate Plane in the context menu or use the SPACEBAR shortcut to cycle through alternate planes.
- Click the drop-list in the minitoolbar and select the dimension style, such as Basic.
- Optionally, do any of the following:
- Place your cursor in the value box and then add prefix or suffix to the value.
- To access more options, click Edit Dimension in the minitoolbar to display the dialog box and then make any required changes.
- Click OK to add the dimension.
- To edit a dimension:
- Select the dimension in the display or browser, right-click, and select Edit in the context menu.
- Double-click the dimension in the display or browser.
Change the required dimension values and then click OK.
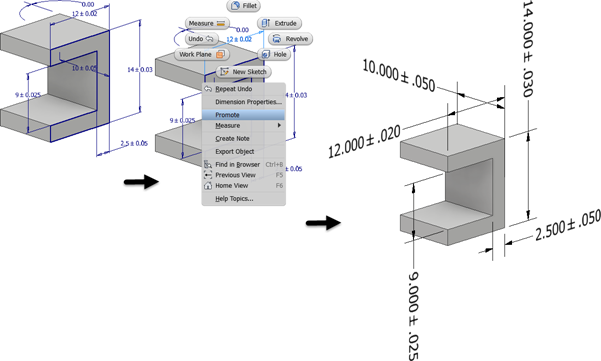
To extract existing dimensions
To include existing dimensions in the model-based definition:
- Right-click a feature in the browser and select Show Dimensions.
- Click any visible dimension and select Promote in the context menu to create a 3D annotation.
If the model dimension includes tolerance information, it is included in the promoted dimension.
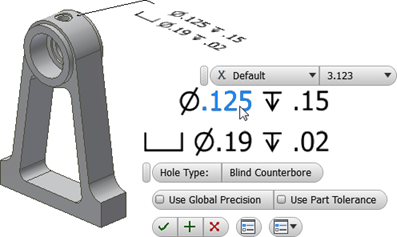
Add or edit hole/thread notes
- On the ribbon, click
Annotate tab
General Annotation panel
Hole/Thread Note
 .
.
- Select the hole feature.
- Optionally, do any of the following and then click to place the hole note:
- Click Align to Geometry in the context menu and then select an edge or axis to orient the text.
- Click Select Annotation Plane in the context menu, or use the SHIFT shortcut key, and then select an alternate annotation plane.
- Click Select Next Candidate Plane in the context menu or use the SPACEBAR shortcut to cycle through alternate planes.
- Optionally, do any of the following:
- Enable the Use Global Precision checkbox or clear the checkbox and then click a drop-list value to change the precision.
- Enable the Use Part Tolerance checkbox or clear the checkbox and then click a drop-list value to change the tolerance.
- To access more options, click Edit Hole Note in the minitoolbar to display the dialog box and then make any required changes.
- Click OK to add the hole/thread note.
- To edit a hole/thread note:
- Select the hole/thread note in the display or browser, right-click, and select Edit in the context menu.
- Double-click the hole/thread note in the display or browser.
Change the required values and then click OK.
Add or edit surface texture symbols
Surface Texture annotations are created with a single-segment leader by default. To create more leader segments, start the command, right-click, and click Single-Segment Leader to unselect the option.
- On the ribbon, click
Annotate tab
General Annotation panel
Surface Texture
 .
.
- Select a model face.
- Optionally, do any of the following and then click to place the surface texture annotation:
- Click Align to Geometry in the context menu and then select an edge or axis to orient the text.
- Click Select Next Candidate Plane in the context menu or use the SPACEBAR shortcut to cycle through alternate planes.
- Optionally, do any of the following:
- Click the drop-list and select the desired surface texture symbol.
- Click a check box next to Force tail, Majority, or All-around to modify the symbol.
- To access more options, click Edit Surface Texture Symbol in the minitoolbar to display the dialog box and then make any required changes.

- Click a letter to enable a value box, add the required finish values, and then click OK to create the symbol.
- To edit a surface texture symbol:
- Select the surface texture annotation in the display or browser, right-click, and select Edit in the context menu.
- Double-click the surface texture annotation in the display or browser.
Change the required values and then click OK.