Property Panels provide contextual access to parameters used for creating and editing features.
The property panel floats above the graphic area and, initially, appears in the upper left of the graphics area. Panels can be resized, combined with the Model browser, moved to another location, and even to a secondary monitor. Property Panels use expandable sections instead of tabs.
Key Concept
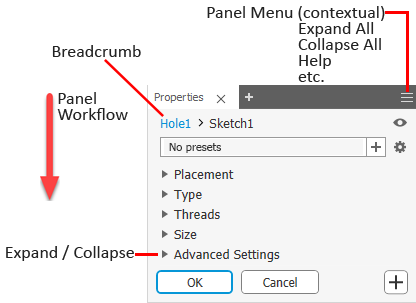
- Panel Workflow - the property panel workflow is top to bottom. That is, any property you set or change can affect the properties in sections below it, but those properties do not affect the properties in preceding sections.
- Breadcrumb - quickly switch from editing the hole to editing the associated sketch with hole centers.
- Expand/Collapse - panel sections can be expanded to expose parameters for editing or collapsed to hide seldom used parameters.
- Panel Menu - the drop down provides access to Help and other advanced settings. The menu adjusts based on context. For example, one list for the property panel, one for the model browser, and so on.
- Docking - the property panel can be docked to any side of the application graphics window, within the browser space, or remain floating whether over the application or somewhere on the desktop. This allows you to position the panel or browser wherever it is convenient for you.
- Display - panels remember their most recent display state and use that when next visited.
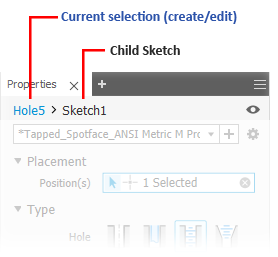
Breadcrumbs
Breadcrumbs horizontally display the current or active location in the document hierarchy. They can provide access to documents, features, and sketches depending on document type.
When you click on breadcrumb text, the property panel display updates to show the appropriate information for the selected item. For example, when editing a hole feature, clicking on the Sketch breadcrumb will apply any hole feature parameter changes not yet saved, and enter the Edit Sketch mode.
Presets
A preset is a collection of pre-defined feature properties. When selected, presets populate values in the property panel allowing for easy reuse of often used property sets. Once you create a hole, a preset called Last Used is listed and as it implies, it will always present the most recently accessed feature parameters.
The
Last Used preset is made up of the parameters used for the most recently placed feature of that type. You can use the
Last Used preset as is or modify its values. At any time you can save the changed preset to a new preset by clicking
 New Preset.
When you use a preset to create a feature, the next time you create a feature of that type the most recently used preset populates the Property Panel.
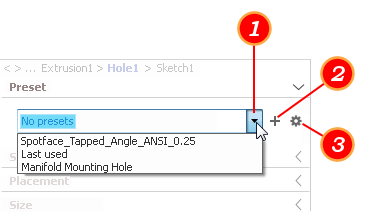
- Drop down list of presets.
- Creates a new preset from the current parameters. A default name is provided, but can be changed.
- Preset Settings
- Save Current - save the current settings to a preset you name or use the default name.
- Rename Current - provide a different name for the current preset. When renaming a preset, you can use the Esc key to exit the process and restore the previous name.
- Delete Current - select the preset you want to delete, then click Delete Current.
- Sort Order
- Recently Used - ordered by most recent use
- Date created - ordered by the oldest preset to the newest preset
- Alpha-Numeric - ordered by numeral and then alphabetically
- Last modified - ordered by most recently modified
When you edit a feature, the preset used to create the feature is loaded into the property panel. If the preset shows No Preset, that means the feature is either a legacy feature or was created with the "Last Used" values. If it is a legacy feature and you change a value, and the value is different from the current "Last Used" values, it is given the name Custom preset.
( * ) Asterisks on Presets, such as
*Preset 1, indicate a feature definition value has changed from the saved version. You can save the modified preset using the settings dropdown
 replacing the previous preset or use
to save it as a completely new preset.
replacing the previous preset or use
to save it as a completely new preset.
Creating New Presets
- Specify the feature parameters in the property panel.
- Click the New Preset button.
- Specify the Preset name if you do not want to use the default name.
For each user, there is a preset file located in the %USERPROFILE%\AppData\Roaming\Autodesk\Inventor xxxx\Presets folder. For example, after creating a hole feature, you will see the HoleCmd.preset file in that folder. The file contains any feature presets created while working as that %USERPROFILE%.
The Last Used preset is stored in the parent folder, %USERPROFILE%\AppData\Roaming\Autodesk\Inventor xxxx, under the file name PresetSettings.xml.
The location can be changed if you prefer a single Preset file for all users. The file path is stored in Application Options and can be changed by going to the
Application Options
 File tab and navigating to the new location. This path also displays in the Projects dialog, lower section, in the Folder Options.
Property Panel Navigation
You can tab from one field to another, whether in the property panel or canvas. When you tab in-canvas, the tabs are for the displayed parameters. When you tab in the property panel, tabbing occurs for those parameters listed in the panel. Cross-highlighting occurs for the related fields.
Property Panel and In-canvas Edit Controls
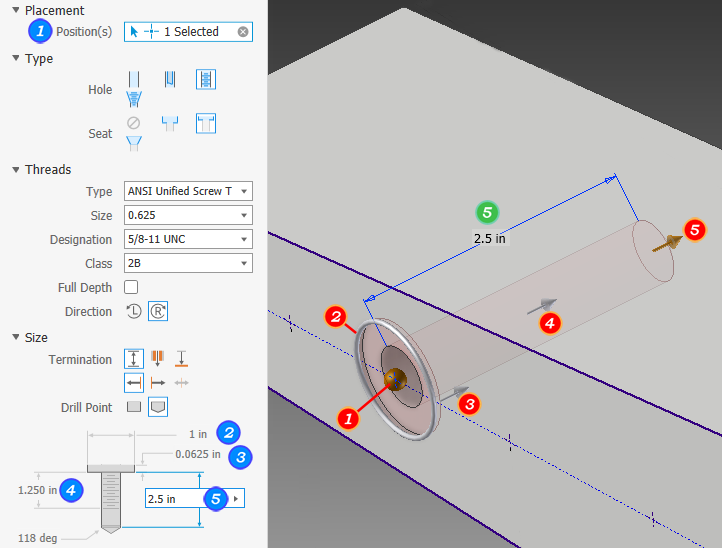
Using the Hole feature as an example for this behavior, when creating or editing features parameter edit fields can be used in the Property panel, in-canvas edit fields, and feature manipulators.
The property panel and in-canvas edit controls are designed to allow you to use keyboard entry easily. When editing a value, you can use the Enter key to modify values. As long as the edit control has focus (actively modifying a value), the Enter key affects only the value.
To complete the feature definition process and close the property panel use CTRL+Enter.
When an edit control does not have focus, Enter completes the feature definition, the same as clicking OK, and closes the property panel.