The Erase & Fill tool does double duty as a hole-filler and a general 3D surface "eraser". (We used to call this the Replace tool, and you will see that terminology in a few places.) Access this tool under the Edit submenu that appears once you have made a selection. Note that you can send in multiple selections, each one will be filled individually, using the same fill settings.
The hotkey f starts this tool when you have an active selection.
The Replace property panel is shown below. The first setting, Fill Type, is described below. The Refine parameter controls the density of triangles in the fill surface. Smooth controls the amount of smoothing, which basically means how "regular" the triangles are.
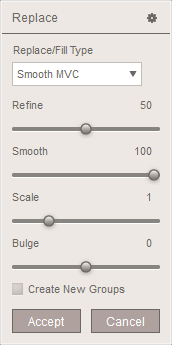
Scale and Bulge affect only the Smooth MVC fill type. This is a smooth fill, which you should imagine as a patch cut out of a 2D rubber sheet and then formed to fit the hole shape. Scale> 1 makes this patch larger than it should be, so it bulges outwards, while < 1 means it is too small and has to be stretched to fill the hole (which flattens it out).
The effect of Bulge > 0 is somewhat analogous to pushing on the back side of the rubber fill patch with your fingers, around the edges, while < 0 pushes in from the front side. Actually what we are doing in these cases is locally rotating the initial tangent-continuous boundary conditions, to point above or below the hole border. This provides quite a range of shape control, so much that in some cases you might use this as a modeling tool!
Finally, Create New Groups, when checked, means that each fill patch (shown in orange while using the tool) will get a new face group. Otherwise, we try to be clever: if the entire patch is contained in another face group, we use that face group; otherwise, we assign a new one.
Fill Type
The three fill types are Smooth MVC, Flat Minimal, and Flat Remeshed.
Before explaining the Fill Type, we have to explain what gets filled. If your input selection doesn't have any interior holes, then the input faces will be completely deleted, and we will fill the hole left behind. If your selection does contain holes, then in the Flat modes we will simply fill the holes. Currently there is no way to do a Smooth fill of a hole without at least replacing the adjacent ring of boundary triangles.
The image below shows how the Smooth MVC fill mode works.
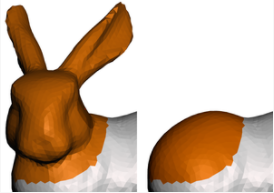
We have selected a large region on the left, which is completely replaced on the right with a new smooth fill surface. You can see that the default is to smoothly blend across the boundary. If the boundary isn't as smooth as you would like (a rough area on the border can distort the whole thing), you can use the Scale and Bulge sliders to improve the result.
The images below shows the Flat Minimal (left) and Flat Remeshed (right) fills, applied to interior holes.
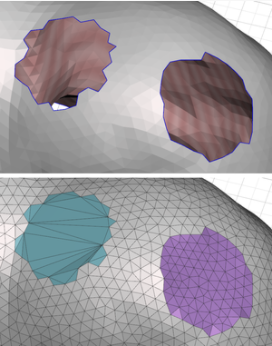
The selections are not shown, but in each case we selected the border ring of the hole with the double-click shortcut. See the Double-Clicking topic for more information on this useful shortcut for selecting holes. The Flat Minimal fill on the left produces a minimal triangulation of the hole. This is the "flattest" fill, but also this region of mesh is going to be a problem if you do further operations like sculpting. The Flat Remeshed mode starts with a Flat Minimal fill, and then runs a remeshing pass while projecting the result onto the flat fill patch. This result is often better for subsequent operations, but will often be "less flat" than the Minimal fill.