Create and edit particle effects
For video tutorials on creating particle effects, see here!
The Particle Editor Tool (Window > Particle Editor) lets you create new particles, modify them and preview the effects in the viewport within the tool. You can open and modify multiple particles at the same time, view History ![]() of actions performed, and use the Respawn
of actions performed, and use the Respawn ![]() and Pause/Resume
and Pause/Resume ![]() icons to respawn the particle effect and pause/resume the particle effects preview.
icons to respawn the particle effect and pause/resume the particle effects preview.
Select Window > Particle Editor to launch the Particle Editor.
The Particle Editor opens with a default, untitled particle effect ready for you to modify.- Modify the default particle effect by editing its properties.(See Particle system properties.)
Click Save
 to assign a name and save the effect to the desired location in your project.
This creates both a particle effect system, and a related particle material.
Other ways to create particle effects:
To create another particle effect, click New
 to open a new tab with an untitled particle effect in the Particle Editor.
You can also use the right-click menu option in the Asset Browser to create a new particle effect:
In the Asset Browser, navigate to your project /contents folder and create a new sub-folder for your particle effects.
Right-click in file view area of the Asset Browser, select Create > Particle Effect, and enter a name for the new particle effect.
A particle asset and a particle material are created in the Asset Browser.
Select the particle effect asset and either double-click or in the Property Editor, click Open in Editor. The particle effect asset launches in the Particle Editor.

The main way you'll work with particles is by modifying the properties of the particle system. Particle systems are simply a group of commands that guide each of your particles from their birth to their death.
The default particle system is called System 1, and you can add and remove controllers to any system to customize the particle effect. Each particle effect can have multiple systems, and each system can have multiple controllers.
Select a particle effect asset in the Asset Browser and double-click to open it in the Particle Editor. You can also open a particle effect asset using the Open icon
 in the Particle Editor.
The particle system properties are displayed in the Particle Editor.

Select System 1.

Selecting System 1 shows you the general, overall properties of this particle system.
In the default system properties, you can edit the system name, set the particle life span (min/max values) in time in seconds, or control the spawn position with the Offset, Tilt, and Spin properties.
See the components of System 1.
By default, this system contains Emitter:Rate, Size, Color, Velocity:Box and Billboard Visualizer components. The Billboard Visualizer uses the custom particle material created for the particle effect. Replace this material with a material graph (containing a Particle Base shader node) of your choice.
Note: If you delete the Billboard Visualizer component, the particle effect won’t display. You can use a non-rendering particle system to act as a trail spawner for other particle systems.
Select each component to view the properties available for editing.
Tip: Reorder the particle effects by dragging and dropping the systems in your particle effect, and copy and paste the controllers and systems using the right-click Copy, Paste context menu options or hotkeys (Ctrl + C, Ctrl + V).
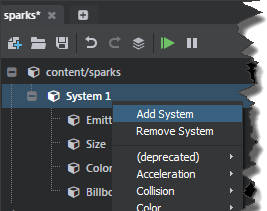
Right-click the particle system (System 1) and select Add System.

- Right-click the system root and select the component you want to add.
- Right-click and select Remove Controller.
Tip: When working with particle effects, click the gear icon
in the Asset Preview of the Particle Editor and select Update Mode > Always.