Get started on iOS
This page tells you everything you need to know in order to get started developing projects for iOS. You'll need an iPhone or iPad to follow along, as well as a Mac running OS X.
NOTE: You'll need to be a registered developer with Apple. It will also be helpful if you have a basic understanding of how iOS apps are typically developed and distributed, especially how to manage your digital signing certificates.
See the Supported platforms page for details on the iOS devices and OS versions that the interactive engine can work with, and make sure your device is a good fit.
You'll have to install and set up a few things on the Windows machine that you use to run the interactive editor, and your Mac OS X development machine.
The Autodesk Interactive Packaging Server lets you package and re-sign the interactive engine from your Windows development machine.
Due to restrictions from Apple, the iOS packaging process cannot be fully completed on a Windows machine only. Some steps can only be completed on a computer running Mac OS X. This is where the Autodesk Interactive Packaging Server comes in.
You will need to install and run the server application on a Mac. For system requirements, see Supported platforms.
Locate the packaging app within your 3ds Max Interactive install directory. For example: C:\Program Files\Autodesk\ Interactive\<version>\tools\ Autodesk Interactive Package Server.app
Copy the app to the Applications folder on your Mac.
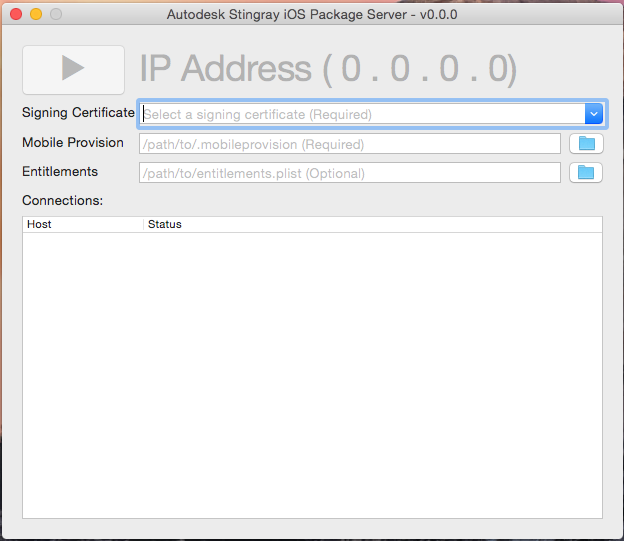
Run the app. The following window appears:

Enter the information required to start the server:
- Signing Certificate
-
[Required] Specifies the certificate you want to use for signing your apps. Note you should use the Distribution certificate when you create a final version of your app that you plan to upload to iTunes Connect.
Note: The drop-down list shows all certificates installed on the machine. If you don't see anything there, and have to enter the value manually, chances are that you don't have the certificate installed on your machine. This may cause the packaging process to fail.
- Mobile Provision
-
[Required] Point to the mobile provision file associated with your signing certificate. You can download this from your Apple Developer Center page.
Note: If you're not using an Enterprise provision profile (which lets you install on any device), make sure that you have added the devices you plan to use for testing to this provision profile. If you used Xcode to develop on this device previously, it is automatically added.
- Entitlements
- [Optional] You can set the entitlements file, if desired. If you don't, it is generated automatically. You can generally leave this setting blank.
Start the server by pressing the play button. (At any time, press the stop button to stop the server.)
When the server starts, you'll see the IP address that you need to enter in order to generate the IPA for the interactive engine, and in order to package your own interactive application for iOS (see the sections below).
You will also see a list of all requests coming in from interactive editors running on your network:

Tip: Double-click a status message to view the full log data.
3ds Max Interactive doesn't ship with signed versions of the engine runtime ready to use on iOS. You need to generate .ipa files for the engine using your own signing certificate.
To generate the engine .ipa files:
Set up the iOS Package Server as described above.
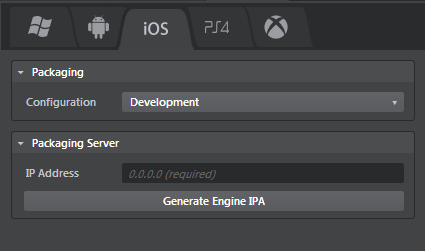
In the interactive editor on your Windows development machine, open the Deployer panel (Window > Deploy and Connect > Deployer) to the iOS tab.

Select an engine configuration. You'll need to generate the "Development" .ipa in order to connect the editor to an iOS device for testing, and you'll need to generate the "Release" .ipa for your final deployment. See also About engine configurations.
Click Generate Engine IPA.
The file is created and saved in your Windows user directory, typically under AppData\Local\Autodesk\ Interactive\engine\ios\<configuration>.
Once the .ipa file for the engine is available, the Deployer panel shows all of the options you can set when you deploy a full standalone build of your interactive app. See [Deploy the project for iOS] below.
Connecting the editor to your device has two benefits:
You can mirror the editor's viewport to the device while you're working on your project content, so that you have a live preview of what your changes look like on the device.
You can easily run your project on the device to test your gameplay.
For more background information, see Connect to a remote device.
To connect to an iOS device:
Plug your device in to a USB port on your Windows machine.
Install the development version of the interactive engine .ipa to the iOS device using iTunes.
Add the engine app to your iTunes app library. You can either drag and drop it to the My Apps area, or select Add File to Library... from the main menu.
Sync your device. iTunes copies the engine app over to the device.
Always use the development version of the engine for this step. The editor can't connect to the release version.
Start the engine app on the device.
NOTE: The first time you run the engine app on your iOS device, you will probably need to configure iOS to trust it. For details, see this page from Apple about how to trust a new app developer in your iOS settings.
When the app starts up, it shows the following information while it waits for an incoming connection from the interactive editor:

In the interactive editor, use the Connections panel (Window > Deploy and Connect > Connections) to set up the connection to the IP address shown on the device, then mirror or run project.

For details, see Using the Connections panel.
Note: The engine app on the device must be in this waiting state in order for the editor to initiate a connection. That means that each time you want to run your project or mirror your viewport, you have to close and restart the engine on the device.
Deploying creates a standalone .ipa bundle that you can try out on your device (and, eventually, distribute on the iTunes store). For background information, see Deploying and Building and Using the Deployer panel.
To package a project for iOS:
- In the interactive editor, open the Deployer panel (Window > Deploy and Connect > Deployer) to the iOS tab and enter the required information. (See below.)
- Click Package Project for iOS.
The deployer creates an .ipa file for your app, and copies it to the location on your computer that you specify in the Destination field.
After deploying:
To copy your deployed app to a connected device for testing, use iTunes on your Windows computer.
If you're using version 12.6.x or earlier, drag and drop your .ipa into your Apps library, then sync your device.
If you're using version 12.7 or later, drag your .ipa over your device's entry in the vertical ribbon. Your device is outlined in blue to indicate that the app will be copied:

Tip: This method may not work for all devices. If it doesn't work for you, try installing the special 12.6.3 version of iTunes that adds back the Apps library. If this fails, you may have to copy the .ipa to your Mac OS X machine and transfer it from there using Xcode.
To distribute your app on the Apple iTunes Store, use the tools provided by Apple. See the App Distribution Guide.

You can set the following options in the Deployer panel for iOS devices, after you have created the .ipa file for the engine.
These settings are common for all tabs. See Using the Deployer panel.
- Title
- The title of your project. This is the name used by online stores, and the name that shows up under the app.
- Bundle ID
- The bundle identifier for your app. Make sure this correlates with the provision profile used to re-sign and the iTunes Connect info.
- Version
- The application version string.
- Build
- The build number string.
Icons used for your app. If you leave them empty, the Deployer uses a default Autodesk icon. When you are ready to release your app, you'll need to specify an icon for each listed size.
The Launch images (splash screens) used for your app. If you leave them empty, the Deployer uses a default Autodesk image. When you are ready to release your app, you'll need to specify an icon for each listed size.
Mobile devices don't have the same amount of memory and processor resources to throw at your project as your PC does. When you're making a project that you intend to be used on mobile platforms, it's really critical to pay close attention to the size of your resources and the overall demands that the project is putting on the device.
For some helpful tips, see Optimize memory usage.