Get started on Xbox One
This page tells you everything you need to know in order to get started developing projects for Xbox One. You'll need to be a registered Xbox One developer with Microsoft already, and you'll need an Xbox One in developer mode to follow along.
You'll have to install and set up a few things on the Windows machine that you use to run the interactive editor.
The parts of 3ds Max Interactive related to Xbox One are only distributed to teams that are registered with Microsoft as Xbox One developers. You need to get this distribution and install it on your computer.
Registered Xbox One developers can download the distribution from the Autodesk Game Developer Center, at http://gamedev.autodesk.com/releases. Make sure that you download the version that matches the version of 3ds Max Interactive that you have installed on your Windows machine.
If you need to register for an account, or if you need to add Xbox One access rights to your account, you can do so through the site.
Once you have the distribution .zip file on your computer, unzip it into your 3ds Max Interactive installation folder. Make sure that the contents of its engine folder are merged into the engine folder that is already present in your installation folder.
On your Windows development machine, install the XDK: the Xbox One platform libraries. You need the October 2016 QFE 2 release. Other versions may or may not be compatible.
You can download the SDK from the Microsoft Game Developer Network Portal, available to registered developers at https://developer.xboxlive.com/.
Connecting the editor to your device has two benefits:
You can mirror the editor's viewport to the device while you're working on your project content, so that you have a live preview of what your changes look like on the device.
You can easily run your project on the device to test your gameplay.
For more background information, see Connect to a remote device.
To connect to an Xbox One:
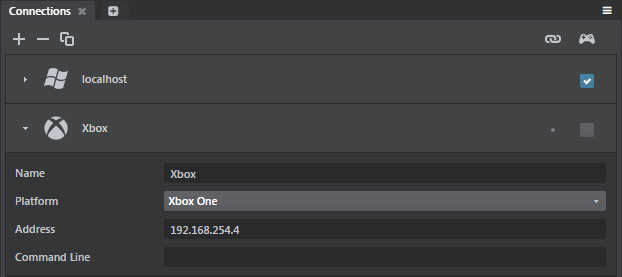
In the interactive editor, use the Connections panel (Window > Deploy and Connect > Connections) to set up a connection to the Xbox One device:

For details, see Using the Connections panel.
Note: In the Address field of the Connections panel, enter the "Console IP" of your Xbox One device. Do not use the "Tools IP".
When you connect the editor to the Xbox One device, the editor automatically sends the engine to the device over the network, runs the engine on the device, then sends your project data to the engine.
Deploying creates a standalone bundle that you can try out on your Xbox One (and, eventually, distribute). For background information, see Deploying and Building and Using the Deployer panel.
To package a project for Xbox One:
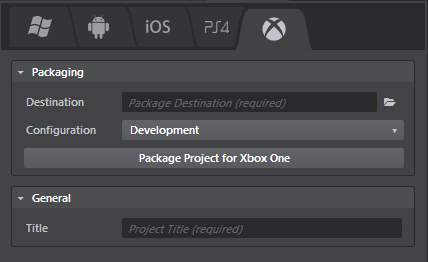
- In the interactive editor, open the Deployer panel (Window > Deploy and Connect > Deployer) to the Xbox tab and enter the required information. (See below.)
- Click Package Project for Xbox One.
The deployer copies the files your app needs to the location on your computer that you specify in the Destination field.
After deploying, you can use the development tools provided by Microsoft to copy your app to an Xbox One device for testing, and to finish preparing your app for distribution using any of the channels supported by Microsoft.

You can set the following options in the Deployer panel for Xbox One devices.
These settings are common for all tabs. See Using the Deployer panel.
- Title
- The title of your project. This sets the name of the executable file for the application, and the product name for online stores.