Tips for developing plug-ins
Developing a custom plug-in that integrates with the editor's JavaScript environment can be a tricky task. This page provides some tips and background information that may help you get started.
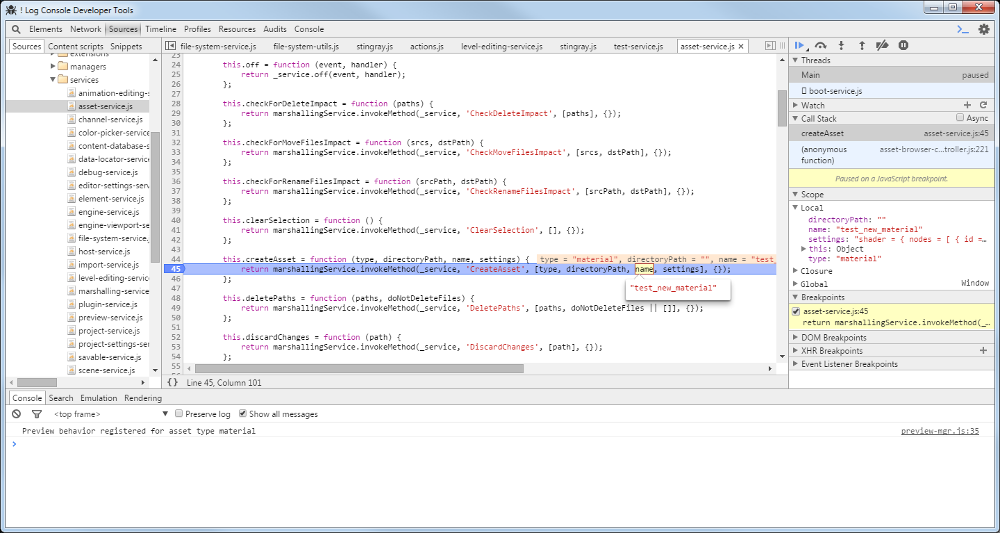
The editor's front-end HTML5 environment runs in the Chromium Embedded Framework (CEF). This means that you have access to the Chrome Developer Tools panel, which offers many essential development resources. You can use the DevTools to place breakpoints and debug your JavaScript code, explore the HTML of your panels, and run JavaScript commands in a console.

To launch the DevTools, press Ctrl+F12.
Each editor window gets its own instance of the DevTools. If you want to zero in on a particular panel, you can undock that panel into its own floating window and press Ctrl+F12 while that window has focus.
For details on all the capabilities of the DevTools, see its home page on the Google developer site.
Most of the editor's JavaScript architecture is built around the principle of asynchronous interactions.
When you call a function in an editor service, you can't depend on that call to be finished when the next line of your JavaScript code is run. Instead, services typically return Promise objects, which resolve at some point in the future after they are invoked. Typically, if a JavaScript service needs to interact with the C# backend, it will only resolve the promise and produce an actual value when its interaction with the backend is complete.
Think of a promise as a guarantee that what you've asked for will be done eventually, at some unspecified point in the future. If you need to rely on the real values produced by those instructions, you need to call the promise's then() function, and give it some extra work to carry out when its original instructions are done. For example:
// This won't print the expected value, since the promise returned by getCurrentProjectPath()
// has not resolved yet when the value is logged:
var project_path = projectService.getCurrentProjectPath();
console.info(project_path);

// Instead, we use then() to hook up new functions that will be called when the promise is finished:
projectService.getCurrentProjectPath().then(
    function( project_path ) { console.info(project_path) },
    function( error_message ) { console.error(error_message) }
);
Anytime a function returns a Promise (like getCurrentProjectPath() in the example above), you can call then() on the returned promise in order to delay a block of code until the work represented by that promise has been finished. The then() function takes two parameters, each of which is a callback function:
the first callback function gets run if the original promise is resolved successfully. This function often gets passed a parameter by the original function when it resolves the promise, like the project_path in the example above.
the second callback function gets run if the original promise is "rejected" -- if an error occured and it can't resolve successfully. This function is usually passed a string that describes the error.
If you return a value from these callbacks, that value becomes the return value of the then() call. This means that you can chain multiple then() calls together in order to create longer sequences. You could make use of this in order to transform a value multiple times, or to carry out multiple asychronous calls in a definite order. You can also nest then() calls within the resolution of other then() calls.
For more information about promises in JavaScript, see this page on the Mozilla Developer Network.
The editor's front-end is a highly complex system that needs to integrate a huge number of JavaScript modules together into a coherently functioning whole. We use require.js as a way to keep all these modules organized, and to give our modules and code blocks a structured way to "include" other modules that they depend on.
This has some important consequences on your plug-ins. For example, in order to gain access to any of the services or other modules provided by the editor, you have to use either the require() function or the define() function provided by require.js.
For code examples that show how this works, see the page about how to Use built-in editor services.
For more in-depth information, you can also see http://requirejs.org/
Whenever you refer to a script module, such as in a call to require() or define(), there are a few ways you can construct the path to that module.
If you need to refer to a built-in service or component in the editor, use a path relative to the editor/core folder. For example, the services and components folders in this example will automatically resolve to editor/core/services and editor/core/components:
require(['services/engine-service', 'components/list-view'], function(engineService, listView) { ... })
If you need to refer to another script file that you ship with your plug-in, we recommend using a simple relative path from the file that contains your require() or define() call to the module you're invoking. For example:
require(['my-module-file', '../subfolder/my-other-module'], function(myModule, anotherModule) { ... })
If you need to refer to a script file within a different plug-in, you can start the path with @, followed by the name of the plug-in, followed by the path to the module within that plug-in's folder. These plug-in paths are automatically resolved by require.js. For example:
require(['@my-other-plugin/some-module', '@asset-browser/asset-browser-actions'], function(otherPluginModule, assetBrowserActions) { ... })