Create a new menu item
You can use the menus extension to add new items into the main menus of the editor.
Each custom menu item can either launch an HTML panel, or carry out an action that you define in your plug-in. For background about actions, see also Register an action.
Every menu extension accepts the following configuration parameters.
extensions = {
    menus = [
        {
            path = "Window/Custom Editor"
            shortcut = "Ctrl+F8"
            order = 200

            // ... add other parameters here
        }
    ]
}
Determines where your menu item appears in the main menu. Required.
shortcut
A key sequence that causes the menu item to be invoked. Optional.
order
A number that indicates the placement or ordering of this item relative to the other items in the same menu. Lower numbers place the item closer to the top of the menu; higher numbers move it toward the bottom. Optional. If omitted, 0 is used, which puts the new item at the top of the menu.
To make a menu item that opens a new panel, set up your menu extension as follows.
You will also need to accompany your plug-in with an .html file and a .js file that have the same name as the panel setting. The .html file provides the content for the new panel, and the .js file is automatically loaded in order to set up any resources or services that may be required by the .html page.
extensions = {
    menus = [
        {
            path = "Window/Custom Editor"
            shortcut = "Ctrl+F8"
            order = 200

            panel = "my-custom-editor"
            width = 400
            height = 400
            title = "My custom editor"
        }
    ]
}
panel
When your menu item is selected, the editor attempts to load .html and .js files with this name. Required.
width and height
Sets the initial size of the panel the first time it is opened. Optional.
title
The name displayed for your panel inside its tab. Optional. If omitted, the name of your plug-in is used.
You can write the content of your HTML panel however you like. There are no particular restrictions.
The editor does ship with some default widgets and components. If you're comfortable with using a framework like Angular.js or Mithril to separate the HTML UI view from the JavaScript controller logic, you may be able to take advantage of these components by modeling your HTML and JavaScript code on the standard plug-ins in the editor/plugins folder.
As an alternative to setting up a panel as above, you can use the view setting to specify a named panel or dialog that you've set up in a views extension, or that another plug-in has registered in a views extension. See also Create a named panel or dialog.
extensions = {
    menus = [
        {
            path = "Window/Custom Named View"
            shortcut = "Ctrl+F8"
            order = 200

            view = "my-custom-named-view"
        }
    ]
}
view
The unique name of the view you want to open, as registered in its plug-in's views extension.
To make a menu item that runs an action, you need to add a single parameter: action.
action
The action that the editor should take when the user selects the new menu item. This value can be either the name of an action that you have already set up in the actions extension, or an inline action definition. For more information, see Register an action.
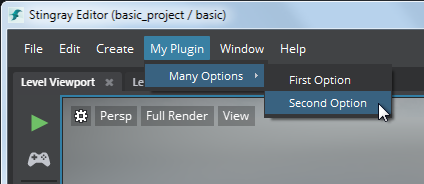
You can create a new menu by using the path parameter without specifying any action or panel to trigger. You can then follow this entry with other menu extensions that populate the menu with new items.
If the path contains no / delimiters, the new item is created in the main menu bar.
For example:
extensions = {
    menus = [
        {
            path = "My Plugin"
            order = 200
        }
        {
            path = "My Plugin/Many Options"
        }
        {
            path = "My Plugin/Many Options/First Option"
            action = "..."
        }
        {
            path = "My Plugin/Many Options/Second Option"
            action = "..."
        }
    ]
}
This configuration produces the following:

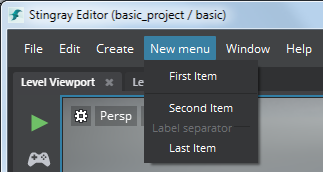
You can create simple menu separators, or separators with a label.
extensions = {
    menus = [
        {
            path = "New menu"
            order = 500
        }
        {
            path = "New menu/First Item"
            action = ...
        }
        {
            path = "New menu/Separator with no name"
            separator = true
            order = 100
        }
        {
            path = "New menu/Second Item"
            order = 200
            action = ...
        }
        {
            path = "New menu/Label separator"
            section = true
            order = 300
        }
        {
            path = "New menu/Last Item"
            action = ...
            order = 400
        }
    ]
}
This configuration produces the following:

separator
When set to true, specifies that this menu item should be represented by a plain separator line with no text.
section
When set to true, specifies that this menu item should be represented by a separator line with a label drawn from the path value.
Only one of the separator and section parameters can be set for any menu item. Both of these may only be set for menu items that have no panel, action or event configured for them.
You can make menu items with the type action checkable, and assign them a default checked or unchecked state. Each time the user selects the menu item, the checkbox state toggles between these states.
extensions = {
    menus = [
        {
            path = "Window/Show My Plugin"
            action = ...
            checkable = true
            checked = false
        }
    ]
}
checkable
When set to true, the menu item will toggle between the checked and unchecked state each time it is selected.
checked
When checkable is set to true, this parameter determines whether or not the menu item is checked by default when the editor starts up. Optional. The default value is false.