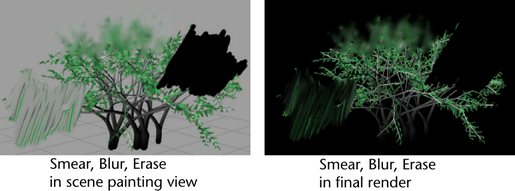
You can erase, smear, and blur paint in your scene using any brush by setting the brush type to Erase, Smear or Blur, respectively. These brushes affect existing strokes using the shape of the brush you erase, smear, or blur with. For example, if the brush has leaves, the paint smears, blurs, or erases where the leaves are painted.
Erase brushes paint alpha values of 0. The stroke will appear black in the scene painting view and in the final render, which may not produce an erased effect. However, the stroke will create a “hole” in the alpha matte, which may be useful for some compositing workflows.

To erase, smear, or blur paint in the scene painting view
- Open the Paint Effects window.
- In thePaint Effects window, select .
- Do one of the following:
- If you use a stylus and pressure-sensitive tablet, review and modify pressure mappings, if desired (). You can map up to three brush attributes to the stylus pressure. For information on modifying stylus pressure mappings, see Make the brush respond to stylus pressure in Set up to paint in 3D.
- If you want to ignore the pressure mappings, select to turn it off. You may want to ignore pressure mappings if you paint with a mouse rather than a stylus.
- In the Content Browser (), or on a shelf, click the brush preset you want to erase, smear, or blur with. The selected brush settings are copied to the template brush.
- Select and turn on Paint at Depth.
- Select . The Paint Effects Brush Settings window opens.
- Beside Brush Type, select Erase, Smear, or Blur.
- Under Channels, turn off Depth and make sure Force Depth on is turned off in the Paint Effects Globals.
- Under Shadow Effects, set Fake Shadows to None, if this is not already the setting.
- Modify other template brush settings, if necessary. For information on modifying template brush settings, see Paint Effects Brush Settings.
- Drag across the area you want to erase, smear or blur.
Tip: Create some smear and blur type brush presets and save them on a shelf for easy access. For information on storing brushes, see Create new brush presets.