These options appear in the Paint Effects Brush Settings window, and the Attribute Editor for any brush node.
By default, Paint Effects strokes do not cast shadows or produce shading effects, however, you can create several types of shadows and shading:
- fake shadows (not true shadows, but very quick to render)
- back shadows (shade the back side of an object) and center shadows (shade the center area of a patch of tubes)
- tube root shadows (shade tubes at the root)
- depth map shadows (strokes cast shadows on surfaces)
Notes:
- You can use both depth map shadows and fake shadows. They do not interfere with each other.
- Strokes do not cast ray-traced shadows, only depth map shadows.
Fake Shadow
Instead of using depth map shadows to cast shadows on surfaces, you can use fake shadows, which take less time to render and are sufficiently realistic on strokes that are on flat surfaces.
Select one of the following fake shadow types:
None
No fake shadows.
2D Offset
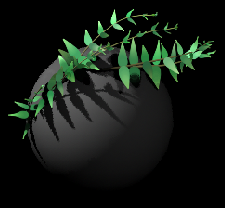
Draws a shadow stamp offset in screen space (or drop shadow).
3D Cast
Defines a flat surface beneath the stroke then casts the shadow on that imaginary plane.
The following examples all use 2D Offset fake shadows.
Shadow Diffusion
Controls the softness of the fake shadows. Higher values make the shadow edge softer.

Shadow Offset
This setting is available only when Fake Shadow is set to 2D Offset. It controls how far the shadow is offset from the casting stroke.

Shadow Transp.
This setting controls how transparent the shadows are. Higher values make the shadows lighter. Lower values make them darker.

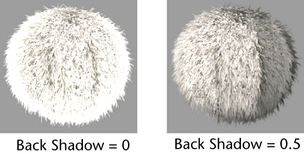
Back Shadow
Both back and center shading techniques are quick to render. The back side of an object doesn’t receive light, and is therefore not illuminated. Back Shadowing simulates this effect by shading the paint farthest away from the light. Higher values make the shading darker.

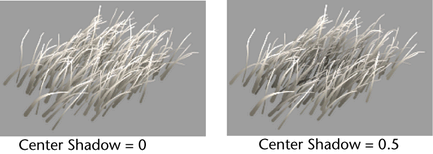
Center Shadow
By default, all tubes are painted at the same brightness. This setting shades tubes closest to the centre of the stroke path, simulating the effect of a clump of plants where the plants on the outside are illuminated, but the plants on the inside are shaded because the light is blocked by the outside plants. Higher values make the shading darker.

Depth Shadow Type
Tube roots are not typically exposed to light (think of grass or fur), which means the tips are illuminated and the roots are shaded.
The following shadowing options simulate this effect by shading the roots. This shading technique is particularly effective for shading plant stems.
Depth Shadow Type is used only when Depth Shadow is greater than 0. Select one of the following options:
SurfaceDepth
Each point on the tube is shadowed according to how close it is to the surface on which it was created. The closer the point is to the surface, the darker it gets. This is useful for trees and reeds.
PathDist
Each point on the tube is shadowed according to how close it is to the current point on the path. This is useful for things like bushes, which have a shadowed interior.
Depth Shadow
This setting darkens (shades) the color along a tube based on its distance from the surface or path (depending on the Depth Shadow Type setting). If Depth Shadow is set to 0, there is no effect. If it is set to 1, the most shadowed parts of the tubes are black.
Depth Shadow Depth
This setting defines the maximum distance over which the Depth Shadow can be applied. Objects farther than this distance from the surface or path (depending on the Depth Shadow Type setting) will not be shaded at all.
Cast Shadows
This is the most realistic shadowing technique, but takes longer to render. Using depth map shadows, the stroke can cast shadows on other surfaces, but it can also cast shadows on its own surfaces (tubes can cast shadows on other tubes in the same stroke). Objects can also cast shadows on strokes.
Turn on Cast Shadows to make strokes cast shadows. Then select the light in the scene that you want to produce the shadows and in the Depth Map ShadowAttributes section of the light’s Attribute Editor, turn on Use Depth Map Shadows. The shadows will not appear when you refresh the scene painting view. They are created when you do a post-process render of the scene.
This technique works only if the stroke uses Real Lights. See the Real Lights option in the Illumination brush settings).
