These options appear in the Paint Effects Brush Settings window, and the Attribute Editor for any brush node.
Although in Maya, you can typically right-click a color box and select Create New Texture to map a texture to it, this is not the case in Paint Effects. To map textures to tube Color and Opacity, you must use the Texturing brush settings.
In the Texturing brush settings, you can apply displacements to the triangles created when using the Mesh Brush Type. If per-pixel shading is used, then a bump map is also applied along with the triangle displacement. The options used to control the mesh displacement/bump mapping are: Map Displacement, Displacement Scale, Displacement Offset, Bump Intensity, Bump Blur, and Use Luminance.
- Map Color
-
By default, Color1 and Color2 are used to apply color along the stroke path or to tubes. To use a texture instead, turn Map Color on and define the texture using the attributes that follow.
- Tex Color Scale
-
Defines the scaling factor applied to Color1 and Color2 saturation values before they are used to define the texture output color.
A scaling factor of 1 multiplies the texture output color by the brush’s untextured color, while a scale factor of 0 uses only the texture color.
- Tex Color Offset
-
Defines the amount the texture’s color is added into the output color.
- Map Opacity
-
By default, Transparency1 and Transparency2 are used to define opacity. Turn this option on to apply a texture to the opacity using the current texture. See Texture Type below.
- Tex Opacity Scale
-
Defines the amount by which the texture’s alpha values multiply the Tranparency1 and Transparency2 values.
- Tex Opacity Offset
-
Defines the amount by which the textures’s alpha values are added to the output opacity.
- Map Displacement
-
Turn on to apply displacements to the triangles created when using the Mesh Brush Type.
- Displacement Scale
-
Amount of displacement relative to tube width.
- Displacement Offset
-
Amount of displacement independent of local tube width.
- Bump Intensity
-
Strength of the added bump effect (if per-pixel shading is on).
- Bump Blur
-
Controls separation of samples used in bump mapping.
- Use Luminance
-
Use color brightness instead of the alpha for displacement.
- Texture Type
-
This option is used only when Map Color or Map Opacity is turned on. Select the type of texture you want mapped to Color and Opacity. You can map Checker, U Ramp, V Ramp, Fractal, and File type textures. For more information on mapping file type textures, see Map file textures to color and opacity.

If you select Fractal, you can set the Fractal Amplitude, Fractal Ratio, and Fractal Threshold in this section.
If you select File, you can select the file in the Image Name box and select Frame Extension and Fringe Removal options.
- Map Method
-
Select how the UV coordinates are defined for the stroke:
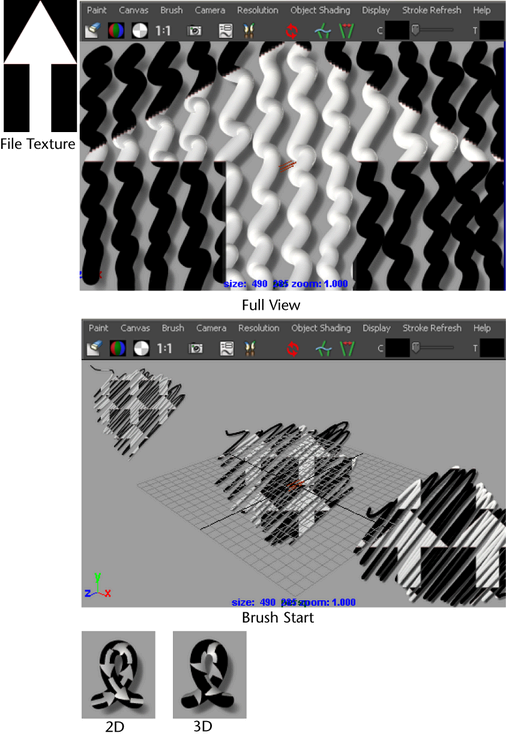
- Full View
-
The texture fits to the view. Painting tubes “reveals” the texture.
- Brush Start
-
The mapping is in “eyespace,” similar to Full View, but the position, scale, and offset of the texture is based on where the brush stroke starts. This texturing technique works best in scenes with Paint at Depth turned on for the brush. If the brush stroke starts far away in the scene, the texture is small. The closer the brush stroke starts, the larger the texture.
- Tube 2D
-
The mapping is in worldspace, but always centered on the tube such that there is never a visible seam.
The texturing follows the flow of the stroke path (U is the direction along the path, and V is the direction across the path).
- Tube 3D
-
The texture is fully mapped in 3D around the tube, with a seam that is visible from some views. The texture appears correctly when you animate the viewpoint.
- Tex Uniformity
-
The setting is used only when the Map Method is set to 2D. If Tex Uniformity is 0, the textures are stretched along the path based on how quickly the different parts of the path were drawn (or where the stroke path curve CVs are). If Tex Uniformity is 1, the texture is mapped evenly along the path.
- Tex Color1
-
Defines the first color/transparency used by the selected Texture Type. For example, this could be one of the checker colors, or the color at the start of a ramp.
This texture color value is multiplied by the brush color value, Color1. So if Color1 is black (value 0), Tex Color1 will paint as black. To ensure that the painted texture colors match the texture colors set for the brush, set the brush color (Color1) to white (value 1) or set Tex ColorScale to 0.
- Tex Color2
-
Defines the second color/transparency used by the selected Texture Type. For example, this could be one of the checker colors, or the color at the start of a ramp.
This texture color value is multiplied by the tube tip color value, Color2. So if Color2 is black (value 0), Tex Color2 will paint as black. To ensure that the painted texture colors match the texture colors set for the brush, set the tube tip color (Color2) to white (value 1).
- Tex Alpha1
-
Defines the alpha value (opacity) for pixels where the texture has its maximum value.
- Tex Alpha2
-
Defines the alpha value (opacity) for pixels where the texture has its minimum value.
- Repeat U
-
Defines the number of times the texture is repeated in the U direction.
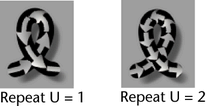
- Repeat V
-
Defines the number of times the texture is repeated in the V direction.
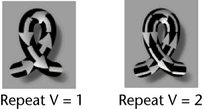
- Offset U
-
Defines how much the texture is offset in the U direction.
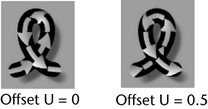
- Offset V
-
Defines how much the texture is offset in the V direction.
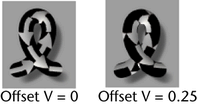 Note: This value is randomized by the Gap Rand value, even if the Gap Size is set to 0.
 - Blur Mult
-
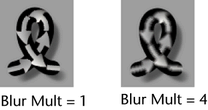
Defines how much antialiasing is applied. Set this value to 0 to turn off antialiasing. A value of 1 produces good antialiasing, while higher numbers produce blurrier results.
- Smear
-
Defines the frequency of the noise used to smear the texture. Increasing this value makes the smear finer and bumpier. Typically, if you increase this value, you will want to correspondingly decrease SmearU and SmearV.
- Smear U
-
Defines how much to smear the texture in the U direction. Increase this value to make the texture smear more in the U direction. A value of 0 produces no smearing.
- Smear V
-
Defines how much to smear the texture in the V direction. Increase this to make the texture smear more in the V direction. A value of 0 produces no smearing.
- Image Name
-
Type the name of the image file you want to use for the file texture, or click the folder icon and select it.
- Use Frame Extension
-
Turn this option on when you are animating a texture. Paint Effects replaces the frame number in the image name with the frame number in the Frame Extension box. For details, see Animate textures on strokes.
- Frame Extension
-
This option is available only when Use Frame Extension is turned on. Type the frame number you want to replace the frame number in the Image Name. Keyframe this attribute when you want to use a sequence of files as a file texture.
- Fringe Removal
-
Corrects dark fringes along file texture alpha boundaries. If the background (alpha value zero) of an image is light or white, turn this option off. To get fringe-free alpha effects from a texture, create the texture against a black background and turn this option on.
- Fractal Amplitude
-
This setting is used only when Texture Type is set to Fractal. Higher values increase the intensity or contrast of the fractal.
- Fractal Ratio
-
This setting is used only when Texture Type is set to Fractal. Higher values make the fractal appear rougher.
- Fractal Threshold
-
This setting is used only when Texture Type is set to Fractal. Increasing this value increases the amount of Tex Color 1 in the fractal, making it appear to “spread.”