To open the UV Editor
- Select
- In the Modeling menu set, select UV > UV Editor
The UV Editor lets you view and interactively edit the UV texture coordinates for polygon, NURBS, and subdivision surfaces within a 2D view. For more information on how UV shells are used, see the related topics below.


All major UV tasks are accessible within the UV Editor either via the UV Editor's menus, View bar, or UV Toolkit. Additionally, many functions are available outside the editor via the Modeling menu set's UV menu. Below you'll find a quick video overview of the UV Toolkit's features and functionality, followed by detailed descriptions of its various commands and tools.
UV Editor menus
For a list of UV Editor menu items, see UV Editor Menu bar.
View bar
The View bar contains options for changing the display of the UV Shells in the UV Editor and occasionally the Viewport.
|
|
Wireframe / Shaded display |
Displays UV Shells as either unshaded wireframes or with semi-transparent shading. Color options for shading can be found in View > Shaded. |
 |
Distortion Shader |
Identifies areas of stretching or compression by shading faces with squashed and stretched UVs. See Identify UV distortion. |
|
|
Texture Borders |
Toggles the display of texture borders on UV shells. Texture borders appear with a thick line. |
|
|
Color UV Shell Borders |
Toggles the display of colored UV borders to any selected components. Useful for finding where shells share the same edges. |
 |
Grid UVs |
Moves every selected UV to its nearest grid intersection in texture space. Shortcut for UV > Grid. To change the grid, right-click the View Grid button on the toolbar. |
 |
Isolate selected UVs |
Displays only the selected UVs or those in the current UV set if none are selected. For more information, see Display a subset of UVs. |
 |
Save image |
Saves an image of the current UV layout to an external file. |
 |
Image |
Toggles whether or not the texture is displayed in the UV Editor. Switch between images using the dropdown next to the Checker shader button. |
 |
Checker shader |
Applies a checker pattern texture to the surface of the UV mesh and behind UVs in the UV Editor. See Apply the checker pattern shader to a UV mesh. |
 / /

|
Channel display |
Displays either the RGBA or Alpha channels. |
|
|
Dim Image |
Reduces the brightness of the currently displayed background image. Use the slider to control the amount. Shortcut for Image > Dim. |
|
|
Filtered Image |
Switches the background image between hardware texture filtering and sharply defined pixels. Shortcut for Image > Unfiltered. |
|
|
Use Image Ratio |
Switches between showing square texture space and texture space with the same ratio of width to height as the image. Shortcut for Image > Image Ratio. |
|
|
Pixel Snap |
Chooses whether to automatically snap UVs to pixel boundaries. Shortcut for Image > Pixel Snap. |
|
|
UV Editor Baking |
Bakes the texture and stores it in memory. Shortcut for Image > UV Editor Baking. |
|
|
Update PSD Networks |
Refreshes the PSD textures currently in use for the scene. When you modify a PSD file (in Photoshop) that is connected to a Maya PSD node (in Maya), you can update (refresh) the image in Maya to show the modifications immediately. See Image > Update PSD Networks. |

|
Exposure |
Adjusts the brightness for display. Lowering the exposure allows you to view detail that is not visible in highlights by default. Click the icon to toggle between the default and modified values. This is a diagnostic option that is not saved in the scene, nor applied to rendered output. |

|
Gamma |
Adjusts the contrast, or brightness of the midtones in the image for display. Increasing the gamma allows you to see details in the shadows of your image. Click the icon to toggle between the default and modified values. This is a diagnostic option that is not saved in the scene, nor applied to rendered output. In particular, it is applied on top of the view transform, if any — you do not need to set it to 2.2 to emulate sRGB. |

|
View Transform |
Controls the view transform that converts colors from the working color space for display. This is useful, for example, if you want to quickly check the raw color values or temporarily apply a different view transform. The available color spaces that you can choose depend on whether you are using an OCIO configuration file for color management, or have defined user transforms.
These are diagnostic options that are not saved in the scene, nor applied to rendered output. They are not available unless color management is enabled. See Color Management. |
UV Toolkit
By default, the UV Toolkit appears on the right side of the UV Editor and contains all the tools you need to modify UV arrangements. For tools and commands with additional options, you can Shift + click the button to open the appropriate options window. You can also right-click certain options for alternate functions.
- Selection masks (
 )
) - Limits selection to Vertices, Edges, Faces, UVs or UV Shells. Double-click any of the icons to select all components of that type loaded in the UV Editor. Right-click any of the icons to deselect all components of that type loaded in the UV Editor.
- Selection method
- Toggles the selection method while dragging the mouse cursor. For more information, see
Select Tool.
When the Move or Scale Tool is active, you can also choose to transform components by dragging them.
- Symmetry
- Activates symmetrical selection. For more information, see
Activate or Deactivate Symmetry.
You can use the Mirror UVs button (
 ) to quickly mirror the current selection across a chosen axis of symmetry. For more information, see
Symmetrize UVs.
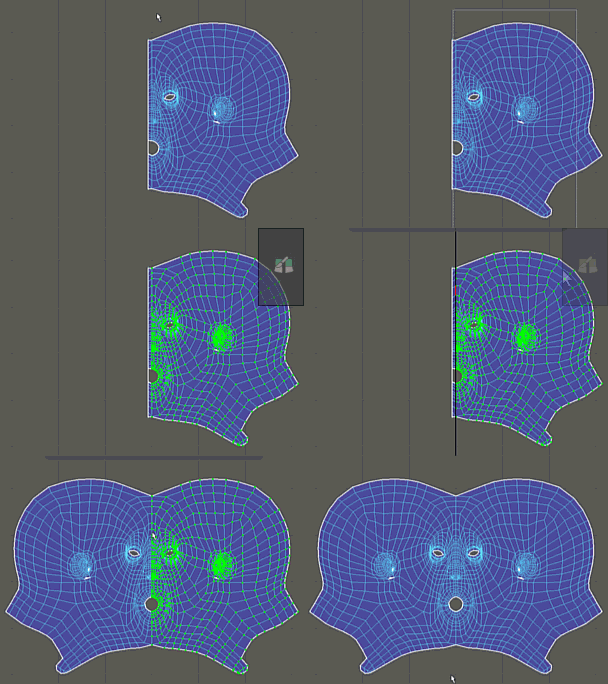
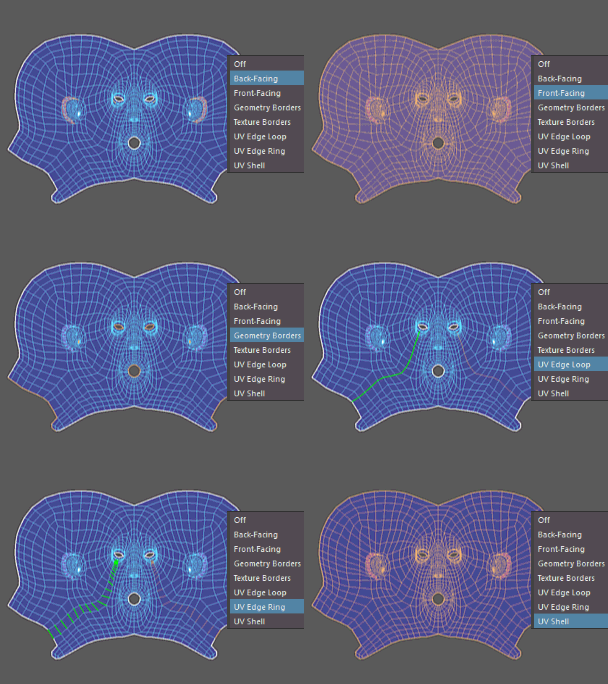
- Selection Constraint
- Limits the components you can select. Options include:
- Back-facing / Front-facing: Components whose UVs have a counter-clockwise or clockwise winding order.
- Geometry Borders: Components on open ends of the mesh.
- Texture Borders: Components on open ends of the UV shell.
- UV Edge Loop: (Edge selection mode only) Entire UV edge loops based on the edges clicked.
- UV Edge Ring: (Edge selection mode only) Entire UV edge rings based on the edges clicked.
- UV Shell: Entire UV shells based on the components clicked.
- Transform Constraint
- Move, Rotate, or Scale Tool to temporarily activate this feature.
- Modify Selection buttons
- These buttons allow you to modify your current selection in various ways.
- All: Select all of the current component type.
- Clear: Clear the current selection.
- Inverse: Select all unselected components and vice versa.
 : Removes or adds one level of components along adjacent edge loops.
 : Removes or adds one level of components along adjacent faces.
Pinning
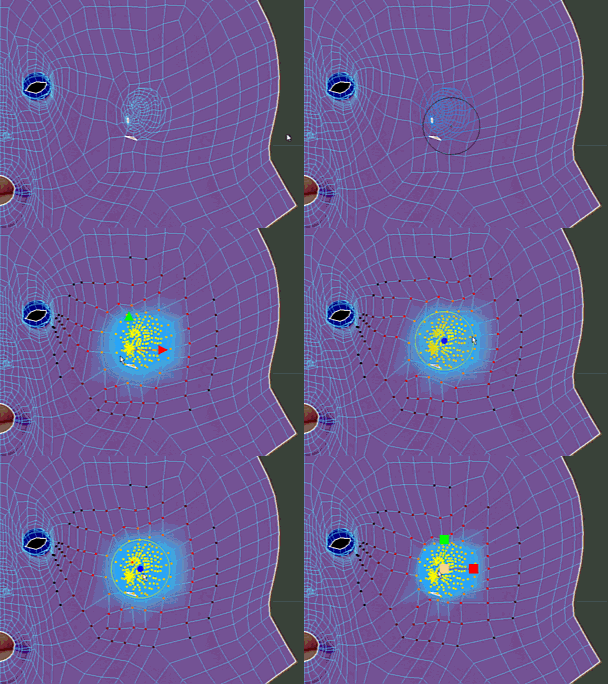
- Pin (
 )
) - Locks the selected UVs so they cannot be moved. By default, pinned areas of the mesh appear blue.
- Pin Tool (
 )
) - Allows you to paint over UVs to lock them. Shift + click to open the Pin UV Tool options.
- Invert Pinning (
 )
) - Unpins currently pinned UVs and vice versa.
- Unpin (
 )
) - Unlocks the selected UVs.
- Unpin All (
 )
) - Unlocks all UVs.
Select By Type
Use these options to select all UVs that share a common trait.
- Back-Facing (
 )
) - UVs that have a counter-clockwise winding order.
- Front-Facing (
 )
) - UVs that have a clockwise winding order.
- Overlapping (
 )
) - UVs whose faces occupy the same UV space as other faces on the mesh.
- Non-Overlapping (
 )
) - UVs whose faces do not occupy the same UV space as other faces on the mesh.
- Texture Borders (
 )
) - UVs on open ends of the UV shell.
- Unmapped (
 )
) - UVs corresponding to unmapped faces. This aids in visually determining any areas where texture maps do not appear or appear incorrectly.
Soft Selection
Allows you to select and affect a range of UVs on a gradient around the current selection. For more information, see the Select Tool.
Transform
Use these options to move UVs more precisely than the standard transform tools.
Pivot
Allows you to set a custom pivot for use with the transform tools. For more information, see Change the Pivot Point.
- Pivot
- Moves the pivot to nine common positions relative to the current Selection or UV Area setting.
- Selection
- When active, the pivot buttons will move the pivot relative to the current selection.
- UV Area
- When active, the pivot buttons will move the pivot relative to the UV space specified by the U and V fields.
- Edit Pivot
- Click this and then move the manipulator to position the pivot manually. You can also toggle this on and off using the Insert key.
- Reset
- Resets the pivot to its default position.
Move
Allows you to translate selected UVs in set increments
- Move input field
- Specifies the increment that the selected UVs will move when one of the move buttons is pushed. You can save values for later use by right-clicking them (saved values are available in the drop-down).
- Move direction
- Click any of the seven buttons to move the selected UVs in the corresponding direction. Click the center button to change between moving components relative to their old positions and moving them absolutely in UV space.
- Step Snap
- Allows you to snap UVs to specific UV space increments.
- Retain Component Spacing
- Maintains the relative distance between selected components when they're moved. This is particularly useful when used with snapping turned on, since without it all selected UVs will snap to the same place (causing overlap).
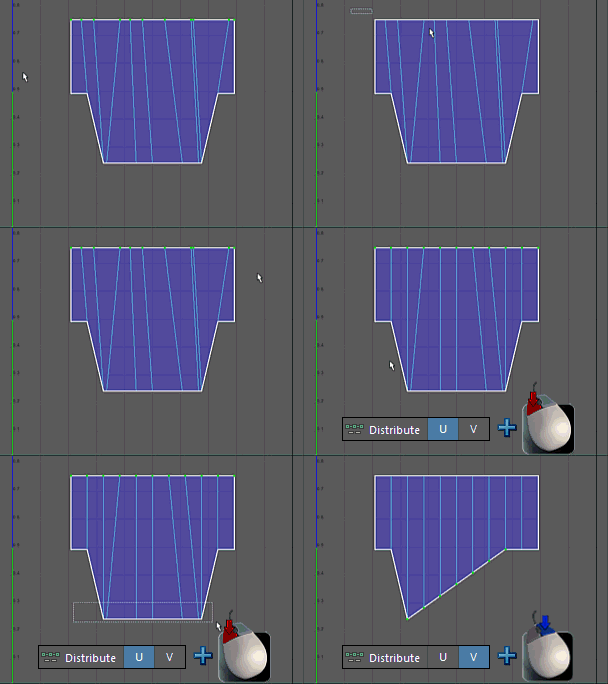
- Distribute (
 )
) - Evenly spaces the adjacent selected UVs apart in the U or V direction. Right-click to distribute the UVs apart by the amount in the
Move input field. Shift + click to open the
Distribute UVs options.
Tools
Contains various tools to help move UVs around the UV space more efficiently.
- Grab (
 )
) - Selects and moves UVs within a brush-based region in the direction that you drag. Useful for making subtle adjustments. Shift + click to open the Grab UV Tool options.
- Lattice (
 )
) - The UV Lattice Tool manipulates the layout of UVs as a group by letting you create a lattice around the UVs for deformation purposes. Shift + click to open the Modify UVs using the UV Lattice Tool options.
- Pinch (
 )
) - Pulls vertices in towards the center of the tool cursor. Useful for more sharply defining an existing crease. Shift + click to open the Pinch UV Tool options.
- Smear (
 )
) - Moves UVs in a direction that is tangent to their original position on the surface in the direction you stroke. Shift + click to open the Smear UV Tool options.
- Symmetrize (
 )
) - Mirrors painted UVs according their topologically symmetrical counterparts over a chosen axis. Shift + click to open the Symmetrize UV Tool options.
Rotate
Allows you to rotate selected UVs by set increments.
- Rotate input field
- Specifies the increment that the selected UVs will rotate when one of the move buttons is pushed. You can save values for later use by right-clicking them (saved values are available in the drop-down).
- Rotate Counterclockwise / Clockwise (
 )
) - Click the appropriate button to rotate the selected UVs by the amount specified in the input field.
- Step Snap
- Allows you to snap UVs to specific UV space increments. This is tied to the Step Snap attribute in the Rotate Tool.
Scale
Allows you to scale selected UVs in set increments.
- Scale input field
- Specifies the increment that the selected UVs will scale when one of the move buttons is pushed. You can save values for later use by right-clicking them (saved values are available in the drop-down).
- Scale (
 )
) - Click this button to scale the selected UVs by the amount specified in the input field. You can lock the scale to specific directions by activating the corresponding button.
- Step Snap
- Allows you to snap UVs to specific UV space increments.
- Prevent Negative Scale
- When on, Maya disables negative scaling of UVs. Scaling along each axis is limited to positive values.
- Flip (
 )
) - Flips the positions of the selected UVs in the specified direction. For more information, see Flip UV Options.
Texel Density
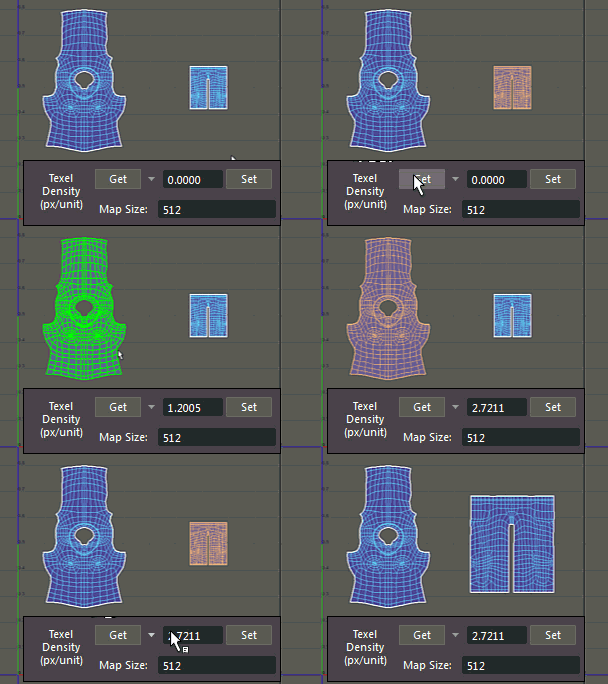
- Get
- Displays the current texel density for the selected UV shell.
- Set
- Scales the selected UV shell to fit the specified texel density.
- Map Size
- Specifies the square map size of the overall texture. Set this first, since it is used to calculate the texel density base value.
Create
Use these options to create new UV Mappings for selected meshes.
- Automatic (
 )
) - Attempts to find the best UV placement by automatically projecting multiple planes. Shift + click to open the Automatic Mapping options.
- Normal-Based (
 )
) - Places UVs based on the normals of associated vertices.
- Cylindrical (
 )
) - Places UVs by projecting them from a surrounding cylinder. Shift + click to open the Cylindrical Mapping options.
- Planar (
 )
) - Places UVs by projecting them from a plane. Shift + click to open the Planar Mapping options.
- Spherical (
 )
) - Places UVs by projecting them from a surrounding sphere. Shift + click to open the Spherical Mapping options.
- Best Plane (
 )
) - Assigns UVs to the faces you select based on a plane computed from vertices you specify.
- Camera-Based (
 )
) - Identical to a Planar projection, but using the current camera as the plane. Shift + click to open the Camera-based mapping options.
- Contour Stretch (
 )
) - Analyzes a four-cornered selection to determine how best to stretch the polygons' UV coordinates over the image. Shift + click to open the Contour Stretch Mapping options.
Cut and Sew
Use these options to break apart or join UV shells.
- Auto-Seams (
 )
) - Attempts to find the best edges on the selected meshes or UV shells to act as a seam. Shift + click to open the Auto Seams options.
- Cut (
 )
) - Separates UVs along the selected edges, creating borders. For more information, see Separate and attach UVs.
- Cut Tool (
 )
) - Allows you to separate UVs by clicking on their adjacent edges. Shift + click to open the
Cut UV Tool options.
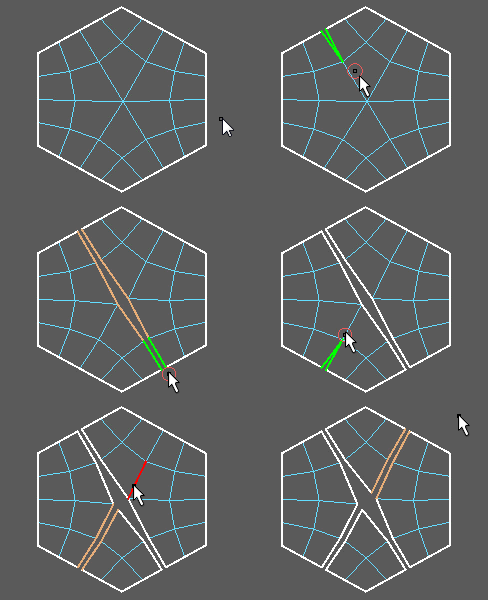
- Create UV Shell (
 )
) - Separates all faces connected to the selected components into a new UV Shell. For more information, see Create UV Shells.
- Create Shell (Grid) (
 )
) - Create a normalized square UV shell by cutting along the current selection's edge perimeter, then evenly distributing UVs to the 0-1 UV grid space.
- Sew (
 )
) - Attaches UVs along the selected borders, but does not move them together in the editor view. Shift + click to open the Separate and attach UVs.
- Sew Tool (
 )
) - Welds UVs along the seams where you drag. Shift + click to open the
Sew UV Tool options.
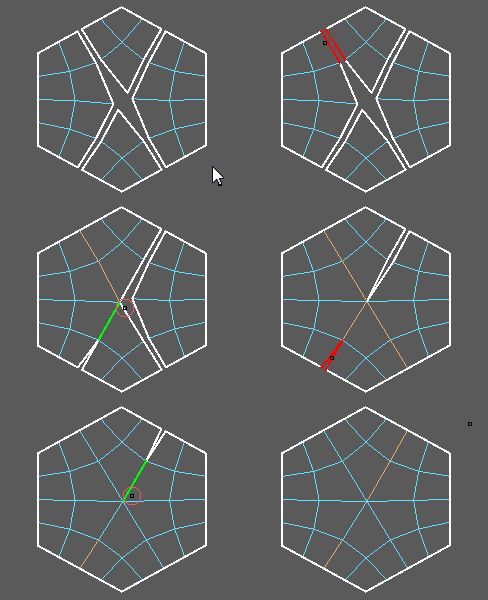
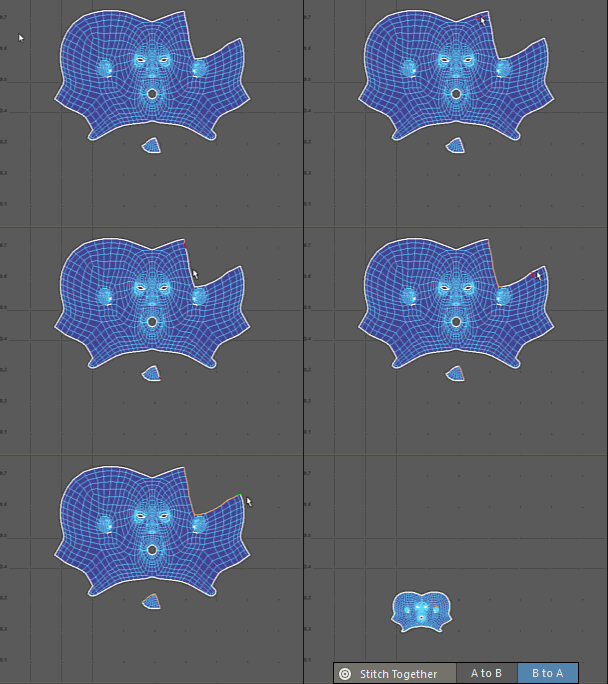
- Stitch Together (
 )
) - Sews two selected edges together by moving one shell towards the other in the specified direction.
Unfold
Use these options to spread UVs out around a seam. This is particularly useful for symmetrical organic objects. For more information, see Unfolding a UV mesh.
- Optimize (
 )
) - Automatically moves UVs for better texture space resolution. Shift + click to open the Optimize UVs options.
- Optimize Tool (
 )
) - Untangle and relax the space between UVs by dragging over them. Shift + click to open the Optimize UV Tool options.
- Unfold (
 )
) - Unwraps the selected UV mesh while attempting to ensure that the UVs do not overlap. Shift + click to open the Unfold UVs options.
- Unfold Along (
 )
) - Legacy Algorithm).
- Unfold Tool (
 )
) - Unwrap and eliminate overlapping UVs by dragging over them. Shift + click to open the Unfold UV Tool options.
- Straighten UVs (
 )
) - Aligns adjacent UVs whose edges are within a certain angle tolerance. Shift + click to adjust the axes and angle tolerance for straightening. For more information, see Straighten UVs.
- Straigthen Shell (
 )
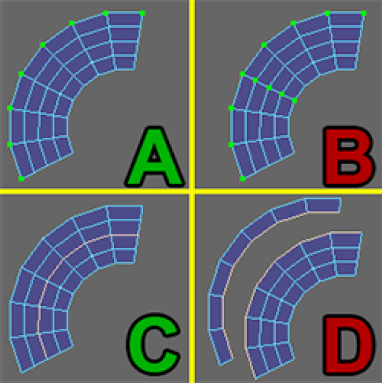
) - Attempts to untangle all UVs along/within the border of a UV Shell. To use this tool properly, you must either select a set of internal or border UVs (not a mix of both) that are contained to one UV shell. When using internal UVs, they must also fall along the same edge loop.
In the above example, A and C are valid because they contain either all border or internal UVs and are all along the same edge loop. Conversely, B is invalid because it contains a mix of border and internal UVs along with two different edge loops, while C is invalid because the UVs span more than one UV shell. For more information, see Straighten UVs.
Align and Snap
Use these options to position and align UVs relative to each other.
- Align (
 )
) - Aligns all selected UVs so that they are co-planar in the specified direction. Alignments are done relative to the furthest selected UV in the specified direction. For more information, see Straighten UVs.
- Linear Align (
 )
) - Aligns all selected UVs along a linear trend line running through them.
- Snap
- Moves the selected UV shells to one of nine positions in a specified UV space.
- Snap Together (
 )
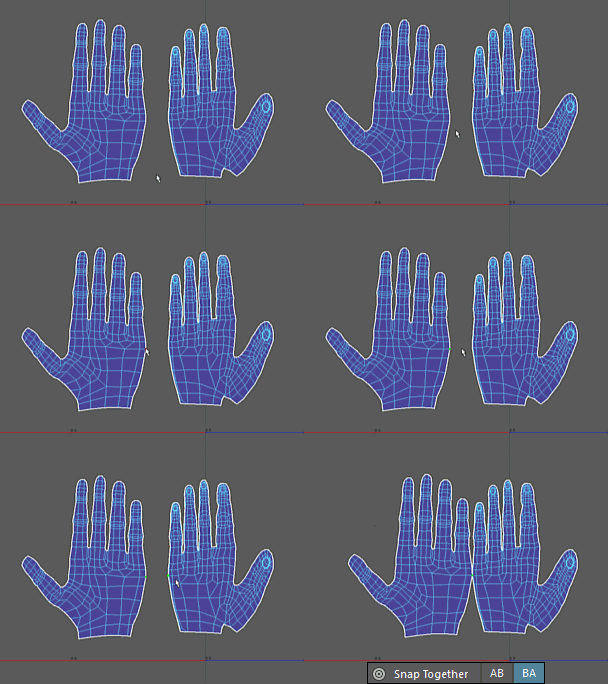
) - Moves one UV shell to the other by overlapping the selected UV on each. You can choose the direction of the snap (in order of selection) via the corresponding buttons.
- Snap & Stack (
 )
) - Moves multiple UV shells on top of one another by overlapping the selected UVs on each. Shells are always moved towards the last UV selected.
- Match Grid (
 )
) -
Moves every selected UV to its nearest grid intersection in UV space. Shift + click to open the Grid UVs options.
- Match UVs (
 )
) -
Moves selected UVs, within a certain tolerance distance, to the average of all their individual positions. Shift + click to adjust the Tolerance.
You can also select multiple shells to match UVs within them. This is useful when you have two near-identical shells stacked on top of each other that you want to make fully identical.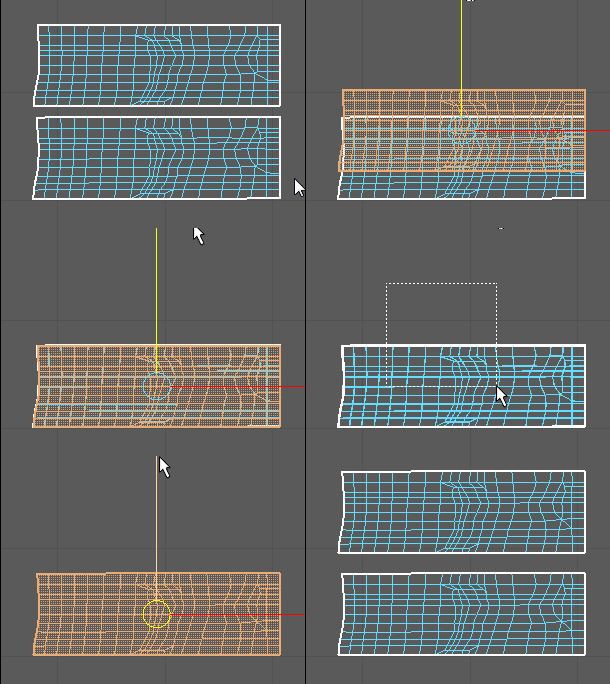
- Normalize (
 )
) -
Scales the selected UVs to fit within the 0-1 UV space. Right-click to scale the UVs so that each of their faces fills the 0-1 UV space. Shift + click to open the Normalize UVs options.
Arrange and Layout
Use these options to position and align UVs relative to each other.
- Distribute
- Distributes (see above) selected UV shells in the chosen direction while ensuring a set amount of units between them. You can also use the Target button to distribute them evenly in the direction of the last selected shell (aka: the target shell).
- Orient Shells (
 )
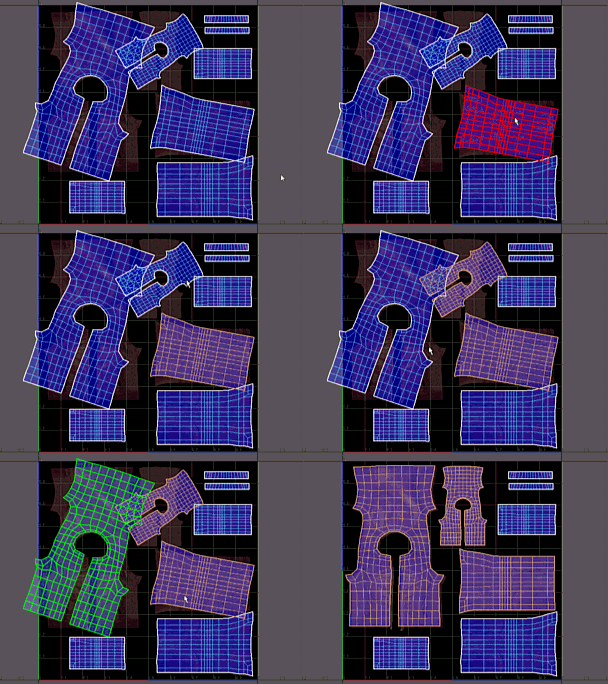
) - Rotates selected UV shells so they run parallel to the most adjacent U or V axis.
- Orient to Edges (
 )
) - Rotates selected UV shells so they run parallel to the selected edge.
- Stack Shells (
 )
) - Moves all selected UV shells to the center of the UV space so that they overlap.
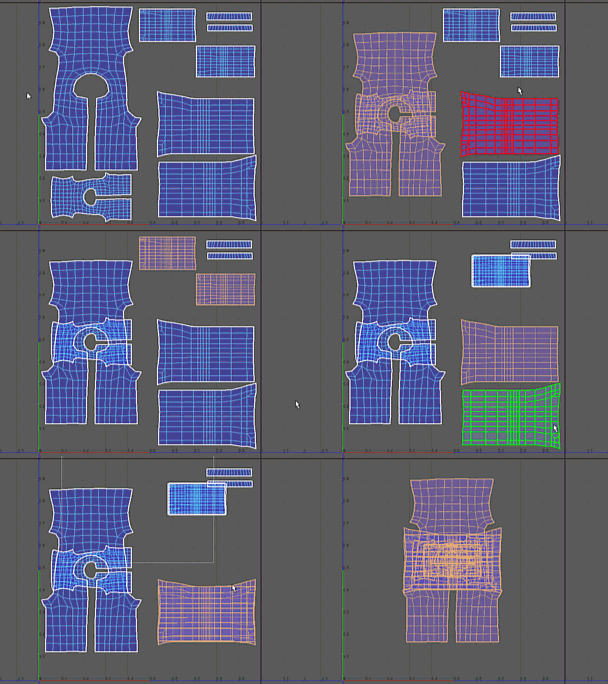
- Unstack Shells (
 )
) - Moves all selected UV shells so they no longer overlap while keeping them close together. Shift + click to open the Unstack Options, which allow you to flip reversed UV shells during the process.
- Stack & Orient (
 )
) - Stack selected UV shells to the center of the UV space and then rotate them so they run parallel to the most adjacent U or V axis.
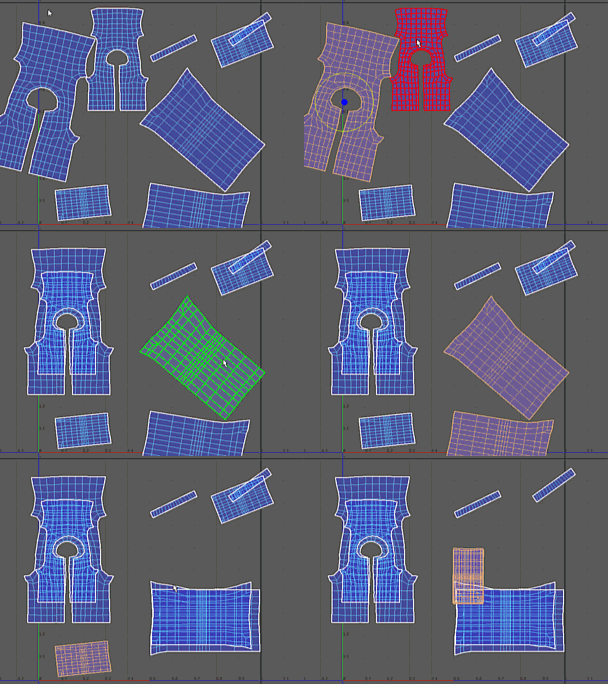
- Stack Similar (
 )
) - Stacks only shells that are topologically similar on top of each other. Shift + click to open the
Stack Similar options.
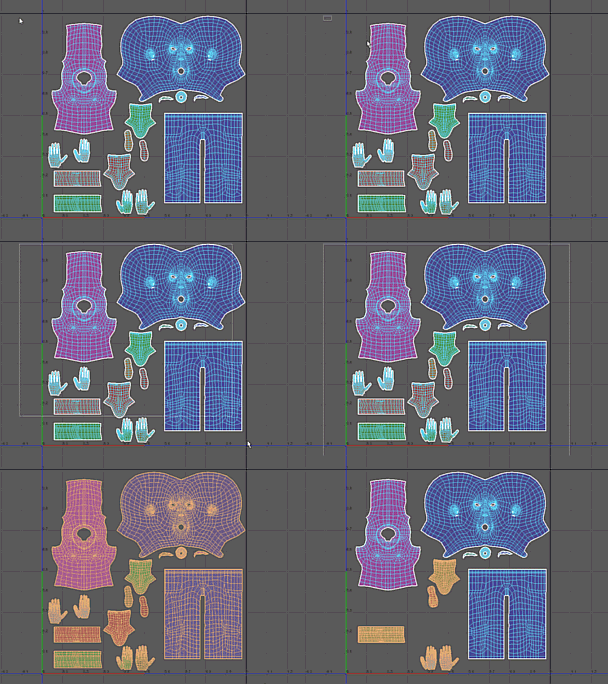
- Tolerance
- Determines how closely the topologies of two shells must match in order for them to be stacked.
- Select Stacked Shells
- Selects all shells that have been stacked after the Stack Similar operation finishes.
- Gather Shells (
 )
) - Move selected UV shells back to the 0-1 UV range.
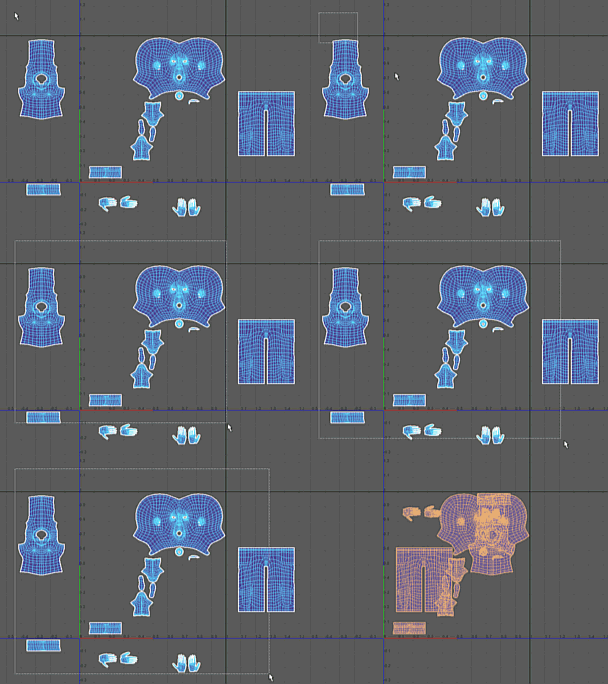 Note: In order to maintain UV layout, shells are offset in steps of 1.0 units. Because of this, shells may straddle the borders of the 0-1 UV space after a Gather operation.
 - Randomize Shells (
 )
) - Randomizes UV shell translation, rotation, and scale. You can adjust the various directions and maximum allowable translate, rotate, scale amounts via the
Randomize Shells options window (Shift + click).
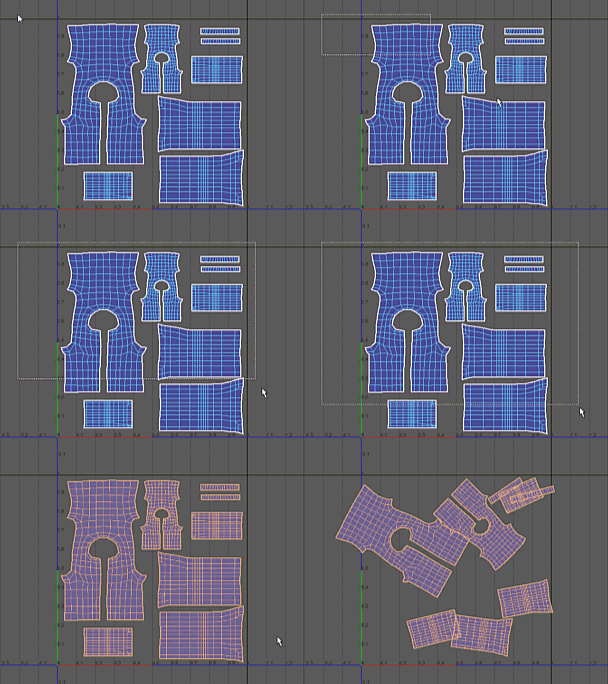
- Measure (
 )
) - Displays a chosen measurement for two selected UVs. Options include:
- U Distance: Number of units between the UVs along the U axis.
- V Distance: Number of units between the two UVs along the V axis.
- Pixel Distance: Opens a window which shows the number of pixels in various directions between the two furthest UVs based on a number of different possible map sizes.
- Angle Between: Angle between two selected UVs (selecting more than one UV will yield inconsistent results).
- Layout (
 )
) - Automatically arranges UV shells to maximize usage of the 0,1 UV space. Shift + click to open the
Layout UVs Options.

- Layout Along (
 )
) - Automatically arranges UV shells to maximize usage of UV space in the specified direction.
UV Sets
Allows you to create and control UV sets for objects in the scene. For more information, see UV Sets menu.
- Create empty UV set (
 )
) - Creates a new, empty UV set on the current object. You can then create the UVs in the set using one of the mapping/projection methods. You can also access this command by right-clicking the UV Set list.
- Copy UVs to clipboard (
 )
) - Copies the current UV layout to the clipboard
- Paste UVs from clipboard to current UV set (
 )
) - Pastes the UV layout in the clipboard to the selected UV set.
- Duplicate UV set (
 )
) - Creates an identical copy of the selected UV set.
- Propogate UV set (
 )
) - Assigns the selected UV set from the UV Set list to the selected objects in the scene. The selected UV set becomes the active UV set for those objects.
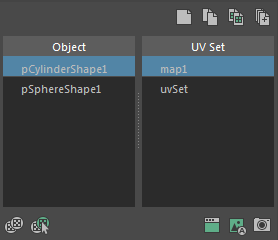
- UV Set list
- Allows you to control which UV set is displayed when an object is selected. To display a specific UV set, select the object it belongs to in the left column and then the specific UV set in the right column.
Right-clicking UV set names in the right-column gives you the option to change their position in the list, copy the UVs to another set, duplicate or delete the set, or produce a UV Snapshot of that set.Note: Maya won't allow you to delete the top-most entry in the UV Set list. If you do need to delete this entry, you can move it lower in the list and then delete it.
- Share instances (
 )
) - Select the polygon to be shared followed by the instance to share.
- Select shared instances (
 )
) - Select instances that share the UV set family with the selected instance.
- Open Relationship Editor (
 )
) - Opens the Relationship Editor in UV Linking mode.
- Auto-load Textures (
 )
) - Loads the linked textures for the selected UV sets.
- Save image file (
 )
) - Exports a UV Snapshot of the selected UV set.