 Steps to set up, select to load, group, and manage machine workspaces
To access
My Machines, choose
Prepare >  Open My Machines from the main menu.
To define machines
When launching this feature for the first time, or after deleting the last defined machine, the list is empty and you will have to define a machine to work with one.
- With the My Machines dialog open, click Add Machine.
- Select an entry from
Supported machines,
Generic machines or
Build platforms.
Supported machines
Supported machines combine build platforms and routines and settings specific to the individual particular additive manufacturing methods and implementations of actual machine models available on the market. Netfabb includes a wide range of these.
Generic machines
These are similar to the supported machines in that they combine a build platform with AM-machine-specific routines. However, they do not target specific models and can (or must) be configured to match your actual machine.
Build platforms
Build platforms are comprised by the X, Y, and Z dimensions of build rooms. Netfabb includes an extensive list of 3D-printing machine models on the market, so rather than having to obtain the dimensions and to define a build room entirely manually, you can search for your machine and select it easily.
- Click Add to My Machines.
This creates an entry in the My Machines list on the left.
To manage groups
Groups are always listed at the topmost positions, followed by machines.
- To create a group, click Add Group and provide a group name.
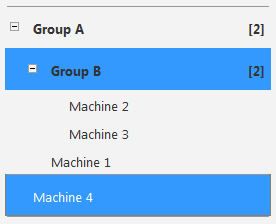
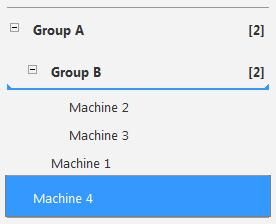
- To move a machine into a group, drag the machine onto the group entry. When the entire entry turns blue (drag the machine directly onto the group name), let go of the mouse button to drop the entry.
- To move a machine out of a group, drag the machine entry onto the containing group entry. When the group entry is underlined in blue (avoid dragging the entry directly onto the group name), with edges pointing up, let go.
- To reorder machines and groups, drag the entries, observing the colored highlighting.
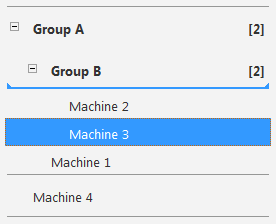 Moving Machine 3 out of Group B |
 Moving Machine 4 into Group B |
 Moving Machine 4 into Group A |
 Moving Machine 2 below Machine 3 within Group B |
To assign scripts and templates
To assign a script, it must already exist in the relevant module, and to assign a template, it must already exist in the form of a 3MF file or as an arrangement of parts on the current machine workspace's build platform.
- Select the machine to assign a script or template to.
- Click
 Edit.
Edit.
- Select scripts from the drop-down menus, or navigate to the file to be used as a template.
- Click Save Machine.
Alternatively, save an arrangement of parts existing on the build platform as a template.
- Make sure to have the correct machine workspace loaded and focused.
- Load or generate the required parts and arrange them as desired.
- Select all parts, then choose
File >
 Export part > as Machine Template.
This makes the parts available immediately for completing the machine set-up in My Machines.