Select parts in the MEP Fabrication Parts palette that will not be used with automatic (auto) fill tools.
When a part, or group of parts, in the MEP Fabrication Parts palette is marked as being excluded from auto fill tools, those parts will not be used to fill with the following auto fill tools:
- Design to Fabrication
- Quick Connect
- Route and Fill
- Multi-Point Routing
- Trim /Extend
- Insert Part
- Standard part placement where adaptors are required; for example, when connecting a flanged valve to a welded pipe
Parts that are excluded from the auto fill tools are identified with the
 icon displayed next to it in the MEP Fabrication Parts palette. This indicates that this part or group of parts will not be used with auto fill tools. In other words, those parts are excluded from auto fill tools.
You can still insert parts that have been excluded from auto fill tools into your model manually, as long as that part is a valid selection.
To exclude parts or groups of parts from auto fill tools:
- Display the MEP Fabrication Parts palette.
The palette displays by default when you create a new model in
Revit. If the palette does not display, click Systems tab
 Fabrication panel
 (Fabrication Part). Alternatively, click View tab
 Windows panel
 User Interface drop-down
 MEP Fabrication Parts.
- Click the Auto Fill Exclusions Mode button
 located at the bottom of the MEP Fabrication Parts palette.
Clicking this button turns on the auto fill tool exclusions mode, and adds a small empty check box
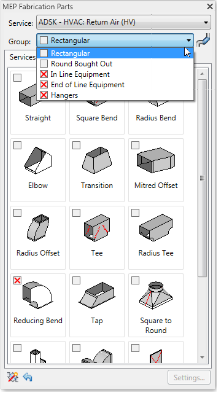
 next to each part displayed in the palette. A check box is also added next to each Service Group name displayed in the Group drop-down list, as shown below.

Auto Fill Exclusion Mode Icon Description  ON
ON
This version of the auto fill exclusion icon includes a small lit lightbulb icon, and indicates that auto fill exclusion mode is on. When the auto fill exclusion mode is on, you can select (check) or deselect (uncheck) parts that will be excluded when auto fill tools are used.
 OFF
OFF
This version of the auto fill exclusion icon includes a small unlit (off) lightbulb icon, and indicates that auto fill exclusion mode is off. When the auto fill exclusion mode is off, you can not select (check) or deselect (uncheck) parts that will be excluded when auto fill tools are used. Turn on auto fill exclusion mode by clicking this icon.
- In the MEP Fabrication Parts palette, do one of the following:
- To exclude individual parts: Click the small check box next to a part to exclude that part from being used with auto fill tools. The
 icon displays when the part is excluded. For example, in the example shown above, the following parts have been excluded: Unequal Radius Bend and Taper Eccentric.
- To exclude an entire group of parts: Click the small check box next to the Service Group name in the Group selector drop-down list. The
 icon displays when the group is excluded. For example, in the example shown above, the following Service Groups have been excluded: In Line Equipment, End of Line Equipment, Hangers.
- To exclude individual parts: Click the small check box next to a part to exclude that part from being used with auto fill tools. The
- Click Reset
 to remove any exclusions added during this Revit session.
When you click Reset, any check marks added during the current Revit session, for the current user, are removed from the MEP Fabrication Parts palette.
Note: Reset
 only removes exclusions that were added during the current Revit session, and by the current Revit user. Any exclusions that were specified in the original default configuration, from an Autodesk Fabrication product, are maintained. Exclusions that were specified in the original default configuration, from an Autodesk Fabrication product, are indicated by the
 icon.
icon.