Learn about new features in the latest release of Autodesk Revit.
 indicates a new feature or enhancement in the latest update. Update features are available to
students and
Autodesk subscribers.
indicates a new feature or enhancement in the latest update. Update features are available to
students and
Autodesk subscribers.
 indicates a new feature or enhancement that was suggested and voted up by
Revit customers on the
Ideas forum.
indicates a new feature or enhancement that was suggested and voted up by
Revit customers on the
Ideas forum.

New features
- Revit Home (2019.1): Revit Home is a new user experience that modernizes the way you access, store, and share project information. It replaces and improves the Recent Files window and supports cloud-based project management. This change is the first step in improving how you open and access models and project-related files.
- Revit Home displays when you start the software. Return to it at any time by clicking
 (Home) on the Quick Access toolbar, or press CTRL+D to switch between the Home page and the ribbon. See
Home.
(Home) on the Quick Access toolbar, or press CTRL+D to switch between the Home page and the ribbon. See
Home.
- For BIM 360 users, Revit Home provides a more intuitive and discoverable experience in the way you access files.
- When you click on a central file from the Recent Files page, Revit always creates a local copy of the central model. This provides a consistent experience with BIM 360 Design models and prevents accidental modifications directly to the central file. New icons and tooltips identify a central model and a non-workshared model.
- On the View tab, the access point to the original Recent Files window has been removed (View tab
 Windows panelUser Interface drop-downRecent Files).
- Access Revit models in BIM 360 projects.
-
Publish the latest version of
Revit cloud models to BIM 360.
- Revit Home displays when you start the software. Return to it at any time by clicking
-
Cloud Models for
Revit: As a Revit subscriber, participate in the BIM 360 ecosystem by saving non-workshared
Revit models directly to BIM 360 Document Management. See
Cloud Models for Revit.
-
Easy upgrade for Revit Cloud Worksharing models: You can upgrade projects without downloading each cloud model. See
Upgrade Cloud Models.
-
Rendering: High resolution texture support: When you apply a new appearance asset to a material, Revit automatically uses the highest resolution texture for Advanced accuracy in Render Quality Settings. With this change, Revit presents a more precise rendering image for your model. To balance performance, in Realistic views and Simplified accuracy in Render Quality Settings, Revit still uses low resolution textures. See
Best Practices: Render Performance and Materials.
- Place an instance of an image: In views that support raster images, you can place an instance of a previously-loaded image using the Place Instance button in the Manage Images dialog. Place instance is available in the project and the Family Editor. See
Manage Images Dialog.
-
Zoom in schedules: When working in a large schedule, easily read small text by zooming into the schedule view. To zoom in and out, hold CTRL and use the mouse wheel, or hold CTRL and press + (zoom in) or - (zoom out). The zoom level percentage displays in the lower right corner of the drawing area. See
About Working in Large Schedules.
-
Move elements very small distances: Elements can now be moved very small distances. When moving elements very small distances, the error "Too small on screen" will not be displayed and the move action will complete.
-
Parts from imported bridge and tunnel geometry: Create parts from bridge and tunnel geometry and other DirectShapes imported from
InfraWorks. See
Import Bridges and Tunnels from InfraWorks.
-
Background fill patterns (2019): When defining the graphic representation of model elements (using materials or graphic overrides for filters, phases, categories, or elements), you can now specify a background color and fill pattern, in addition to the foreground color and fill pattern. Use these patterns to distinguish elements visually in views, improve the readability of project documentation, and meet office or industry standards. See
About Fill Patterns.
- Import models with background and foreground fill patterns from AutoCAD(2019.1): When you export a model with a background solid fill pattern and a foreground fill pattern from Revit to AutoCAD and re-import it to Revit, the model retains the double fill pattern.
-
Modernized user interface (2019): To simplify view management and support the way you work, the following improvements have been made: (See
About Organizing Views.)
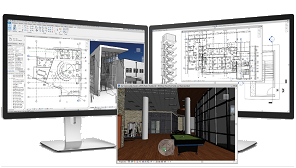
- Multi-monitor support: Drag a project view out of the Revit application window into its own window. Move the window to another monitor as needed to support your workflow. See About Multi-Monitor Support.
- Tab views: In the drawing area, each view (or schedule or sheet) has its own tab. Use the Tab Views tool to combine tiled views into a single window with a tab for each.
- Tile views: Use the Tile Views tool to separate tabbed views into individual windows (tiles) in the drawing area so you can see multiple views at the same time. Drag views from one tile to another to organize them as desired.
- Close inactive: The Close Hidden tool is now the Close Inactive Views tool. Instead of closing all hidden views, this tool now closes all views except for the currently active view in each tile.
- Docking: You can dock individual views in desired locations of the drawing area. Improved docking behavior provides more sensitivity to docking locations and provides a better preview of the new location. See Dockable Windows.
- The Replicate Window tool has been removed.
-
3D views: The following improvements have been made to support the way you work with 3D views.
- Levels in 3D views (2019): When working in a 3D view, you can display and modify levels for the model. You cannot add levels when working in a 3D view, but you can move, modify, and delete them. To change the visibility of levels in a view, use the Visibility/Graphic Overrides dialog, Annotation Categories tab. See
About Levels in 3D Views and
Work with Levels in 3D Views.
When you upgrade an existing model, 3D views do not display levels. Use the Visibility/Graphic Overrides dialog to make them visible. See also Upgrade Information.
- 3D view projection modes (2019): You can now specify the projection mode of 3D view as Perspective or Orthographic from the ViewCube menu. See ViewCube Menu.
-
Uncropped perspective views
(2019): To improve the modeling process in 3D views, the Crop View tool on the View Control Bar can be deselected in perspective views. See
Crop a View.
- Navigation improvements for uncropped perspective views (2019.1):
- The panning tool is more responsive.
- The Zoom in Region tool moves the camera instead of zooming on an uncropped perspective view. This allows Zoom in Region to be used as a navigation tool.
- The Reset Crop Region tools enable crop visibility so you can see the result of your changes.
- The behavior of the keyboard modifier for Orbit/Pan/Zoom has been refined. You can switch between Orbit and Pan using the center mouse button and the Shift key.
- Navigation improvements for uncropped perspective views (2019.1):
- Perspective views (2019.1):
- When you duplicate a perspective view, all relevant view attributes, such as camera position and zoom, are now transferred to the new view.
- Panning is more responsive in perspective views.
- When orienting a 3D view or perspective view to an elevation, section, or floor plan, the view orients to that camera position and the section box is activated and cuts the model.
- Levels in 3D views (2019): When working in a 3D view, you can display and modify levels for the model. You cannot add levels when working in a 3D view, but you can move, modify, and delete them. To change the visibility of levels in a view, use the Visibility/Graphic Overrides dialog, Annotation Categories tab. See
About Levels in 3D Views and
Work with Levels in 3D Views.
- OR condition for rule-based view filters (2019): When creating view filters that identify elements based on parameter values, you can now use OR conditions, in addition to AND conditions. Create multiple rules and rule sets, and nest rule sets to get the desired results. This improvement enables you to define complex, sophisticated rules that identify elements based on categories and parameter values. Apply these filters to views to change the visibility or graphic display of the identified elements. See
About Rule-Based Filters,
Create a Rule-Based Filter, and
Examples of Rule-Based Filters.
-
Site collaboration (2019.1): To streamline the process of developing, using, and sharing topography data for a project,
Revit supports interoperability workflows with
Civil 3D. See
Sharing Topography between
Revit and
Civil 3D.
-
Dimensions for curved objects in section views (2019): You can now annotate geometry from references created by edges, curves, and points in a non-perpendicular view plane. See
About Placing Dimensions on Non-perpendicular Cut Geometry.
-
File versions (2019): To streamline the File Open process and avoid undesired file upgrades, the
Revit Open dialog now displays the software release that was last used to save a selected file (for file types RVT, RFA, and RTE). Files last saved with an older release will be updated. Files last saved with a newer release cannot be opened using an earlier release of the software. By checking this information before clicking Open, you can avoid unnecessary delays and inadvertent file upgrades.
-
Rename views using a slow double-click (2019): In addition to other methods for renaming views, schedules, sheets, and groups, you can now use a slow double-click in the Project Browser. Whereas a fast double-click opens a view, a slow double-click allows you to rename it. This change aligns the software with standard Microsoft® behavior.
To disable the use of a slow double-click for renaming, edit Revit.ini and change the value of EnableRenameOnSlowDoubleClickByDefault to 0 (zero).
-
Confirmation when renaming views (2019): Before you rename a view, a dialog asks if you want to rename the level and corresponding plan views that have the same name. Starting with this release, you can select the option "Do not show me this message again." If you select the check box, the next time you rename a view, the dialog is omitted, and the answer previously chosen is used. This improvement streamlines your workflow, allowing you to continue your work without pausing to respond. See
About Renaming Corresponding Levels and Views.
-
Warning when deleting levels (2019): Before you delete a level, the software warns that corresponding views will also be deleted. New in this release, the warning also lists elements related to the selected levels. Expand the warning to see the full list of affected views and elements. Click OK to continue with the deletions, or Cancel to cancel the request. This improvement is aimed at preventing team members from inadvertently deleting elements from the model, thus helping teams to avoid costly mistakes. See
About Deleting Levels.
-
Revit Cloud Worksharing (2019): When you use
Revit Cloud Worksharing to collaborate on a
Revit model in the cloud, models are now saved to BIM 360 Document Management. See
Revit Cloud Worksharing.
- Vertical text alignment (2019): When you annotate models using the Text tool, you can align text to the top, middle, or bottom of a text note. See Add a Text Note.
- Improved stability (2019): When you perform certain operations, such as opening, saving, and upgrading models, the software checks loaded families for stability issues. By performing this check often, the software can uncover potential problems earlier, before they cause widespread issues in the model. By taking a few simple steps to correct the situation, you can quickly restore your model and resume work without delay. See Some Families Have Become Unusable.
- Point cloud format support (2019): The workflow has changed for importing raw format point clouds into Revit. Use Autodesk Recap to convert raw format point cloud data to an indexed format (RCP or RCS). You can then insert the indexed point cloud files into a Revit model.
- New DACH sample models (2019): Revit includes new DACH sample project models, based on award winning architecture from INNOCAD. The models demonstrate Revit DACH use in all nine German design phases and in all major disciplines: Architecture, Structure, MEP, and Construction.
- New DACH content library and templates (2019): The Revit templates for DACH have been adjusted for the latest BIM requirements. The new Architectural, Structure, and MEP content fulfills the BIM requirements of architects and engineers and includes the annotations for Germany, Austria, and Switzerland. The new construction content library fulfills the need of construction customers both for visualization and 2D design intelligence.
- Material appearances (2019): New appearance assets are available for use with materials in models and families. These new assets use physically-based definitions, optimized for use with the Autodesk rendering engine. They provide high quality, realistic visual effects in rendered images and in views that use the Realistic or Ray Trace visual style. Upgraded models continue to use the legacy appearance assets for materials. Replace legacy assets with the new assets to improve the quality of views and rendered images. See About Appearance Assets and Upgrade Information.
- Split railings (2019): The Split tool can now be used on railing elements outside of the sketch mode. When a railing is split, the resulting elements will now have path sketches independent of each other. See Modify a Railing.
-
Resizable dialogs (2019.1): The Go To View dialog and the Add View to Sheet dialog are now resizable. You can drag the corners or edges of these dialogs to resize them to see long lists of views and long view names.
-
Move a surface pattern on top of a wall (2019.1): You can drag, rotate, and align patterns on the painted top surface of a wall to adjust and align them.
-
Align sections (2019.1): You can use the Align command to select the line for a section view and use it as the reference for alignment or as the object to align. For example, you can align a section line with an angled wall. In addition, snaps are enabled for section lines, so you can snap while moving a section line, or snap to a section line during the placement of another element. When placing a section, you can snap to geometry for the start and end points of the section line by using the Snap Overrides option of the context menu. See
Override Snap Settings.
- Learning videos (2019.1): To make it easier to find learning videos related to specific features, each video now resides on its own help page, and the page title starts with "Video:", clearly identifying it as such in the left navigation pane. These pages also have related topic links so you can easily go from a video page to other help pages for more information about the feature. Other help pages have links back to these videos, where appropriate. To locate videos about a feature, search the help for "video <feature>".
-
Steel structures and connections (2019): You can now model and design steel connections to improve your level of detail for documentation and fabrication. A new suite of structural tools allows for the following features.
- Structural connections: The former Steel Connections for Revit add-in is now included with Revit. This functionality adds 130 standard steel connections to the Revit Library. See Standard Connections.
- Custom connections: Combine steel parts and standard connections to define a custom connection type. See Custom Connections.
- Steel fabrication elements: Plates, bolts, anchors, shear studs, holes, and welds can now be placed in your model as elements. See Steel Fabrication Elements.
- Steel element cut tools: Modify plates and steel elements with modification tools to better accommodate the geometry of elements at a connection. See Steel Element Cut Tools.
- Steel parametric cut tools: You can now add custom parametric cuts to steel elements to accommodate joined elements and connections. See Steel Parametric Cut Tools.
- API for detailed steel modeling: Using the Detailed Steel Modeling for Revit dedicated API, you can now create individual steel elements as well as generic connections, existing or new standard steel connections and custom connections.
- Structural Precast for Revit enhancements:
-
Enhanced custom fabric sheets creation: Create custom fabric sheets (CFS) using any collection of reinforcement (individual rebars, rebar sets, free form rebar sets, area reinforcement). Automatically convert the reinforcement for the supported precast elements into custom fabric sheets to speed up the precast concrete modeling process.
-
Extended CAM export: Better connect both cast-in-place and precast concrete projects to the automatic fabrication processes. The CAM Export allows you to create Unitechnik and PXML files for:
- any selection of shape drive reinforcement
- assemblies containing structural solid wall or structural solid slab system families (including their reinforcement, built-in parts, contours and fabrication parameters) not split using Structural Precast for Revit
- assemblies containing loadable families that can host rebar, including their reinforcement, built-in parts, contours and fabrication parameters
-
Precast hollow core slab families: New hollow core slab families offer various edge profiles, voids, and strand patterns. Download this content from the Autodesk Knowledge Network.
-
Convert to Custom Fabric Sheet checkbox: You can now create a custom fabric sheet using the Convert to Custom Fabric Sheet checkbox in the in the Steel Bar tabs of the
Precast Wall Area Reinforcement Type and
Precast Slab Area Reinforcement Type dialogs.
-
Unitechnik 7.0 CAM Export: The design-to-fabrication process is more automated with the capability to export the information of precast assemblies (such as solid walls and slabs, hollow core slabs and girder slabs) or just rebar cages using Unitechnik 7.0. This format is supported the same way Unitechnik 5.2, Unitechnik 6.0 and PXML 1.3 are supported.
-
Export manually created assemblies using API: Added the ability to export manually created assemblies using API for supported CAM formats (Unitechnik 5.2, 6.0, 7.0 and PXML 1.3).
-
Assembly names in CAM files: You can use the name of the assembly in the convention for naming the PXML or Unitechnik formats, to have better options for managing the documentation of precast projects.
-
Dimension visibility on precast shop drawings: You can create shop drawings without placing automatic dimensions, for the cases when you prefer manual annotation. See
About Dimensioning Families for Precast Drawings.
- Precast lattice girder slabs automation (2019): Girder slabs are now part of the precast automation process, following similar configuration rules and workflow as the existing elements. Available in the upcoming release of Structural Precast Extension for Revit 2019.
- API for precast automation (2019): Using the Precast for Revit dedicated API, you can now create and modify shop drawings for precast elements, integrate third party add-ins for precast element configuration, and customize precast element numbering. Available in the upcoming release of Structural Precast Extension for Revit 2019.
-
- Transfer steel elements (2019): You can now transfer steel plates, bolts, anchors, welds and connections between Revit and Advance Steel, using the Advance Steel Extension for Revit.
- Free form rebar shape matching (2019): To improve scheduling and annotation of rebar in your documentation, free form rebar now either matches existing rebar shape families or creates new rebar shape families from its bar geometry. See About Free Form Reinforcement Shape Matching.
- New family content (2019): To support the work of the precast engineer and detailer, new German content is available for the main types of precast elements including column, framing, and foundation.
-
Modify Top Elevation and Bottom Elevation for duct, conduit, and cable tray: To more easily adjust the location of design components, you can edit parameter values to set the Top Elevation and Bottom Elevation for duct, conduit, and cable tray. In order to make them easier to find and edit, these parameters have been relocated on the Properties palette beneath the Offset parameter.
-
Apply connectors to pipe segments based on the fitting requirements: You can edit pipe connector settings in the fabrication configuration to apply a connector based on the fitting needs. When you set "Connector (In)" to "Not Used," you avoid the need to use the Edit Part dialog to select a different connector for each fitting type. See
Enabling Piping End Connections to Update from Attached Fittings in Revit 2019.2.
- Add hydraulic separation in hydronic networks (2019): To improve the sizing of pipes in hydronic systems, you can separate hydronic piping networks into primary, secondary, and tertiary loops to calculate the flow and pressure loss for each loop. See Add Hydraulic Separation to a Hydronic Network.
- Duty and standby for parallel pumps (2019): To improve the sizing of pipes in systems that contain parallel pumps, you can now create a pump set that accounts for the number of on duty pumps in hydronic network calculations for flow and pressure drop. See Add or Remove Pumps in a Mechanical Equipment Set.
- Load additional fabrication parts into a model (2019): Use the Fabrication Settings dialog to load additional parts from the fabrication parts folders into the model for placement. See Specify a Fabrication Configuration and Load Services in Revit.
- Rise/drop symbols (2019): Rise/drop symbols for Wye-Filled and Reverse Wye-Filled have been added for duct. See Rise Drop Symbols. In addition, the method for determining the display of a rise or drop for duct or pipe has been improved.
- MEP system selection (2019): When you pre-select a system, the bounding box around the network has been replaced with a dashed line on the duct or pipe elements.
- Match connectors for fabrication parts (2019): To save time while modeling, Revit will automatically match mismatching fabrication connectors that can be made compatible.
- Step down connectors for fabrication detailing (2019): When connecting lined duct to unlined elements using step down connectors, Revit will match the step down size to the lining thickness. See Step Down Connectors.
Not available in the current release
The following features and workflows are not available.
- Exporting building sites to ADSK files (2019)
- Publishing to Autodesk Buzzsaw (2019)
- Suite workflows (2019)
- Communicator (2019)
Subscription features now available to users of Revit 2019
Most new features and enhancements that were made available to Autodesk subscribers in 2018 updates are now available to users of Revit 2019.
For a detailed list of those enhancements, see What's New in Revit 2018.