Render Queue
Rendering > Render Queue
From the menu bar, select Rendering > Render Queue or when in the Simple UI mode, select Render > Render Queue to open the Render Queue module.
Before using the Render Queue, you will need to set off a render. When in the Simple UI mode, select Render > Render Image or when not, select Rendering > Render Settings, then in the Display Output tab, enter the setting you need. Click the Add to Render Queue button to start image calculations. Enter a name for the rendered image, select where the renders will be saved, then click Save. This opens the Render Queue and adds an entry displaying the state, file name, render mode, quality, image size, and path.
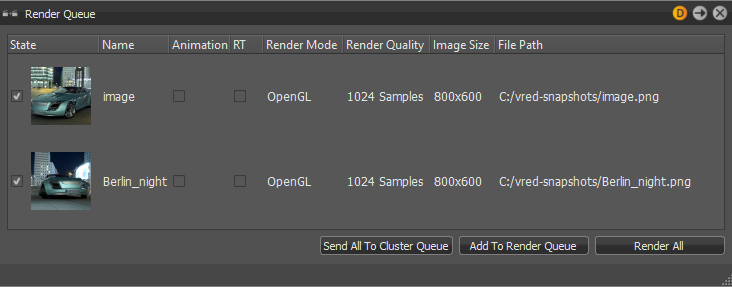
The Render Queue
Every line within that queue represents a job that has to be calculated.
Visibility flags assigned to an object by a render layer are captured when something is added to the Render Queue.
NOTE Use this Python command activateRenderLayerState(string name) to activate every stored render layer state with the passed key-name.
State - Uses the checkbox to control job consideration on rendering. A preview image helps to identify the jobs within the queue.
Name - Shows the name chosen on file browse dialog box.
Animation - Indicates the type of job. Checkbox is selected on animations.
RT - Indicates the type of renderer. When enabled it uses Raytracing and Open GL when disabled.
Render Mode - Creates the output, based on the setting from the Scene module's Settings tab. It uses the selected image render mode that was configured there.
Render Quality/Image Size - Shows the settings set during job creation.
File Path - Shows image name and full path.
Context menu
Right-mouse click in the list to access this context menu.
Set - Sets the current camera (render view) to the job initial position.
Recapture - Captures the current camera view and overwrites settings from selected job.
Rename - Enables the renaming of the job name within the render queue.
Delete - Removes the selected render job.
Active - Controls job consideration on rendering, when enabled.
Move Up/Move Down - Rearranges jobs inside the queue. Calculation performs jobs from top to bottom.
Run - Starts rendering the selected job immediately.
Run All - Processes all jobs. Behave like the Render All button.
Start image calculation
Add to Render Queue - Creates a job from current camera view and adopts the last settings from the Render Image module.
Render - Processes all jobs.
Why use the Render Queue
Use the Render Queue to create cluster render jobs and send them to the Cluster Queue.