In this exercise you insert an image of an aerial photograph from the Internet.
The images used in this exercise are in highly compressed wavelet formats making them particularly suitable for this purpose.
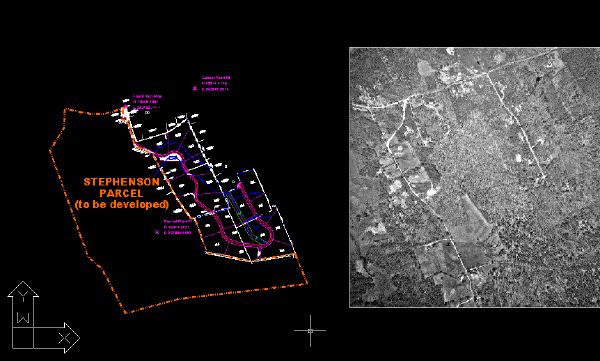
In this lesson, you insert an aerial photograph into a drawing that contains a plan view of an undeveloped parcel of land. The photograph shows the current land use for the site and the surrounding region.
Related Exercises
Before doing this exercise, you should ensure that AutoCAD Raster Design toolset options are set as described in the exercise Exercise A1: Setting AutoCAD Raster Design Toolset Options.
Exercise
- In the \Tutorial5 folder, open the drawing file
Map_01.dwg.
Locate the image to insert
- To display the Insert Image dialog box, click
Raster menu
 Insert.
- Under Insert Options select the Insertion Dialog option. Ensure that Show Frames Only and Zoom To Image(s) are cleared.
- Click Search the Web
 to display the Browse the Web - Open dialog box.
- In the Address field, enter
https://www.autodesk.com/rasterdesign-tutorial and press Enter.
This takes you to a page on the Autodesk website that contains an aerial image available in two formats: .ecw and .sid.
- Click the link for either the Downloadable .sid image or Downloadable .ecw image.
In the Browse the Web - Open dialog box, the address of the file is displayed in the Name or URL field.
- Click Open.
Insert the image
- In the Image Insertion dialog box, on the Insertion tab, click Pick.
You will be prompted to pick the location of the bottom left corner of the image frame, then the rotation angle, then the size of the image.
- Move the image frame to the right of the vector drawing, then click to place the bottom left corner.
In later exercises of this tutorial, you correlate the image to the vector drawing of the site using Match and Rubbersheet.
- Press Enter to specify a rotation of 0.
- Move your cursor to the upper right, then click a corner point that makes the image frame about the same height as the existing drawing.
- Click OK.
Save the image as a TIFF file
- Click
Raster menu Save As.
You must save the wavelet compressed files (.sid or .ecw) as a format AutoCAD Raster Design toolset can write to.
- If necessary, navigate to the \Tutorial5 folder.
- Enter Aerial_01.tif for the filename, select TIF for the file type, and click Save.
- Choose Uncompressed for the Encoding Method and click Next.
- Choose Tiled for the Data Organization and click Finish.
The image can now be modified, having been saved in an editable format.
- Close the drawing without saving changes.