For the last finishing operation, use another Pencil finishing toolpath over the entire part except the base surface. Copy the previous operation and edit the parameters.
- Right-click on the Pencil1 operation in the CAM Browser. (Do not be concerned if your Pencil node appears with a number other than Pencil1.)
- Select Duplicate from the pop-up context menu. A copied operation named Pencil1 (2) is added directly below Pencil1.
- Rename the copied toolpath to Parallel Pencil.
- Right-click Parallel Pencil and select Edit from the context menu to open the Operation dialog box and edit the parameters. Notice that all parameter values are the same as the previously created Pencil operation.
Tip: In many cases, creating a copy (using Copy and Paste or the Duplicate option) is faster than creating a new operation since similar parameter settings are often used in successive operations.
 Tool tab
The selected tool should still be #21 - Ø6mm ball.
 Geometry tab
Confine the toolpath to the area above the base.
- Click the Geometry tab.
- From the Machining boundary: drop-down menu, choose Selection.
- Select an edge on the lower boundary as shown below:
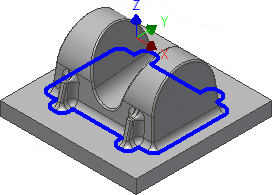
- Set Additional offset: to: 1 mm
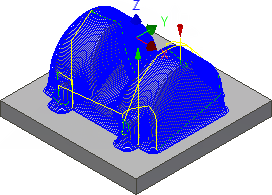
 Passes tab
- Click the Passes tab.
- Disable the Limit number of stepovers check box.
- Set Stepover: to: 0.7 mm
- Disable the Stock to Leave check box.
Start the Calculation
- Click
 at the bottom of the Operation dialog box, or right-click in the graphics window and select OK from the marking menu, to automatically start calculating the toolpath.
The toolpath is now calculated and a preview appears in the graphics window.
That completes the toolpaths for this tutorial. You should now have these operations listed in the CAM Browser:

Continue to To Post Process the Part (Tutorial 4)...