If the master runs assembly needs to be configured in an iAssembly factory, you can create a tube and pipe interchangeability set in the configuration table using the Make Adaptive command. If you do not apply the Make Adaptive command, the master runs assembly will behave as a normal Inventor component, is not configurable, and is shared throughout the iAssembly factory. In that case, the master runs assembly can be adaptive in only one iAssembly member, otherwise it remains non-adaptive throughout the tube and pipe iAssembly factory.
In each configuration, set an appropriate adaptive master runs assembly so that it can be swapped in on the configuration to meet your design needs.
The following sample instructs you how to create a tube and pipe iAssembly factory based on the tube and pipe tutorial assembly file. Before you begin, click File  Manage
 Projects to set up the tutorial project and make it active. The project file and assembly are located in the installation path. (XP default: C:\Program Files\Autodesk\Inventor <version>\Tutorial Files\Tube & Pipe. Windows 7 default: C:\Users\Public\Documents\Autodesk\Inventor <version>\Tutorial Files\Tube& Pipe.)
- Ensure that the tube and pipe tutorial project is active, and open AirSystemAssy.iam.
- Create a master runs assembly containing appropriate routes and runs. For instance, use the predefined style ASTM A53/A53M-ASME B16.11 - Welded Steel Pipe to create two auto route regions across the I-Beam.
- Activate the top assembly.
-
 On the ribbon, click Tube and Pipe tab
  iPart/iAssembly panel
  iPart/iAssembly Author .
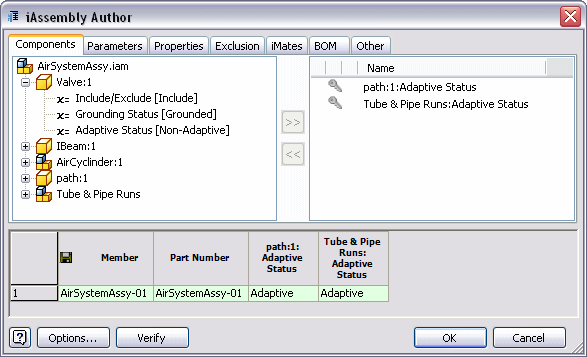
 File name of the master runs assembly is displayed in the candidate objects list, by default, Tube & Pipe Runs. The adaptive status is automatically selected into the configuration table.
 Note: Configuration row in green indicates the active configuration.
 - Optionally, click Name to customize the part number and member name for assembly configuration. In this exercise, use the default naming schema.
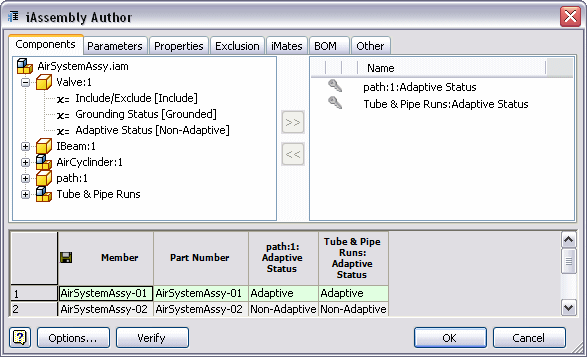
- In the configuration table, right-click a row number and select Insert Row.
A new configuration is created, AirSystemAssy-02. By default, the master runs assembly is non-adaptive as indicated in the Tube & Pipe Runs: Adaptive Status column.

- Click OK to close the iAssembly Author dialog box and save the top assembly.
- In the Model browser, expand Table and double-click AirSystemAssy-02 to activate the new configuration.
- With the top assembly active, right-click the master runs assembly and select Make Adaptive.
- In the Make Adaptive dialog box, determine whether to select or clear the Make all runs adaptive check mark and click OK.
- Edit routes and runs in the active configuration as needed.
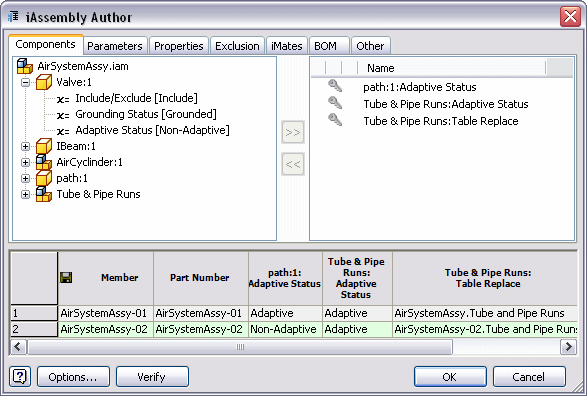
- In the Model browser, double-click Table and verify the following for the master runs assembly:
- Adaptive Status column has a value of Adaptive in the new configuration.
- Table Replace column is added to the configuration table.
- The tube and pipe interchangeability set is initiated with two master runs assembly members so it can be swapped in for the desired configuration row using the Table Replace drop-down list.

- Repeat Step 6 through Step 12 to add more configuration rows and include more adaptive master runs assembly members into the tube and pipe interchangeability set.
- Optionally, to swap in another tube and pipe interchangeability set member for one configuration, click the appropriate Table Replace cell and select a specific master runs assembly. Note: A master runs assembly member can only be adaptive once in the iAssembly factory.
- Optionally, if you want to further control the master runs assembly status, such as including or excluding the master runs assembly from one configuration, do either of the following:
- Select the master runs assembly in the candidate objects list and click
 to add all status to the configured objects list.
 - Expand the master runs assembly in the candidate objects list, select Include/Exclude [Include] or Grounding Status [Ungrounded] and click
 to add it to the configured objects list.
- Select the master runs assembly in the candidate objects list and click
- Optionally, on the BOM table, add the BOM structure and quantity properties for the master runs assembly into the configuration table and set the appropriate value.
- After you have completed all other Inventor iAssembly properties, click Verify to validate the assembly configuration. For instance, a master runs assembly member can only be Adaptive once in the iAssembly factory and the BOM Qty column can only contain a number or a string of Default.
If errors occur, the configuration table presents the visual feedback in yellow.
- Click OK to complete the tube and pipe assembly configuration.
In each configuration, you can independently make tube and pipe edits such as route adjustments, drawings, and representations.
- When adding a new configuration row, set an appropriate active configuration as the base for the new configuration. The new configuration contains the same assembly structure as the active configuration.
- If it is ok for the master runs assembly to remain non-adaptive for the new configuration, you need not apply the Make Adaptive command. In this case you can ignore Step 8 through Step 12. Optionally, you can place assembly constraints to position the entire non-adaptive master runs assembly as a rigid body.