- In the
Shape Editor, choose
>

- In the
Animation,
Rigging and
Modeling menu sets:
Deform > (Create) Blend Shape >

Basic tab
- BlendShape Node
-
Specifies the name of the blend shape deformer (the blendShape node). You should rename this node so that it indicates the role of the blend shape deformation (for example, lipSync). If you don’t specify a name, Maya provides the default name blendShapen. You can create multiple blend shape deformers on an object or a group of objects. See Create blend shape deformers for more information.
- Envelope
-
Specifies the blend shape deformation's scale factor (amount of influence). Use the slider to specify values from 0.0000 to 1.0000 (the default). This is the same as setting the Envelope value in the Attribute Editor, or setting the Weight value for a Blend Shape Deformer in the Shape Editor - see Scale the influence of the blend shape for more information.
Origin
Specifies whether the blend shape will be relative to the base object shape’s position, rotation, and scale (Local or World). The default is Local.
- Local
-
Local blends the base object shape to the target object shape(s) while ignoring differences in position, rotation, and scale between the base object and the target object(s). For facial animation setup, you would typically want to select Local. In general, Local is useful when you want to have your target object(s) in various separate positions for easy viewing, but don’t want their positions to affect the deformation.
- World
-
World blends the base object shape to the target object shape(s), taking into account any differences in position, rotation, and scale between the target object shape(s).
Target Shape Options
Select from the following:
- In-Between
-
Specifies whether the blending will be in series or in parallel (the default).
If on, the blending will be in series. Shape transitions will occur in the order in which you selected the target objects. The effect will be that the blend shape will be able to change from the first target shape, to the second, and so on, back and forth through the series of target shapes chained together as “in-between” shapes.
If off (the default), the blending will occur in parallel. Each target shape can influence the blending simultaneously in a parallel fashion rather than one after another in a series. Typically, for facial animation setup, you want In-Between off so that you can have a variety of basic facial expressions that form the basis of all the possible expressions. Because the blending is in parallel, you can control the influence of each basic expression at any moment to get a nearly infinite variety of highly nuanced expressions.
- Check Topology
-
Select this option to check if that the base object and the target object(s) have the same topology (vertices for polygon objects or CVs for NURBS objects) before you create a blend shape deformer - see Create blend shapes using multiple target objects). Default is on.
- Delete Targets
-
Select this option to delete the target object(s) after creating the blend shape deformer - see Delete target objects for more information. Default is off.
Advanced tab
Deformation order
Specifies the placement of the blendShape node in the base object’s history. For most cases, you can select Automatic (the default) and let Maya figure out where to put the blendShape node. You shouldn't need to change the order unless you are performing a specific task and know where you need the blendShape node to be in the object's history.
- Automatic (formerly called Default)
-
The default recommended setting. Maya determines where the blendShape node should be located in the object's history based on the deformers that are currently connected on the selected object. The blendShape node will be placed using either the Pre-deformation or Post-deformation options:
- The blendShape node uses the Pre-deformation option if the selected object has no deformers, or it has a Skin, Cluster, Blend Shape, or Delta Mush deformer in its history. These types of deformers are supported by the Shape Inverter.
- The blendShape node uses the Post-deformation option if the object has any nonlinear deformers (Bend, Flare, Sine, Squash, Twist, Wave) or any of the following deformers in its history: Lattice, Wrap, ShrinkWrap, Wire, Wrinkle, Muscle, Soft Modification, Sculpt, Texture, Jiggle, and Point on Curve. These types of deformers are not supported by the Shape Inverter.
The Shape Inverter essentially allows blend shapes to be added before skinning by inverting the shapes so that they produce the proper results after the skinning deforms the mesh.
- Pre-deformation (formerly called Front of chain)
-
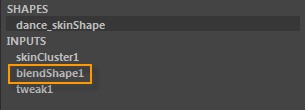
Maya positions the BlendShape node so that it's evaluated before all the deformers (including Skin nodes) in the selected object’s shape history, but after any of the Tweak nodes. Tweak nodes keep track of the translation of the points on the base object as it's deformed - see Point tweaking on objects.

Blend shape deformers are often used to create deformation effects on a skinned character, so Pre-deformation assures that the effects from blend shape deformation occur before those caused by the skin. For more information on doing this, see Create pre-skinning corrective shapes.
You shouldn't use the Pre-deformation option if there are nonlinear deformers (Bend, Flare, Sine, Squash, Twist, Wave) or any of the following deformers in the object's history: Lattice, Wrap, ShrinkWrap, Wire, Wrinkle, Muscle, Soft Modification, Sculpt, Texture, Jiggle, and Point on Curve. This is because the effects of these deformers are not supported by the Shape Inverter, so the results from the Blend Shape deformer won't be correct when they're evaluated after Blend Shape.
However, if you need to use the Pre-deformation option in this case, the best solution is to turn off all unsupported deformers, either by selecting the Has No Effect option for the deformer node's attribute, or by setting the deformer's Envelope attribute value to 0 (no influence).
- Post-deformation (formerly called Before)
-
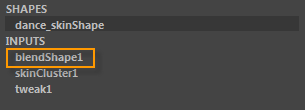
Maya positions the blendShape node so that it's evaluated after all the other deformers on the selected object. In the object’s history, the BlendShape node will be placed above all other deformers, directly below the object's Shape node.

Post-deformation shapes are mainly used for sculpting corrective shapes on skinned characters - see Create post-skinning corrective shapes for information. These target shapes must be either Tangent Space or Transform Space type (see Add Blend Shape Target Options).
The Post-deformation order ensures that the corrective shape is evaluated after the effect of the skin deformation has been calculated, so the deltas are smaller and the deformation is generally smoother than with Pre-deformation shapes.
- After
-
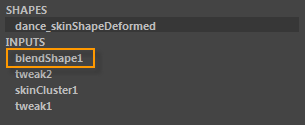
Maya positions the deformer immediately after the deformable object's Shape node in the stack so it's evaluated after the other deformers.

This actually creates a new shape with its own Tweak node. You can use After to create an intermediate deformed shape somewhere in the middle of the object’s history. The original shape of the object is not hidden.
- Split
-
Maya splits the blend shape deformation into two deformation chains. You can use Split to deform an object in two ways at the same time, creating two final shapes that originate from the same original shape.
- Parallel
-
Maya places the blendShape node in parallel with the existing INPUT nodes in the object’s history, and then blends the effects provided by the INPUT nodes and the deformer. A parallel blender node (default name: parallelBlendern) that blends the effects of the existing INPUT nodes and the new deformer is placed before the final Shape node at the top.
Parallel is useful when you want to blend the influences of several deformers acting on a single object. For example, if you create a blendShape deformer with Automatic placement for an object, and then create a Sine deformer with Parallel placement, you can directly control how much influence each deformer has on the object by blending each of their influences.
The parallelBlender node provides a weight channel for each deformer node, which you can edit.
- Exclusive
-
Specifies whether the deformer set is in a partition. Sets in a partition can have no overlapping members. If on, the Partition To Use and New Partition Name options become available. Default is off.
- Partition To Use
-
Only available if Exclusive is on.
Lists any existing partitions, and a default selection Create New Partition. If you select Create New Partition, you can edit the New Partition Name field to specify the name of a new partition.
- New Partition Name
-
Only available if Exclusive is on.
Specifies the name of a new partition that will include the deformer set. The suggested partition name is deformPartition, which will be created if it does not already exist. Typically, you might put all your exclusive deformer sets in the partition named deformPartition. However, you can create as many partitions as you like, and name them whatever you want.