The following sections of the Attribute Editor provide attributes that are shared between most materials.
Special Effects
These attributes control the appearance of glows produced from light reflecting off surfaces, or from surface incandescence. Special Effects attributes are available for Anisotropic, Blinn, Lambert, Phong, and PhongE material types.
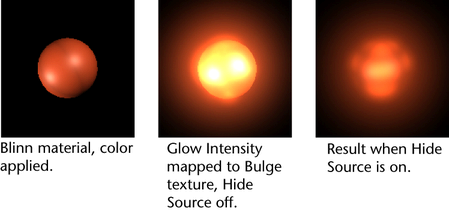
- Hide Source
-
Makes the surface invisible when rendered (if the Glow Intensity value is non-zero) showing only the glow effect. Hide Source is off by default.
- Glow Intensity
-
The brightness of the surface glow effect. The slider range is 0 to 1, but you can type in higher values to create a ‘blown out’ or ‘burn in’ effect. The default value is 0. Mapping a texture to the Glow Intensity can create very interesting effects. Turn on Hide Source to view the results.

Matte Opacity
You can control the mask value for individual objects. Matte Opacity attributes are available for Anisotropic, Blinn, Lambert, Layered Shader, Phong, PhongE, Shading Map and Use Background material types.
- Matte Opacity Mode
-
Select from the list of modes in the drop-down list.
For best results when adjusting these attributes, select the Display Alpha Channel icon in the Render View to view the mask channels when re-rendering the scene.
- Opacity Gain
-
This is the default Matte Opacity Mode. This mode produces both reflections and shadows.
The matte channel is first calculated, and then multiplied by the specified Matte Opacity value. The Opacity Gain value is used as a multiplier on the matte value produced by this material.
The Matte Opacity Mode value is also keyable. The Opacity Gain range is from completely invisible to no effect (rendered as usual).

- Solid Matte
-
Solid Matte makes the value of the matte channel constant for the material. The value you specify in the Matte Opacity slider is used, instead of the default value.
Use Solid Matte to adjust the overall density or visibility of the Use Background material.

- Black Hole
-
When you select the Black Hole mode, the matte channel for the material is set to 0 (fully transparent). This creates a black hole in the alpha output where the object assigned shader renders the matte ‘knocked out’.
In this mode, the Matte Opacity slider is disabled and its value ignored.
 Note:
Note:For the Opacity Gain and Solid Matte modes, if an object has non-zero Transparency, objects behind it make their usual contribution to the matte channel’s values. This is the difference between setting Matte Opacity to 0.0 in these modes, and choosing the Black Hole mode.
- Matte Opacity
-
This value depends on which Matte Opacity Mode is selected (Opacity Gain or Solid Matte). For example, for Opacity Gain, the Matte Opacity value indicates the multiplier amount for the alpha channel. The default is 1, which means that any opaque material registers an unaffected alpha value.
Any values between 0 and 1 act as a multiplier to the alpha channel value to arrive at modified value. Use the slider or enter a value to adjust the density or visibility of the mask channels.

Raytrace Options
The Raytrace Options attributes control the appearance of a surface during raytracing only.
Raytrace Options attributes are available for Anisotropic, Blinn, Lambert, Phong, and PhongE material types.
- Refractions
-
When enabled, rays that are traced through transparent or semi-transparent objects are refracted, or bent according to the material’s refraction index.
- Refractive Index
-
The amount that light rays bend when passing through a transparent object. A Refractive Index value of 1 does not bend light rays at all, so you need to set the index value higher than 1. Refractive Index values for common materials are: glass (1.6), air (1), water (1.333), crystal (2), diamond (2.417). The valid range is 0.01 to infinity. The slider range is 0.01 to 3, but you can type in a higher value. The default setting is 1.6.
Tip:- The material’s Hypershade swatch only approximates the effect of the Refractive Index attribute.
- Surfaces must have thickness for Refractive Index to have any effect. If a surface does not have thickness (for example, a plane or face element), set the Refractive Index value to 1.
- For best results, make sure there are suitable objects in the background to be refracted.
- Refraction Limit
-
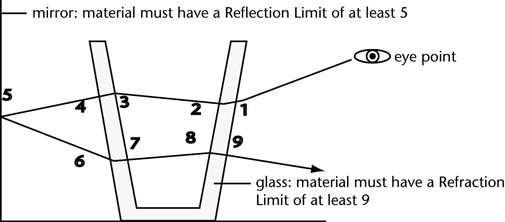
The maximum number of times the surface allows a light ray to be refracted. For example, if the Refraction Limit value is 10, the surface refracts light rays that have previously been refracted and, or reflected (off itself or off other surfaces) 9 times or less; the surface does not refract light rays that have previously been refracted and, or reflected 10 or more times. The valid range is 0 to infinity. The slider range is 0 to 10. The default value is 6. Increasing this value may significantly increase render times.
You must also consider the Render Settings window Raytracing refractions attribute too. Maya uses the lower value of the 2. For instance, if your limit is set to 9 on the material and 6 in the Render Settings window, a value of 6 is be used. See also, Reflection Limit
In the following example, a glass sits in front of a mirror.

The number of refractions includes both the entry and exit of a light ray from a surface having thickness.
The physical property Total Internal Reflection (TIR) can make some transparent objects appear not to refract light. This is caused by light rays reflecting inside the thickness of the object. If this occurs, increasing Refraction Limit has no effect because the Reflection Limit is stopping light rays before they can exit the surface. However, because TIR is a real-world property, you may want to keep this effect.
Tip:To simulate realistic looking glass, set the Refraction Limit value to 9 or 10.
- Reflection Limit
-
The maximum number of times the surface allows a light ray to be reflected. For example, if the Reflection Limit value is 4, the surface reflects light rays previously reflected (off itself or off other surfaces) 3 times or less; the surface does not reflect light rays previously reflected 4 or more times. The valid range is 0 to infinity. The slider range is 0 to 10. The default value is 1.
Set the Reflection Limit value according to the material’s Reflectivity value. For example, if the Reflectivity value is between 0 and 0.5, set the Reflection Limit value between 1 and 2. If the Reflectivity value is between 0.5 and 1, set the Reflection Limit value between 2 and 5.
High values for Reflection Limit greatly increase rendering time. Test render the scene using various settings, and use the lowest values that give you acceptable results. Even highly reflective surfaces rarely need a Reflection Limit value as high as 10 or more.
You must also consider the Render Settings window Raytracing Reflection attribute too. Maya uses the lower value of the 2. For instance, if your limit is set to 5 on the material and 1 in the Render Settings window, a value of 1 is used. See also Reflection Limit.
- Reflection Specularity
-
This attribute is available for Blinn , Anisotropic , Phong , and PhongE materials.
Reduce this value to avoid highlight aliasing artifacts produced in reflections during raytracing because of very thin or small highlights. Maya adds Reflection Specularity to each material to control the contribution of the specular highlights in reflections. The valid range is 0 to 1. The default is 1 (full contribution).
- Light Absorbance
-
Describes how light-absorbing a material is. A material with an Absorbance of 0.0 transmits completely. The higher the value, the less light passes through.
Transparent materials generally absorb an amount of the light which passes through them. The thicker the material, less light gets through—the thinner the material, more light gets through.
- Surface Thickness
-
The simulated thickness (in world space) of transparent objects created from single surfaces (for example, a NURBS plane, or polygon face).
Using Surface Thickness does not produce the same results as building a surface with actual thickness—the effect works well when the edges of the surface are not visible (for example, closed surfaces, or bounded shapes, like a car windshield).
- Shadow Attenuation
-
Shadows of transparent objects are brighter in the center, simulating a light’s focus. A setting of 0 results in constant intensity shadows. The focusing increases as the parameter increases from 0 to 1. The default value is 0.5. The amount of attenuation for a given light ray depends on the angle between the light ray and the surface normal of the transparent object: the greater the angle, the greater the attenuation. To turn off the shadow attenuation completely, set shadow attenuation to 0.
- Chromatic Aberration
-
Different wavelengths of light refract at different angles when passing through a transparent surface during raytracing. Chromatic Aberration only affects light rays as they pass through the second surface of a transparent object (the first exit ray).
Hardware Shading
This is not rendered.
Override hardware shading for Lambert, Blinn, Phong, PhongE, and Anisotropic shaders.
Hardware Shader
Plug-in writers can use this to override the hardware display while preserving software rendering.
For example, you can create a DirectX11 shader or GLSL Shader node, then browse to your .fx or .ogsfx shader file from the dx11Shader or GLSLShader Attribute Editor.
For more information about hardware shaders, see:
Hardware Texturing
This is not rendered.
Preview rendered materials and textures in the scene views. You can select specific channels to view and determine the hardware render quality. Hardware Texturing attributes are available for Anisotropic, Blinn, Lambert, Phong, and PhongE material types.
- Textured channel
-
This drop-down list displays the mapped attributes for a texture-mapped material. This can be useful if you map several textures to a material and want to view them one by one. If, for example, you map a Checker texture to a Blinn material’s Color attribute, and a File texture to its Specularity attribute, you can select Color from the drop-down list to display only the Checker texture in the view. The top of a material’s Attribute Editor also provides tabs for each texture so you can select and edit the texture and watch the results in the view.
The Combined Textures option can be used to process the entire shader into one texture for hardware display purposes. It allows the entire shader to be previewed on the applied object and not just single channels, for example, color and incandescence.
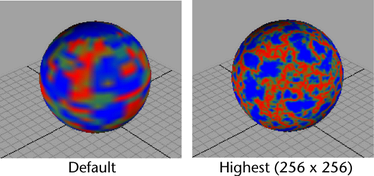
- Texture resolution
-
Lets you choose to view the textured object with varying degrees of accuracy and clarity.
 Note:
Note:- Some effects, such as bump mapping or glows, cannot be seen in hardware texture mode (in the scene views). Use the Render View or IPR render to view the results.
- The Texture Resolution options only improve the quality of the hardware textured image in the scene views. You cannot use these options to improve the test render quality in Render View. Instead, change the Resolution and Anti-aliasing Quality settings in the Render Settings window. Remember: the higher the quality the slower the render time.