The Render Settings Module
Rendering > Render Settings
Along the top of the Render Settings module is a context menu and four tabs, File Output, General Settings, Raytracing Quality, and Display Output.

Find the render summary above the Send to Cluster Queue, Add to Render Queue, and Render buttons.
Presets
Click Presets to display a menu with the following options for saving, reloading, editing, and restoring default rendering settings.
- Save - Saves the current render settings as a preset. Once saved, the preset will appear in the menu. This option is disabled when Default is enabled. Select a preset or make changes to the current render settings to enable it.
- Save As - Opens the Preset Name dialog for renaming a preset. Once saved, the preset will appear in the menu. This option is disabled when Default is enabled. Select a preset or make changes to the current render settings to enable it.
- Edit - Opens the Edit Presets dialog for activating, renaming or deleting presets.
- Default - Resets the Render Settings to the VRED defaults.
Presets are stored in the following XML file: C:\Users\<USERNAME>\AppData\Roaming\VREDPro\ raytracingtemplates.xml
File Output (tab)
Image
View - Provides a list of views from all cameras, viewpoints, predefined camera track animations, or variants (if the camera was active upon its creation). Select a view to be used for image calculation. If a track is chosen, all contained viewpoints are rendered automatically.
Variant - Simplifies batch rendering of variant sets by combining viewpoints with variant sets and rendering out images for each combination.
- Select viewpoints with the View option.
- In Variants, set the variants.
The render session is now made based on the combination of viewpoints with the selected variants. Each output image is named for easy identification. For example, with variants as the naming priority:
Three viewpoints: 45 degree front view, Side view, 45 degree rear view. ( [Front_R_45] [Side_R] [Rear_R_45] )
Three variant trim levels of the car ( [GranTorismo] [Coupe] [StationWagon] )
Resulting rendered image file names:
- GranTorismo_Front_R_45.png
- GranTorismo_Side_R.png
- GranTorismo_Rear_R_45.png
- Coupe_Front_R_45.png
- Coupe_Side_R.png
- Coupe_Rear_R_45.png
- StationWagon_Front_R_45.png
- StationWagon_Side_R.png
- StationWagon_Rear_R_45.png
Filename - Sets the image file name and path where the rendered image file is stored.
Use Time Stamp - Appends a time stamp to the filename.
Image Size Presets - Offers a drop-down menu of presets for all the usual resolutions, such as PAL, NTSC, HD 720, HD 1080, and 4K.
Image Size - Enables you to enter a custom resolution when a preset image size has not been selected. If a preset from above is used, the corresponding amount of pixels for horizontal and vertical resolution are automatically filled in.
Printing Size - Sets width and height of the resulting print in centimeters.
Resolution - Sets the printing resolution in dots per inch.
Region Render - Restricts rendering to the rectangular region specified by the following coordinates:
Use Current Render Window Region - Sets the upper left and lower right corner, according to the rectangle selected in the Render Window. If the button is activated, upper left and lower right corners are updated automatically including any change of the region.
Upper Left Corner - Defines the X and Y coordinate for the upper left corner of the region frame.
Lower Right Corner - Defines the X and Y coordinate for the lower right corner of the region frame.
Render Mode - Sets the illumination mode applied for rendering the image to a file. The following render modes are available:
CPU Rasterization - This mode does not compute direct reflections, nor does it compute refraction or any other sophisticated visual effects.
Precomputed Illumination - This mode is comparable to VRED OpenGL rendering mode. It uses pre-computed Ambient Occlusion and indirect illumination for rendering and calculates specular reflections and refractions and correct shadows from light sources.
Precomputed+Shadows - This mode uses pre-computed image-based lighting and indirect illumination, without using pre-computed Ambient Occlusion values. Instead, it calculates shadows based on the active environment.
Precomputed+IBL - This mode uses pre-computed indirect illumination and samples the environment.
Full Global Illumination - This mode doesn’t use any pre-computed values. It accurately samples everything, using a physically-based approach. Other features, like Photon Mapping, require the render mode to be set to Full Global Illumination.
Important:This value automatically changes the Still Frame illumination mode in the Raytracing Quality tab.
Render Quality - Sets the number of image samples used for rendering or use one of the following presets:
- Draft
- Preview
- Production
- Production Interior
Important:This value automatically changes the Use Image Samples value from the Antialiasing section of the General Settings tab.
Supersampling - Activates/deactivates supersampling for the rendering. The default setting is On.
Background Color - Sets the background color when rendering a file in Raytracing render mode.
Tonemap HDR - Applies tone mapping to the high dynamic image rendering. As a result, a 32-bit rendering looks the same in the compositing tool as set in VRED. However, the values of the image are compressed by the chosen tone mapper to values from 0 through 1. In doing so, the dynamic range is lost. Therefore, effects like glow are hard to calculate in the compositing tool afterwards.
Export Alpha Channel - Activates alpha channel rendering. If the file type supports alpha channels, the alpha channel is embedded into the resulting image. The background color is seen through transparent objects.
Premultiply Alpha - Renders the alpha channel pre-multiplied. This option is only available when Export Alpha Channel is enabled.
Export TIFF/PSD in HDR Format - Sets the exported render file type as TIFF/PSD in HDR format.
Export EXR in 16 Bit Float Format - Sets the exported render file type as EXR in 16 bit format.
Export Multi Layer EXR/PSD for Render Passes - Sets the exported render file type as EXR/PSD for the render pass.
ICC Profile - VRED supports the storage of ICC color profiles within the project data to ensure color management consistency during the entire workflow and between devices. Storing ICC color profiles guarantees the colors visible on the workstation are the same as on any other computer. The default setting is Current Settings, but you can select any of the following:
- sRGB IEC 61966-21
- Adobe RGB 98
- Monitor ICC Profile
- Image ICC Profile
Meta Data
This feature embeds certain scene settings in the rendered output. Later, you can import the rendering (its metadata) into VRED, using File > Import Scene Data > Rendering Meta Data. The settings saved within the image upon creation are applied to the currently loaded scene, for example, the camera settings adopt.
This option is only available for JPG, PNG, TIFF, and EXR files.
All - Embeds all the following metadata.
Render Settings - Embeds the current render settings as metadata to the rendered image, for example, image resolution, image samples, pixel filter, and Raytracing quality settings.
Camera - Embeds the settings of the currently active camera as metadata.
Scene Graph - Contains the following options:
Node Visibilities - Embeds the visibility states of all Scene Graph nodes as metadata.
Switch Node States - Embeds all switch node choice states as metadata.
Materials - Contains the following options:
- Switch Material States - Embeds all switch material choice states as metadata.
Embedding Meta Data into Rendered Images
Saving and restoring node visibilities and switch node states relies on a consistent node naming scheme within the Scene Graph hierarchy. The same applies to switch materials within the materials hierarchy, within the Material Editor’s list view. As the metadata does not contain information on nodes/materials that are added or renamed since the rendering, their states remain unchanged when importing the rendering metadata. Also, if there are inconsistencies, some states may not be reconstructed. All nodes and materials, whose state could not be reconstructed, will be displayed in the Import Results dialog after the import has finished.
Consistency of visibility states
In the metadata, you can identify a node by its node path, which is a concatenation of the names of its ancestors and itself. If all nodes with the same node path have the same visibility, the node path is considered consistent and it is stored with this visibility on metadata export. If nodes with the same node path have different visibilities, this node path is considered to be inconsistent and it is not considered during export. The visibility state of those inconsistent nodes cannot be reconstructed on import and remains unchanged.
To ensure all visibilities are exported and reconstructable upon import, either ensure all nodes with the same path have the same visibility, or create an unambiguous node path by renaming the respective nodes.
Consistency of switch states
In the metadata, the state of a switch node/material is defined by the name of the node/material selected by the choice (called choice name in the following). The choice is considered to be consistent, if the choice names of all switches with the same node/material path are identical.
To ensure all switch states are exported and reconstructable upon import, either ensure all switches with the same path have the same choice, or rename the respective switches.
When importing switch states, if the switch has several children called choice name, a state of a switch in the scene cannot be restored. In this case, the switch is displayed in the Import Results dialog with its proposed choice name.
The scene-contained switches should not have multiple choices with the same name.
Renderpasses
- Export Renderpasses - Activates rendering with renderpasses. All activated renderpasses are rendered and saved at a time.
Combined Channels (tab)
Color Channels - Contains the following options:
- Beauty
- Diffuse IBL
- Diffuse Light
- Diffuse Indirect
- Incandescence
- Background Color
- Specular Reflection
- Glossy IBL
- Glossy Light
- Glossy Indirect
- Translucency
- Transparency Color
Image Processing - Contains the following options:
- Fog
- Frontplates
- Lens Flares
- Backplates
Auxiliary Channels - Contains the following options:
- Occlusion
- Mask
- Material ID
- Cryptomatte Object
- Depth
- Normal
- Position
- View Vector
- Cryptomatte Material
Separated Channel (tab)
Material Channels - Contains the following options:
- Diffuse Color
- Glossy Color
- Specular Color
- Incandescence
- Translucency Color
- Transparency Color
- Background Color
Illumination Channels - Contains the following options:
- IBL Diffuse
- Lights Diffuse
- Indirect Diffuse
- IBL Glossy
- Lights Glossy
- Indirect Glossy
- IBL Translucency
- Light Translucency
- Indirect Specular
Note:To reconstruct the beauty pass image, using the other renderpasses, it is necessary to render to EXR/HDR/Floating Point TIFF image format, without Tonemap HDR activated. Because Tonemapping changes the linearity of values, render with Tonemapping after the renderpasses are combined to the final image. To reconstruct the beauty pass, layer the Diffuse IBL/Light/Indirect, Glossy IBL/Light /Indirect, Specular Reflection, Translucency, and Incandescence Passes, using a linear add operation in your compositing tool.
Image Processing - Contains the following options:
- Fog
- Frontplates
- Lens Flares
- Backplates
Animation
Render Animation - Makes animation-related settings accessible, when activated. It provides the possibility to render an animation clip or only a part of it.
Note:When combining variant set rendering with animation rendering in the same job, Render Animation must be enabled in Render Settings > File Output > Animation. Select the relevant clip or enter the relevant times within the timeline. The variant set animation will not render, if this is not done. For multiple animations, we recommend they be added to their own render jobs.
Type - Sets the type of animation. Choose from Clip and Timeline.
Animation Clip - This option is only accessible when no camera track animation or variant is selected within the above Image section's View drop-down. A predefined clip can be selected here.
Format - Determines the file output for the rendered animation. Choose from:
- Image - Generates a picture for every frame.
- Movie - Provides the output within a single AVI movie file. Video file compression settings (Frames per Second) are available in a later step, after initializing the render process.
Use Clip Range - Enables the rendering of the whole clip. To render only a sequence from the selected clip, deselect it and define the first and last image of the sequence in Start Frame/Stop Frame. Frame Step (only available when the Images format is selected) helps when not every frame of an animation sequence should be generated. With a Frame Step setting of 3, for example, VRED renders every third image of the sequence. The default value, 1, generates one image per frame.
Start Frame - Sets the first frame of the animation.
- End Frame - Sets the last frame of the animation.
Frame Step - Skips the set value of frames, when rendering out an animation, to reduce the render time when testing a rendered sequence. The result will be at a lower frame rate.
Frames per Second - Defines the frame rate for the output movie. This option is available when the Movie format is selected.
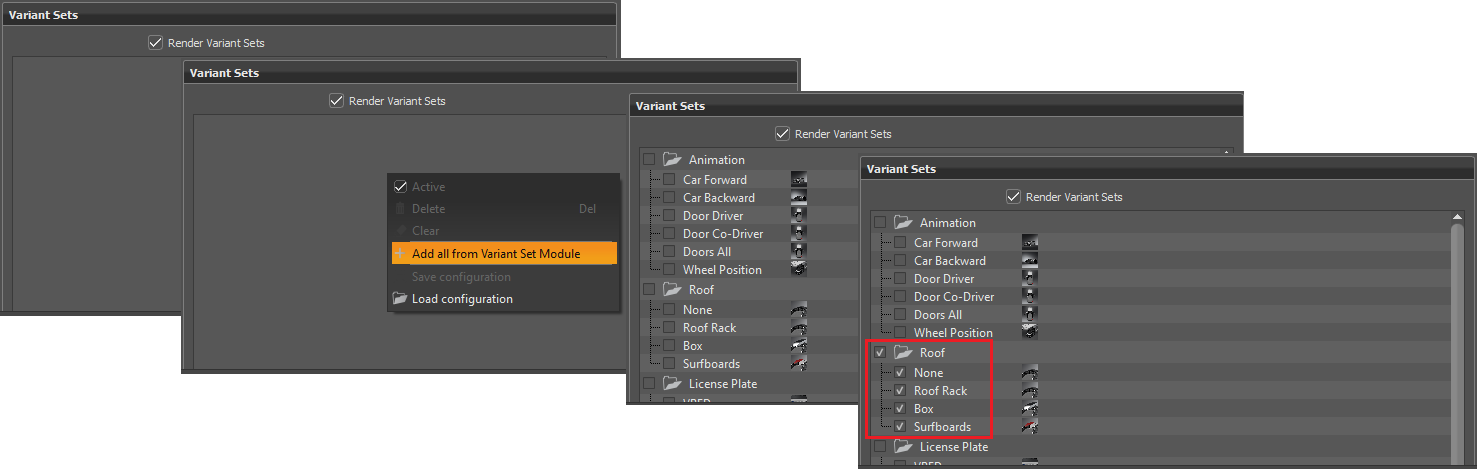
Variant Sets
Use the Variant Sets section to easily render multiple versions of a model in VRED. Render a red car in a garage, yellow car in a garage, and red car in park, in one render job. Material and environment variant sets can be set by checking what's wanted and unchecking what's not.

If you reorder groups by click-dragging, this changes the render and naming order of your files. Reordering is not permitted on a per variant set basis, only with groups.
Ungrouped Variant Sets
When ungrouped variant sets are dragged from the Variant Sets module to the Variant Sets section of Render Settings, they will be grouped under the same parent node, named ungrouped. This treats all ungrouped nodes as if they belong to one group to simplify deleting, dragging and dropping, and selecting/deselecting.

Render Variant Sets - Enables variant sets to be added to the render job. Right-click to access a context menu with the following options:
- Active - Adds checks to all selected variant sets (materials, geometry, and environments) in the Variant Sets section and adds their information to the Render Summary at the bottom of the module.
- Delete - Deletes entire folders of variant sets from the Variant Sets section.
- Clear - Clears all variant sets from the Variant Sets section and removes all information from the Render Summary below. To add them back, use Add all from Variant Set Module.
Add all from Variant Set Module - Adds all variant sets in the current scene to the Variant Sets section. Check a variant set to render it. To select everything in a folder, check the folder. To deselect everything in a folder, uncheck the folder.
Save configuration - Saves the configurations as an XML file. This is useful to keep along side your VPB files to get the same rendering results another time.
- Load configuration - Reloads the XML configuration file for design reviews, so you have the same results as before.
Use View From Variant Sets - Ignores the viewpoint set in the Render Settings module and uses what was set in the view tab of the Variant Sets module.
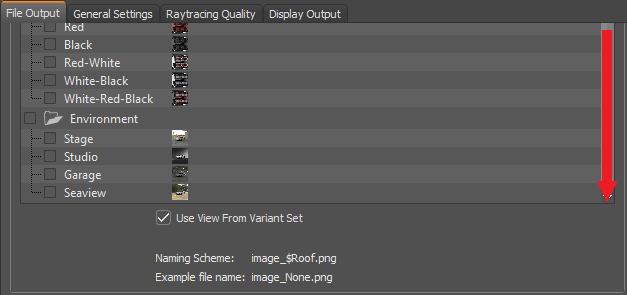
At the bottom of this section, the naming scheme and an example file name are displayed. The naming of the rendered files uses a combination of the variant set names to form the final file name. A unique indentifier can be added to the beginning, but only at the time when selecting the render job save location.
Known Limitations with Rendering Variant Sets
Please be aware of the following limitations when rendering variant sets:
Only one viewpoint will be used for variant sets containing multiple viewpoints within the Viewpoints variant type. If a default is set and added to a variant set, it will be triggered, regardless of its position in the list. If no default is set, the first variant listed will be triggered.
Any animation in a variant set will be triggered.
Features such as Next, Previous, and Loop have yet to be correctly supported. Please avoid using them for rendering variant sets. These variant sets will be triggered and scenes will change in line with the next/previous state.
Variant names should be short to avoid extra long file names that might go beyond the character limits of your OS.
When combining variant set rendering with animation rendering in the same job, Render Animation must be enabled in Render Settings > File Output > Animation. Select the relevant clip or enter the relevant times within the timeline. The variant set animation will not render, if this is not done. For multiple animations, we recommend they be added to their own render jobs.
Cluster
The creation of pictures can be distributed to other computers connected to the network (cluster).
Enable Cluster - Enables the cluster.
Hostnames - Defines the clustering slaves. Hostnames and IPs can be used to access the slaves.
General Settings (tab)
In the General Settings tab, you can enter global parameters for antialiasing, the pixel filter, and other options.
Antialiasing
Computer screens are made of small pixels, which is why illustrations of round objects or curved surfaces appear faceted at their edges. Antialiasing is a technique that makes the edges from rendered objects less pixelated.
The Antialiasing settings control the number of samples taken during stillframe antialiasing. These are the primary controls that influence the quality of the rendered image.
Use Image Samples - Sets the number of samples taken during stillframe antialiasing. Higher values produce a cleaner result, while lower values reduce the render time. A value of 128 is a recommended starting point, in general, but may be too low for interior scenes with full global illumination.
Use Time - Sets the maximum duration for creating a single image.
Use Infinity Rendering in Viewport - Sets the calculation of the image samples as endless. If this box is not checked, there are as many image samples calculated as set in Use Image Samples (for example, 256 images) or as the calculation takes until the preset time is reached.
Start Update Render with ... Samples - Sets the number of samples at which the antialiasing render update starts. A value of 16 typically prevents grainy-looking progress samples from displaying. The render continues to calculate in the background.
Adaptive Sampling - Allows the raytracer to skip regions that are already smooth and focus the processing power on regions that are still noisy. The various quality settings control a threshold for a region to be considered as smooth. Setting the control to Highest Quality disables adaptive antialiasing and always samples each pixel with the number of image samples specified. While this gives the highest render quality, it may waste processing power and time on regions that are already smooth.
Preview Quality - Sets the sampling quality to a low level, resulting in preview render quality and short render times.
Low Quality - Sets the sampling quality to low level, resulting in average render quality and short render times.
Medium Quality - Sets the sampling quality to medium level, resulting in good render quality and medium render times.
High Quality - Sets the sampling quality to high-quality level.
Ultra High Quality - Sets sampling quality to a production quality level.
Highest Quality - Sets the sampling quality to the maximum available quality level.
Use Clamping - Activates clamping of bright pixels to eliminate white spots after antialiasing. The value sets the maximum value for a white pixel.
Important:Activating clamping and reducing the value reduces the maximum resulting image color range.
Denoiser - Provides options for reducing noise for raytracing on antialiased images. The denoise filter should also work with clusters.
- Off - No denoising is applied.
- CPU - Statistic-based denoising is applied and enables the Denoise Filter Threshhold parameter.
- Deep Learning Stillframe - Deep-learning-based denoising is applied during stillframe rendering.
- Deep Learning Always - Deep-learning-based denoising is applied during interactive and stillframe rendering.
Denoise Filter Threshold - Sets the threshold filter value for the level of noise reduction. It is only enabled when the Denoise CPU option is selected. The parameter can be set to values between 0 and 3. It controls the aggressiveness of the filter. The larger the value is, the more noise is removed and, simultaneously, more blurring artifacts may be introduced. Once set, click the Filter and Save Now button.
Limitations to the Denoiser
There are a few limitations to the Denoiser.
- It only works on Maxwell generation and up NVIDIA GPUs.
- Performance depends highly on the GPU used.
- Only sharp pixel filter variants work. Other pixel filters cause noise that isn't detected by the denoiser.
- Denoising in Display Cluster mode may cause seams between segments, since the whole image is required for it to work.
- Can consume a lot of memory. For example, a 4K image, about 2-3 GB of GPU memory is required. Memory requirements can exceed that of your GPU For high resolution rendering.
- Deep-learning denoising is only applied to all individual renderpasses. This can cause slight differences between the denoised beauty image and combined denoised images.
Filter and Save Now - Filters the current image in the viewport, using the threshold value specified. The filtered image is saved at the location specified in Render Settings > File Output (tab) > Image (section) > Filename and has the same format, as well. Its name is based on the filename specified there, with a suffix and the unfiltered original image is saved next to it.
Pixel Filter
A pixel filter weights the image samples taken per pixel and therefore, controls the antialiasing quality of the rendering. High image filter sizes may result in blurry images.
Filter - Contains the following filter options:
Box - The box filter is the simplest pixel filter. It weights each image sample equally. A size of 0.5 should be used for this pixel filter.
Triangle - The triangle filter linearly distributes the samples between the various pixels. It gives decent results and is therefore, the default pixel filter in VRED. It should be used with a size of 1.0 independent of screen resolution.
Gaussian - The Gaussian filter uses a Gaussian function to weight the samples. Samples near the center of a pixel receive a larger weight compared to samples further away from the pixel center. It gives slightly better results compared to the triangle filter in some situations. A size of 1.0–1.2 is recommended.
Mitchell Netravali - The Mitchell Netravali filter prevents blurring that may occur when using box, triangle, Gaussian, or bspline filter by sharpening the image. It gives the highest-quality result, but may have ringing on hard contrast edges. A size of 2.2 is recommended.
Lanczos - The Lanczos filter is a sync-based filter that does an optimal reconstruction of the image. It delivers sharp high-quality results, but may have ringing. A size of 2.5 is recommended.
Bspline - The bspline filter uses a bspline function to weight the samples. It gives results comparable to Gaussian filtering, but suffers less from blurring. A value of 1.3–1.5 is recommended.
Catmull Rom - The Catmull Rom filter creates sharp images, but may have ringing, just like the Lanczos and Mitchell Netravalli filter. A size of 2.5 is recommended.
Sharp Triangle - In this triangle filter variant, one sample affects only 1 pixel. This way, the first impression of the image looks sharper and the image noise is high frequency.
Sharp Gauss - In this Gauss filter variant, one sample affects only 1 pixel. This way the first impression of the image looks sharper and the image noise is high frequency.
Sharp BSpline - In this BSpline filter variant, one sample affects only 1 pixel. This way the first impression of the image looks sharper and the image noise is high frequency.
Size - Defines the number of neighboring pixels taken into account for sampling.
Options
Certain rendering features can be enabled or disabled globally.
Enable Photometric Parameters - Activates the photometrically consistent rendering pipeline to generate images containing realistic and reliable luminance information. The process chain includes photometric input values for light sources, environment maps, materials, cameras, clamping threshold, and the display luminance. Spectral data for light sources and incandescence are photometrically consistent and physically implausible parameters are removed from the user interface. This mode provides the means to reproduce the rendering, results in realistic luminance information on the display. Therefore, it is necessary to set up the display luminance parameter to match the current display, preferably using measured data. Also, adjust the clamping threshold and tone mapping parameters of the cameras, accordingly.
Enable Spectral Raytracing - Activates the spectral rendering pipeline for raytracing. The lighting simulation calculation uses spectral distributions for all the colors, instead of conventional tri-stimulus RGB values. The spectral information for the color channels of materials and light sources can be provided and edited by opening the respective color dialogs. See Choose a Color.
Illuminant - Sets the light spectrum considered to be white. Usually this value should be D65 to match daylight.
Equal Energy - Uses an equal energy spectrum as white. An equal energy spectrum has an equal value for all wavelengths.
D65 - Uses a D65 daylight spectrum as white.
Optimize for Many Light Sources - Allows the renderer to optimize the light calculation by slightly reducing the quality, which significantly increases the rendering performance. While the quality loss is not recognizable in most situations, some scenes may suffer from heavy noise, when this feature is selected. In such scenes, it can be necessary to disable the optimization to get a clean render result. In scenes with many light or geometry light sources, rendering may slow down.
Enable NURBS Raytracing - Enables VRED to render NURBS data without prior tessellation.
Cost Visualization - Analyzes where the most time is spent, while tracing an image.
BRDF Behavior - The new BRDF model is better at conserving energy. The weighting of the diffuse/glossy/specular layers should consider the glossy/specular colors, in addition to the fresnel reflectivity. The result does not show dark edges when a glossy color turns to black. Instead, it displays a purely diffuse material. This provides better fine-tuning of the specular reflections. For compatibility reasons, the old BRDF model can still be chosen from the list. Version 2014 and above does consider the glossy color to weight the diffuse color and avoid darkened edges.
Ver. 2014 and above
Ver. 6.0x and below
Number of CPU Cores - Sets the number of CPU cores used for raytracing. Sometimes, limit the number cores VRED uses is required, so some processing power is left for other applications. This setting is a runtime-only setting and does not influence cluster machines.
Raytracing Quality (tab)
In the Raytracing Quality tab, parameters for illumination, photon tracing, various sampling qualities, trace depth, and materials can be set globally.
Illumination Mode
Interactive/Still Frame- Enables the choice of different illumination modes for interactive and still frame rendering in raytracing. It allows working in a precomputed mode for fast interaction with the scene and automatic switching to full global illumination for still frame rendering. Five modes are available:
CPU Rasterization - This mode does not compute direct reflection, refraction, or any other sophisticated visual effect.
Precomputed Illumination - This mode is comparable with the VRED OpenGL rendering mode. It uses precomputed Ambient Occlusion and indirect illumination for rendering and calculates specular reflections and refractions and correct shadows from light sources.
Precomputed+Shadows - This mode uses precomputed image-based lighting and indirect illumination, but doesn’t use precomputed Ambient Occlusion values. Instead, it calculates shadows based on the active environment.
Precomputed+IBL - This mode uses precomputed indirect illumination and samples the environment.
Full Global Illumination - This mode doesn’t use precomputed values, but accurately samples everything in a physically-based approach. Other features, like Photon Mapping, require the render mode to be set to Full Global Illumination.
Photon Tracing
Photon Tracing provides an approach to calculate the global illumination of a scene. The default full global illumination mode in VRED provides high-quality results, but may require longer calculation times. Photon Tracing can reduce the time required to render a clean image by a larger margin, especially in indoor scenarios, such as car interiors or architectural indoor scenes.
Mode - VRED provides different photon mapping modes.
Off - Disables Photon Tracing and uses the default full global illumination algorithm in VRED.
Indirect Only - Uses Photon Tracing to calculate the indirect illumination in a scene. This is the most common mode.
Caustics + Indirect - Uses Photon Tracing to calculate indirect illumination and caustics due to specular materials in a scene.
Trace Depth - Sets the trace depth of the photon tracer.
Interactive Count/Still Frame Count - Specifies the number of photons sent into the scene for each image sample. Specifying a photon count of 100,000 photons, while having set the image samples set to 256, results in 25,600,000 photons send into the scene for a frame. The higher the number of sent photons, the less pixelated the output is.
Use Automatic Photon Radius - Uses a pre-process to lookup the 16 closest photons for each photon in the scene and calculates two times the average lookup radius. This feature works for most situations.
Photon Radius - Specifies the radius around a hitpoint used by the raytracer to look for photons. A larger radius allows the raytracer to find more photons, but may result in slower lookup times.
Interactive Final Gather/Still Frame Final Gather - There are two ways to use the photon map. The first approach is always used for caustic photons. It gathers photons around a hitpoint to calculate the incoming illumination. This approach gives fast interactive performance and can calculate all light paths in a scene, but it may require a high photon count to get a clean image. The other approach is to use final gathering. In final gathering, a one bounce indirect illumination is performed before evaluating the Photon Maps. This is the default Photon Tracing approach in VRED since it generates high-quality images in a short time. Setting the final gather quality to Off enables the first approach while setting it to any other value uses the second approach.
Final Gather Radius - Sets the lookup radius used to find the nearest final gather point during Raytracing. Using a smaller radius increases performance, but requires more photons to avoid dark regions.
Note:To evaluate the final gather points, use the Indirect Illumination Rendering with photon mapping and final gathering turned on. For a good quality result, the final gather points should have few black regions where no photons are stored.
Final Gather Refresh - Setting the Final Gather Quality (Interactive Final Gather/Still Frame Final Gather values) to 1 or higher, the update frequency of the Photon Map may be set. By default, the Photon Maps are updated for each image sample, sending many photons into the scene. If Final Gather Quality is set to Off, it is often sufficient to update the Photon Map only once per frame and use it for each image sample to reduce the render times.
On Each Sample - Updates the Photon Map for each image sample. This is the default setting, since it also works for scenes with animated objects that may otherwise cause flickering.
On Scene Change - The Photon Map is updated once per frame, unless Motion Blur is activated. Since caustics require many photons, the Caustic Map is still updated for each sample, while the indirect illumination Photon Map is only updated once. This setting often results in the best rendering performance, but requires a much higher photon count to receive artefact-free results, particularly when rendering scenes with animated objects. The result may flicker in regions with a low photon count. This is why this mode should only be used for scenes with static geometry and materials.
Use Final Gather for Glossy Reflections - When activated, glossy reflections are evaluated by the final gather map, rather than path tracing. This reduces the render time, but results in less accurate reflections.
Disable Automatic Updating of Photon Map - When activated, the photon map is not automatically updated.
IBL Sampling Quality
Interactive - Sets the interactive IBL sampling quality.
Still Frame - Sets the still frame IBL sampling quality.
Reflection/Refraction Sampling Quality Settings
Interactive - Sets the interactive sampling quality of reflections and refractions.
Still Frame - Sets the still frame sampling quality of reflections and refractions.
Trace Depth
Interactive - Sets the interactive amount of reflection and refraction each ray may encounter.
Still Frame - Sets the still frame amount of reflection and refraction each ray may encounter.
Material Overrides
Each material can bring its own settings for material properties, illumination mode, IBL sampling quality, reflection/refraction quality, and trace depth. For each material, different overrides can be set separately in the Material Editor's Raytracing Settings.
Predetermined, all overrides are globally activated. That means, you can use different render settings for each material. This can be deactivated here, so the special material settings are ignored.
Allow Material Overrides - Overrides the global allow material setting for interactive or still frame rendering.
Illumination Mode Override - Overrides the global set illumination modes for interactive or still frame rendering.
IBL Sampling Quality Override - Overrides the global IBL Sampling quality for sampling the environment map.
Reflection/Refraction Quality Override - Overrides the global sampling quality for reflections/refractions.
Trace Depth Override - Overrides the global set trace depth modes for interactive or still-frame rendering.
Display Output (tab)
In the Display Output tab, several parameters can be defined globally for color, histogram, and visual support.
Color
Monitor Luminance (cd/m²) - This setting is only available when the checkbox Enable Photometric Parameters is active under General Settings > Options. Sets up the luminance value of the preferred display. When using photometric parameters, the actual monitor luminance is necessary to reproduce the rendering results with realistic photometric values on the display device.
Monitor Colorspace - Contains the following colorspace options:
Simple Gamma
sRGB IEC 61966-21
A.RGB 98
Monitor ICC Profile
Improve Color Depth - Increases the range of effect and correction commands for the color depth.
Dynamic Tonemapping - Maps one set of colors to another, approximating high-dynamic range images to make an image look better and full of detail. It reduces tonal values.
Histogram
Shows the relative color distribution of the rendered image. This tool is useful to detect overly bright areas of light. Different modes are available. It can use logarithmic and linear display scales.
Show Histogram - Enables each color distribution to be viewed separately.
Red - Shows histogram of red image channel.
Green - Shows histogram of green image channel.
Blue - Shows histogram of blue image channel.
Logarithmic Scale - Uses a logarithmic scale for the histogram values.
Grayscale - Shows the luminance histogram of the rendered image.
Visual Support
Show Snapshot Frame - Draws a yellow frame into Render View, indicating the target image to be rendered. After activation, all the following settings are available.
Show Region Render Frame - Draws a green frame into the Render View dependent on the values of the region start XY and region end XY input fields.
Show Rule of Thirds Guide - Draws orange guide lines into Render View, allowing to use the rule of thirds.
Show Inner Frame - Draws an orange frame in the Render View, indicating the area where text or graphics show neatly.
Unit - Defines the distance unit of the inner frame by percent or in pixels.
Left - Right - Sets the distance of the left and right side.
Top - Bottom - Sets the distance of the top and bottom side.
Render Summary
The Render Summary is above the Send to Cluster Queue, Add to Render Queue, and Render buttons. Get more contextual information about the render and how long it could take. Get the total number of images and renders.
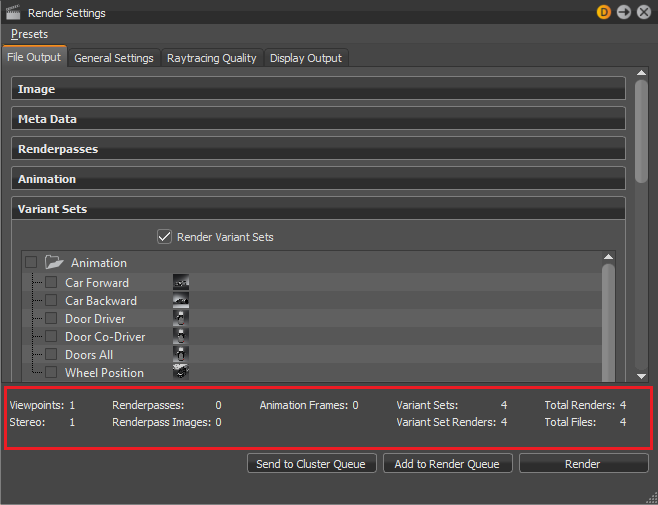
The same information is also available in the Render Queue, just in a different format.
To Start Image Calculations
Click one of the following button, which appear at the bottom of the module, to start image calculations.
Send to Cluster Queue - Renders to the Cluster Queue; however, you must be logged into the Cluster Manager before sending anything to the Cluster Queue. See To Manage Cluster Rendering.
Add to Render Queue - Creates a job from the current camera view and adopts last settings from the render module, after submitting the Render Queue Window opens. Image names cannot be changed, since there are multiple jobs being rendered. A notification appears if rendered images are going to be overwritten.
Render - Creates the image or movie with current settings. An image's name can be changed during this process.