DWG Compare
Your Civil 3D drawings go through multiple revisions and edits before the final product. If you have many versions of a drawing, it can be difficult to keep track of all the changes made to it.
In this Have You Tried article, we’ll take a closer look at the DWG Compare feature in Civil 3D. DWG Compare isn’t new, but if you have never used it, you might want to find out how it can organize your workflow.
In each Have You Tried article, we profile a useful feature or workflow in Civil3D. We look across what's new, what's been around for a while, and identify features that could improve your experience with Civil 3D while making you and your team more productive.
Do you have a feature you want to see covered? Tell us about it in the comment section after providing your feedback at the bottom of the page.
What is it?
The DWG Compare feature analyzes changes made between two Civil 3D drawing files and highlights changes in the current drawing.
This feature identifies objects in the drawing that have been modified, added, or removed. These changes are highlighted using a color-coding system and revision clouds in the Comparison Drawing.
Why use it?
As you work through the design process, it can be difficult to remember the individual changes you've made to a Civil 3D drawing since the last revision. Using the Compare DWG function, changes in the drawing are visually presented in the form of color-coded markers and revision clouds. This tool can be helpful in quickly reviewing changes and identifying clashes between the two drawings. While the differences between your drawings may be small, the effects of a small change could prove to be substantial.
Video: Have You Tried DWG Compare
Where do you find the tool?
The Compare DWG tool can be accessed by using any of the following methods:
- Click the Collaborate tab
 Compare panel DWG Compare
  .
. - Click Application menu Drawing Utilities DWG Compare .
- Enter COMPARE in the Command window.
How does it work?
After selecting the DWG Compare tool, you'll be prompted to specify the drawing file that you want to compare with the current drawing.
The DWG Compare toolbar appears and the comparison results are displayed in the current drawing.
It's important to note that if you have a layer that is turned off or frozen in your current drawing, it will not become part of the comparison result.
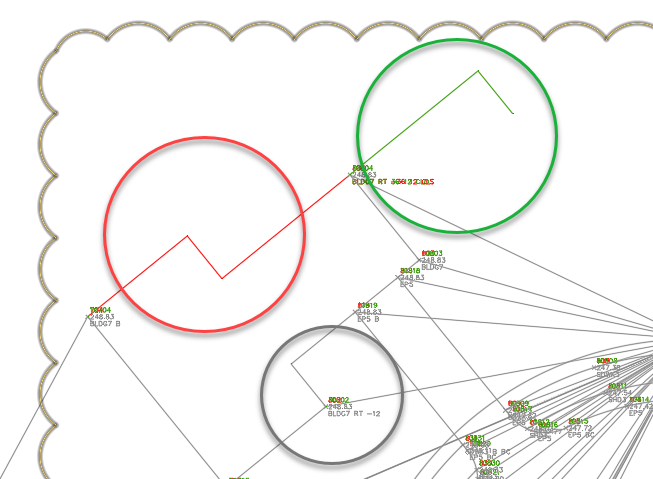
Differences between the comparison drawing and the current drawing are grouped by proximity into change sets that are surrounded by revision clouds. Revision clouds are used to highlight the differences between the compared files and color-coding is used to identify differences between the drawings.
DWG Compare Color-Code System
Differences in the compared drawings are marked using a color-coded system:
| Red | Objects that are only in the compared drawing. |
| Green | Objects that are only in the current drawing. |
| Gray | Objects that are common to both drawings. |
The DWG Compare Toolbars
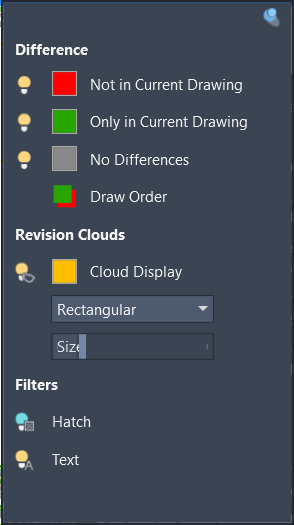
The DWG Compare toolbars provide several options to review and control the comparison result. These options include the ability to toggle the comparison results on or off, import objects, export snapshots of the comparison results, and zoom in to the differences between the drawings.
Toolbar 1
| Command | Result |
|---|---|
| Difference | Click the lightbulb next to the Not in Current Drawing or Only in Current Drawing options to toggle the visibility of the differences between the current drawing and the compared drawing. |
| Draw Order | Reverses the draw order between overlapping objects in the current drawing and the compared drawing. |
| Revision Cloud Display | Click the lightbulb icon to toggle the visibility of the revision clouds. To change the shape of the revision clouds, select Rectangular or Polygonal from the Revision Clouds drop-down list. To change the offset distance between the change sets and the revision clouds, use the Size slider. The size of the change sets is determined by the proximity of the changed objects compared to the size of the revision clouds. |
| Filters | Filters provide a way to exclude text or hatch objects from the comparison result. |
Toolbar 2

| Command | Result |
|---|---|
| Toggle the Comparison Results | Click the lightbulb button to hide the comparison results temporarily as you work in the current drawing. |
| Navigate Between Change Sets | Click the right and left arrows to zoom into the next or previous change set. |
| Import Objects | Click Import Objects to import selected objects from the compared drawing in to the current drawing. |
| Export a Snapshot | Click Export Snapshot to combine the two drawings into a new drawing file for a later review. |
End the Comparison
Click Exit Compare to end the comparison and close the DWG Compare toolbars.