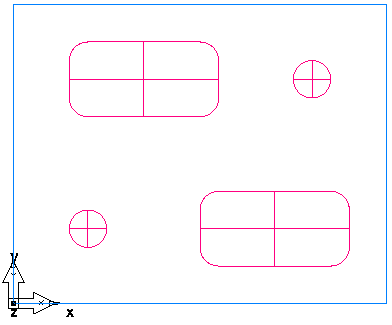
This step shows how to create Hole and Rectangular Pocket features.
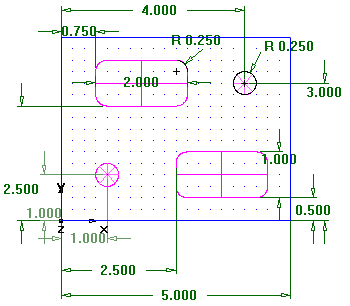
Inches:
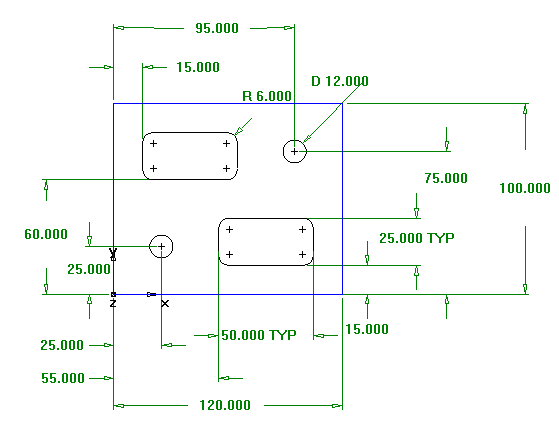
Millimeters:
- Create a Hole feature.
- Select Home tab > Part Program panel > Features.
- In the New Feature wizard, select Hole in the From Dimensions section, and click Next.
- Enter a Diameter of 0.5 (12 mm), and click Next.
- Enter a hole center location of
X
1.0 (25
mm) and
Y
1.0 (25
mm), and click
Next.
This displays the Strategies page. This page controls the types of operations used to cut the feature. The default operations for a Hole feature are to spot drill and then drill the hole. If the Hole has a chamfer, the default is to cut the chamfer with the spot drill operation.
- Accept the default strategy settings by clicking
Next.
The Operations page shows a summary of the operations to cut the feature, the automatically selected tools, and the feeds and speeds.
- From the Finish menu button select the Finish option.
- Create a Rectangular Pocket feature.
- Select Home tab > Part Program panel > Features.
- In the New Feature wizard, in the From Dimensions section, select Rectangular Pocket, and click Next.
- Accept the default dimensions by clicking Next.
- Enter a pocket location of
X
0.75 (15
mm), and
Y
2.5 (60
mm), and
Z
0 (0
mm), and click
Next.
The Strategies page shows that roughing and finishing operations are created.
- Click the Finish button.
- Select Home tab > Part Program panel > Features and create a second Hole with a diameter of 0.5 (12 mm), located at X=4 (95 mm) and Y=3 (75 mm).
- Select Home tab > Part Program panel > Features and create another Rectangular Pocket the same dimensions as the first, but positioned at
X=2.5 (55
mm),
Y=0.5 (15
mm).
- Select File > Save, and save the part as milling.fm.