From Dynamo, you can make more study types for use with Generative Design in Revit.
Each study type in the Create Study dialog originates as a Dynamo graph. The Dynamo author creates the logic required to define and explore a particular design challenge. After refining and testing the graph, the author then exports it for use as a study type with Generative Design in Revit. See Workflow: Generative Design.
Adding a study type is typically performed by someone who is familiar with Dynamo for Revit. See Generative Design for the Dynamo Author.
To add study types to the Create Study dialog in Revit
- Use
Dynamo for Revit to create and test the graph.
The graph must follow specific rules for use with Generative Design in Revit.
- Inputs and outputs have unique names.
- Inputs are set to "Is Input".
- Outputs are set to "Is Output".
- Additional requirements are satisfied. For complete details, see Generative Design Primer: Setting up a Graph.
- If needed, use File
 Save As to save the graph with a new name.
When you export a graph, any previous graphs with the same name are overwritten.
- In
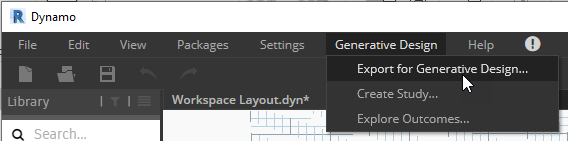
Dynamo for Revit, click Generative DesignExport for Generative Design.
- If the dialog displays "First run the graph," click Run.
This allows Dynamo to validate the graph before exporting it.
- If the dialog lists any issues, resolve them before proceeding.
For example, you may need to set nodes as inputs or outputs, or fix name conflicts. See Generative Design Primer: Setting up a Graph.
- Complete the fields to provide a description and an image.
This information appears in the Create Study dialog in Revit to describe the study type.
- At the bottom of the dialog, select one of the following:
- Keep cached data: This option retains any data in the study that's specific to the Revit model you have been using with the graph. When someone creates a study, it uses this data unless they specifically change it.
- Clear cached data: This option removes any data in the study that's specific to the Revit model you have been using with the graph. When someone creates a study, they are prompted to select new data in their current model.
- Click Export.
The graph is exported to the folder indicated in the dialog, along with any dependencies needed to run it. As long as the graph resides in that folder, it appears as a study type in the Create Study dialog.
The Dependencies folder contains the following:
- info.json: the study type description that appears on the Create Study dialog
- study_type.png: the thumbnail image that appears on the Create Study dialog
- packages: a folder containing the Dynamo packages used by the graph
- definitions: a folder containing any exported custom nodes
- Share the study type with team members.
If other team members want to use the new study type, send them the exported DYN file and its Dependencies folder. Ask them to place the files in the following location on their computers:
C:\Users\<username>\Documents\AEC Generative Design
Note: While you can share study types with team members, generated outcomes cannot be shared with others.