About the Camera Editor
Scene > Camera Editor
Use the Camera Editor to create and manipulate cameras, as well as modify camera properties in VRED. See a list of all cameras within a scene. The Camera Editor makes all camera-related property settings accessible. In addition to the simple UI camera settings, more advanced attributes are available, such as exact camera lens characteristics and custom projections, and camera properties.
Another way to access the Camera Editor is to right-click the empty space next to the Quick Access Bar and select it from the list.
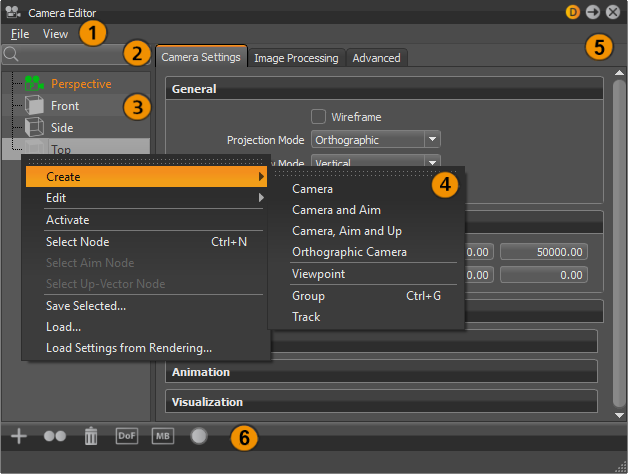
The Camera Editor has a left and right side. The left houses the Menu Bar, Tree View and Search field. The right contains three tabs, Camera Settings, Image Processing, and Advanced. Along the bottom of the editor is the Icon Bar.
 Menu Bar
The menu bar contains two menus, File and View. Use these options for saving, loading, and viewing.
File
This menu is found along the top of the Camera Editor, just above Search.
Save Selected
Writes selected data to disc. Save Selected supports saving a camera and viewpoints. The .osb file format supports saving a camera with camera tracks and viewpoints. XML only supports saving the selected camera or viewpoint.
Load
Reads stored data from disc. The loaded data is added as new cameras or viewpoints.
Load Settings from Rendering
Loads settings from a rendered image (.jpg, .png, .tiff, .exr) that includes meta data and applies it to the selected camera or viewpoint.
View
This menu is found next to File, along the top of the Camera Editor, just above Search.
Render Viewpoint Previews
Renders previews for the viewpoints of the active camera.
 Search Field
Searches the Cameras Tree View to find whatever you are looking for.
 Cameras Tree View
The Cameras Tree on the left, lists all scene-contained cameras, camera tracks, and viewpoints. Cameras can be grouped. Double-clicking a camera activates and connects it to the Render Window.
 Context Menu
Right-click within the Camera Tree to access the context menu.
Create
Provides the following creation options:
Camera
Creates a camera with a perspective view. Perspective View is similar to the view of human eyes. Objects further away seem smaller than objects right in front.
Camera and Aim
Creates a separate node for the camera and aim. Each node is selectable and can be moved in the Render Window.
Camera, Aim and Up
Creates a separate node for the camera, aim, and up. Each node is selectable and can be moved in the Render Window.
Orthographic Camera
Creates a camera with an orthographic view.
Viewpoint
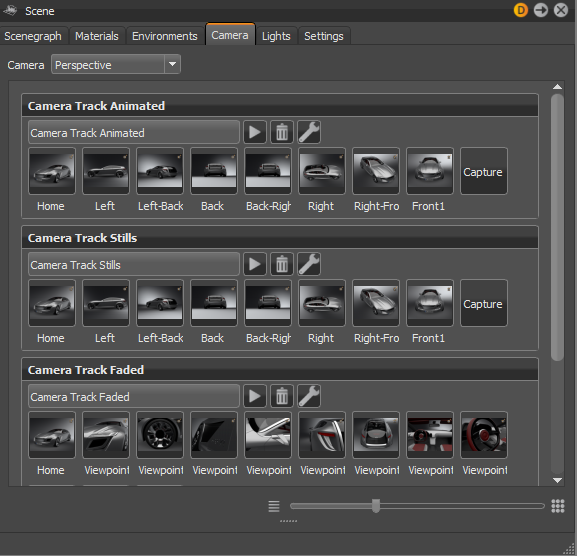
Creates a bookmark for the viewpoint, capturing the position and orientation of the camera(s). A camera track, which stores the viewpoints, is created below the camera.
Group
Creates an empty group. Drag and drop cameras into the group.
Track
Enables you to use the camera animation within the Clip Maker. To do so, create an animation block inside the Curve Editor. Drag the camera block into the Clip Maker to use it.
Edit
Provides the following editing options:
Rename
Renames the selected camera, view point, track, or group.
Duplicate
Duplicates the selected camera, view point, track, or group.
Delete
Deletes the selected camera, view point, track, or group.
Copy Attributes
Copies all the attributes of the selected camera to the clipboard.
Paste Attributes (sub menu)
Provides the following pasting options:
All - Pastes all attributes.
Viewing - Pastes only the camera view attributes.
Camera Attributes - Pastes the general camera attributes.
Tonemapping - Pastes only the camera tone mapping attributes.
Color Correction - Pastes only the camera color correction attributes.
Glow - Pastes only the camera glow attributes.
Glare - Pastes only the camera glare attributes.
Blending - Pastes only the camera blending attributes.
Mirror X, Mirror Y, and Mirror Z
Pastes only the X, Y, or Z mirror reflection of the camera.
Set to Current View
Updates selected viewpoint with the current position and orientation.
Reset View
Resets the view to its initial settings.
Activate
Activates the selected camera and connects it to the Render Window.
Select Node
Selects camera node in the Scene Graph.
Select Aim Node
Selects camera aim node in the Scene Graph.
Select Up-Vector Node
Selects camera up-vector node in the Scene Graph.
Save Selected
Saves the selected camera to an .osb file.
Load
Loads cameras and settings from an .osb/.vpe/.vpb file.
Load Settings from Rendering
Loads settings from a rendered image (.jpg/.png/.tiff) including the meta data.
 Camera Parameters
This section of the Camera Editor has three tabs. All parameters for camera settings are listed in the Camera Setting tab. Image processing parameters are in the Image Processing tab and advanced settings are in the Advanced tab. Select a camera to load its parameters.
 Icon Bar
Use the icons in this toolbar to create, duplicate, or delete a camera, viewpoint, track, or group, as well as toggle different camera and viewpoint attributes.
How to Create a Camera
Select Create. This creates a camera, camera and aim, camera, aim, and up, orthographic camera, viewpoint, track, or group.
How to Duplicate a Camera
Select Duplicate. This creates a copy of the current selected camera, viewpoint, track, or group.
How to Delete a Camera
Select Delete. This deletes the current selected camera, viewpoint, track, or group.
How to Toggle the Depth of Field
Select Toggle DOF. This toggles depth of field for the selected camera or viewpoint.
How to Toggle Motion Blur
Select Toggle MB. This toggles Motion Blur for the selected camera or viewpoint.
How to Toggle a Glow
Select Toggle Glow. This toggles the glow effect for the selected camera or viewpoint.