WebInterface Preferences
Activate the VRED Professional internal Web Server and turn on debug mode, if necessary. Activating the Web Server allows the execution of remote Python commands. A local firewall is recommended.
In the Menu Bar, click Edit > Preferences, then on the left side of the dialog box, select WebInterface.
Base
Enable Web Server
Makes it possible for the execution of remote Python commands. When selected, the following options become available.
Port
Displays the server port. This is where ssl and non-ssl requests are handled.
Encrypted HTTPS Only
Makes VRED reject unencrypted connection requests, when enabled. Set this option so there is no unencrypted communication between VRED and a web browser.
Secure Python
Allows the execution of Python commands from remote locations, when enabled.
Enable Debug Mode
Enables enhanced logging in the VRED terminal.
Certificate File
Generates a self-signed certificate. You will need to define the certificate to use, then define which certificates your browser trusts. This is done using a self-signed certificate. Install this certificate in the Windows Certificate Trust Store, to avoid browser warnings about invalid untrusted certificates.
 Select Certificate File - Defines the certificate used.
 Create Self-signed Certificate - Opens the Create Self-signed Certificate dialog to create a self-signed VRED certificate to use to sign individual VRED webserver instances.
 Certificate Information - Opens the Certificate Information dialog and provides information about the certificate, like version, serial number, and validity.
Custom Web Root Directory
These options are for enabling and setting a custom web root directory. If you write your own web applications with an embedded VRED Stream, like our VREDStreamApp that can be accessed via web browser from any device, store the custom webpages in a local file location. Define this in Directory, so the VRED WebServer can execute the webpage.
Custom HTML should not be called index.html, as this is already in use for our VRED Hub page. After the directory is set to your custom page in the preferences, for example, MyIndex.html, access the page from any device using the following URL: http://hostname:8888/MyIndex.html.
We have also added new URL properties for the VRED Stream and it is now possible to set fullscreen, disable keyboard input, and disable navigation directly in the URL.
Enable File Access
Enables file access to the custom web root directory specified in the Directory option.
Directory
Only available when Enable File Access is enabled.
Specifies the web root directory for accessing files.
Select Web Root Directory - Defines the web root directory used.
Host Access
These options set which sources the web browser will trust.
Restriction
Determines whether there are restrictions as to which sources your web browser will trust.
- No restriction - Doesn't place any restrictions. The web browser trusts all sources.
- Local host - Denies access to all other hosts, except localhost. The web browser only trusts localhost.
- Host list - Makes it possible for the host names to be entered. The web browser will trust any sources from one of the hosts listed.
Host List
When the restriction Host list is set, this enables the Host List field, where you can enter hosts that will be trusted by the web browser.
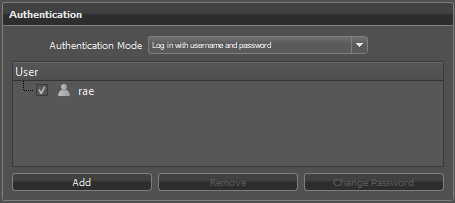
Authentication
Adds an extra layer of security, but requiring a user to log in and enter a password.
Authenication Mode
If you don't want any authenication for the Web Server, select No Authentication. To set a user and password and add another layer of security, select Log in with username and password.
How to Generate a Self-signed Certificate
VRED has added a self-signed VRED certificate authority. Use this certificate to sign individual VRED webserver instances. You will need to create a certificate, define access, and if needed, set authentication.
Creating a Self-signed Certificate
Select Edit > Preferences > WebInterface.
Next to Certificate File, click
to define the certificate to use.Click
(the Create self signed certificate button) to create a certificate, enter a unique name for the certificate, and click Save.In the Host Access section, in Restriction, set which source the web browser will trust.
In the Authentication section, change Authenication Mode to Log in with username and password.
Click the Add button, then add a username and password.
Click OK. The new user will appear in the User section.
Cross-Origin Resource Sharing (CORS)
This features provides a way for a web application running on VRED to access content from another website, to do something such as play a YouTube video.

Enable Cross-Origin-Requests
Enables resources on a web page to be requested from another domain outside the domain from which the first resource was served.
Allowed Origin
Only available when Enable Cross-Origin Requests is enabled.
Enter the URL domain to be displayed by cross-origin request sharing in the WebInterface.
Cross-Origin Resource Sharing (CORS) for the VREDServer
Cross-Origin Resource Sharing (CORS) was also implemented for the VREDServer in some requests within vrWebInterface.cpp.
HTTP Headers for CORS
These are the HTTP headers for cross-origin request sharing:
Preflight (OPTIONS)
Access-Control-Allow-Origin: *
Access Control Allow methods: GET,HEAD,PUT,PATCH,POST,DELETE
Access Control Allow Headers: content-type
Actual request (GET)
Access-Control-Allow-Origin: *
How This Works
If the HOST or PORT is different from the one running the current website/web application and the web application tries to send a request to this other host via Javascript, the HOST will agree to the request. Otherwise, the browser will not send the request.
The browser asks the different HOST or PORT in a preflight request with the HTTP method "
OPTIONS", if the HOST agrees. If it responds with the HTTP headers as in Preflight above, then it looks to the actual request.The browser sends the actual request. Here, too, an HTTP header must be included as above in Actual request This must be set; otherwise, the browser will not process the response.
For additional information on the headers and how they work, visit Access-Control-Allow-Origin and Cross-Origin Resource Sharing (CORS).