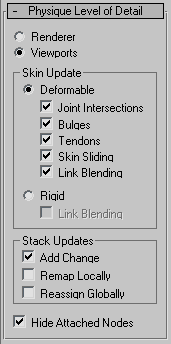
Controls in the Physique Level Of Detail rollout not only optimize the viewports, but also affect the rendered result. The primary purpose of this rollout is for troubleshooting.
After you create bulge angles and tendons, you can turn off their influence to see exactly what they add to the deformation of the skin. This rollout also has controls for how changes in the modifier stack below Physique are handled.
Procedures
To troubleshoot bulges and tendons:
-
 Select the mesh of a character that has bulges or tendons.
 - Go to the
 Modify panel.
 - On the Physique Level Of Detail rollout, in the Skin Update group, make sure Deformable is chosen.
- Turn Bulges off, then on. Do the same with Tendons.
Examine the mesh with and without the influence of bulges and tendons.
- Use the Bulge Editor or the sub-object levels to adjust bulge and tendon settings.
Interface

- Renderer
- When chosen, settings in the Skin Update group affect rendered images.
- Viewports
- When chosen, settings in the Skin Update gropu affect viewports.
Skin Update group
- Deformable
- When chosen, Physique deformation is active. Deformable yields the highest-quality rendering. The Deformable toggles are unavailable unless Deformable is chosen.
- Joint Intersections Turn off to remove joint intersection influence. Joint intersection influence allows the mesh to overlap itself; for example, at the elbow and knee joints. Default=on.
- Bulges Turn off to remove any bulge angle influence. Default=on.
- Tendons Turn off to remove any tendon influence. Default=on.
- Skin Sliding Turn off to remove skin sliding influence. Default=on.
- Link Blending Turn off to remove the influence of link blending. Default=on.
- Rigid
- When chosen, forces all vertices to use Rigid assignments rather than Deformable. This is an easy way to isolate deformation problems. It also provides the quickest viewport redraw speed. You might choose this option while adjusting the animation of your skeleton.
- Link Blending Turn off to remove the influence of blending on rigid links. This toggle is unavailable unless Rigid is chosen. Default=on.
Stack Updates group
The controls in this group handle changes to vertex count that arise from (nonanimated) changes to the modifier stack.
If the vertex count changes, vertices are reassigned globally. Add Change adds in changes based on the vertices' initial position. The other options reset the initial position at each frame to do the remapping and reassigning. For this reason, turning on Add Change or making nonanimated stack changes should always be done at the initial position (Figure mode or frame 0).
- Add Change
- Adds in changes from the stack and then applies Physique deformation. No vertex remapping or reassigning is performed. Default=on.
This option will generally give you the deformation you want. There is no performance penalty (from Physique) when this option is used.
- Remap Locally
- For deformable vertices, this resets the vertex position on the Physique deformation spline used for bending, as well as the link position used to interpolate twist. For rigid vertices, this option resets the link position used to interpolate twist. Default=off.
When vertices are sliding along the length of the spline and you want them to bend and twist based on the spline position, but don't want vertex weights to change, turn this option on.
- Reassign Globally
- Re-weights, and resets the position on the spline used for bending for moved vertices globally. The vertex link assignment, weighting, and spline position are reset for all moving points on every frame. (This is equivalent to Physique 2.2.) This option is like reinitializing on every frame. Default=off.
When vertices are moving to different envelopes and you want them reassigned to the new envelopes, use this option.
- Hide Attached Nodes
- Toggles the display of the underlying skeletal system. This allows you to hide and unhide the biped, for example.