The Autodesk 3ds Max Asset Library is a standalone application for browsing and organizing libraries and assets both locally and online. Using the Asset Library, you can quickly access your material from any added location and then drag and drop files directly into a scene. You can download Asset Library for free from the Autodesk App Store or install the program using the Content menu of 3ds Max. Once installed, launch the application from the desktop or choose Content > Launch Autodesk 3ds Max Asset Library.
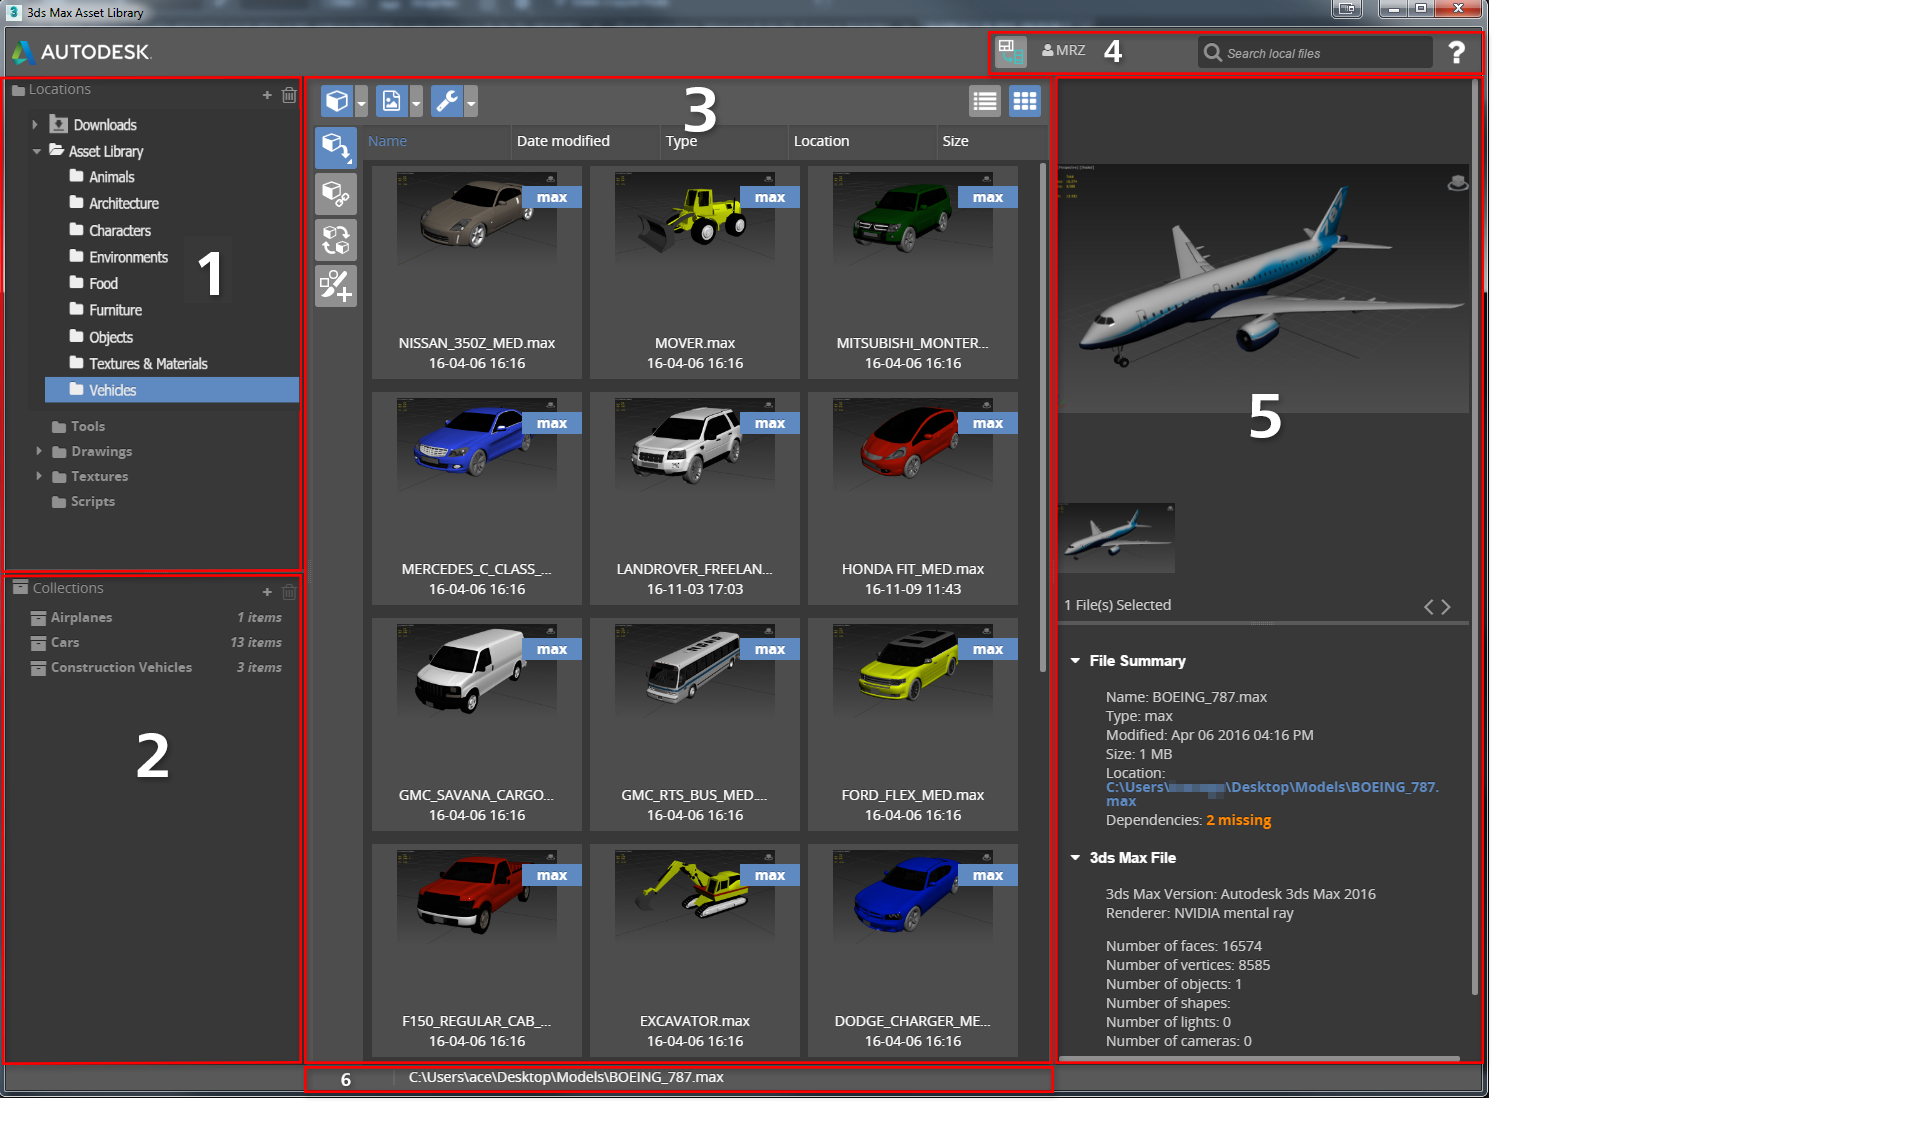
Asset Library interface
- Locations Panel
- Collections Panel
- Asset Panel
- Main Toolbar
- Preview Panel
- Status Bar
Locations Panel
Use to browse assets locally. Multiple locations can be added and deleted (except default locations). Any missing or renamed folders are shown with an exclamation mark.
Collections Panel
Use to organize assets into collections to save and share with others. New collections can be added while existing collections can be deleted. Only downloaded content may be added to a collection.
When a collection is imported, any inaccessible assets will be shown with an exclamation mark (for example, files located on another network). For more information on importing collections, see Using the Asset Library.
Asset Panel
Use to browse assets and import them into 3ds Max. Filter by file type, set merge and import options, and toggle file display. For more information, see Using the Asset Library.
Filter options
To exclude specific file types from the filters, click the arrow to the right of the filter button and from the drop-down menu uncheck each format to be hidden.
Filter buttons are blue when on. When a filter button is gray, all files of its type are shown.
-
 Filter 3D Objects
- Turns on the 3D objects filter, removing all unchecked files types authored in 3D programs such as 3ds Max, AutoCAD and Revit.
-
 Filter Textures
- Turns on the Textures filter, removing all unchecked 2D image and video file types.
-
 Filter Tools
- Turns on the Tools filter, removing all unchecked miscellaneous supported file types (for example, scripts). Unsupported files may be browsed within Asset Library but not added to 3ds Max.
Import options
Option buttons are shown in blue when enabled and greyed out when not applicable for the currently-selected file type.
-
 Merge/Import
- Applies the Merge option to incoming 3D objects or imports other supported file types into a 3ds Max scene.
-
 Xref
Xref
- Applies the Xref option to the incoming 3D file. Files added with the Xref option cannot be edited within 3ds Max. This option is only available for 3D objects.
-
 Replace
- Replaces any objects selected in 3ds Max with the incoming asset. This option is only available for 3D objects.
-
 Object Paint
- Adds the asset to a 3ds Max scene at the position clicked in a viewport. You can add multiple copies of the asset by clicking again. This option is only available for 3D objects.
Display options
Sort search results by a specific parameter by clicking either Name, Date Modified, Type, Location, or Size column headers. Click the desired parameter again to sort the files in descending order.
-
 List View
- Displays the filtered assets in List view, which shows file location and size information.
-
 Thumbnail View
- Displays the filtered assets in Thumbnail view, which shows a preview of the assets.
Thumbnail View options
With Thumbnail View enabled, move the cursor over an asset to display the following icons:
-
 Edit Asset Tags
- Opens the Tag Editor where you can add searchable tags to the asset. For more information, see Tag Editor in Using the Asset Library.
-
 Show In Explorer
- Shows the location of the file in Windows Explorer.
-
 Manage External Dependencies
- Opens the Manage External Dependencies dialog. For more information, see Managing External Dependencies.
Right-click options
With either Thumbnail or List View enabled, right-click an asset to display the following menu options:
- Show In Explorer
- Shows the location of the file in Windows Explorer.
- Manage External Dependencies
- Opens the Manage External Dependencies dialog. For more information, see Managing External Dependencies.
- Edit Asset Tags
- Opens the Tag Editor where you can add searchable tags to the asset. For more information, see Tag Editor in Using the Asset Library..
- Copy Tags
- Copies tags belonging to the selected asset to the clipboard.
- Paste Tags
- Assigns any copied tags to the selected asset.
- Remove Asset Tags
- Removes all tags belonging to the object.
- Thumbnail Preview Display
- Shows one or more thumbnails of the asset in the Preview panel.
- Texture Map Preview Display
- Shows associated texture maps for the asset in the Preview panel.
Main Toolbar
Use the main toolbar to toggle layout, access account options, search for assets, and get help.
-
 View Toggle
- Toggles between horizontal and vertical layouts.
-
 Accounts Button
- Manages accounts and connects to external partnered stores:
- Select Sign In/Out to sign in or out of your Autodesk A360 account.
- Select Account Details... to open the Autodesk User Profile dialog, where you can view account details, edit your profile, or change your password.
- Select External Stores... to open the Connect to External Stores dialog, where you can connect to supported stores or disconnect from an existing one.
-
 Search field
- Use to search for assets in locations and collections. The currently-selected location or collection is shown in the field. Supports wildcard characters and special searches for numbers of faces, cameras, lights, objects, shapes, and vertices. For more information, see Using the Asset Library.
-
 Help button
- Use to access online help, provide feedback, see software version and data collection information, or check for software updates.
Preview Panel
Use the Preview panel to add, remove, and set thumbnails to the currently selected asset, and toggle between thumbnail and texture map display.
In addition, you can preview the selected asset and its metadata information. For .max files, version and renderer information is shown as well as the number of faces, vertices, and other model details. Missing dependencies are also shown. Bitmap metadata includes dimensions, resolution, and bit depth.
For Creative Market assets, pricing and licensing details are shown as well as any additional product information and links.
Status Bar
Shows the path of the currently-selected file and any relevant information.