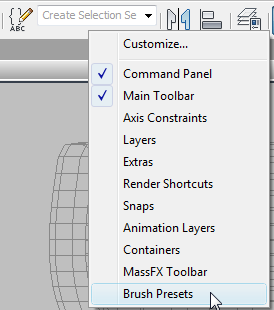
The Brush Presets toolbar gives you quick access to up to 50 different brush settings for use with paint-oriented tools.
Brush settings on this toolbar apply to the following tools:
- Paint Deformation (Edit/Editable Poly)
- Paint Soft Selection (Edit/Editable Poly)
- VertexPaint modifier
- Skin modifier
You can also use the toolbar to create new presets and to open the Brush Preset Manager, which lets you edit presets, and save and load groups of presets. The current group of presets is saved when you quit 3ds Max and is restored the next time you start 3ds Max.
Procedures
To use the Brush Presets toolbar:
- Access any of the brush tools listed above.
The tool starts with a default brush.
- Right-click an empty area on a toolbar, such as the main toolbar below the Named Selection Sets drop-down list, and choose Brush Presets.

This opens the Brush Presets toolbar.
- Do either of the following:
- Click any of the presets to use it instead of the default brush.
- Change brush settings and click
 (Add New Preset) to add a new button with the current settings.
- Paint with the brush.
- If you change brush settings with a preset brush active, the preset will remember the changes between sessions. Common setting changes such as Size will apply to use of the brush with any tool.
- To change a preset's name, copy it, delete it from the toolbar, or save or load all brush presets, click
 (Brush Preset Manager).
Interface

The Brush Preset toolbar controls are available only when a brush tool such as Paint Deformation is active.
-
 Brush Preset Manager
 -
Opens the Brush Preset Manager dialog, which lets you add, duplicate, rename, delete, save, and load brush presets.
-
 Add New Preset
 -
Adds a new preset with the current brush settings to the toolbar, first prompting you for a name for the brush. If you attempt to exceed the maximum number of brush presets (50), a dialog alerts you.
- [brush presets]
-
Each preset is available on a button with a grayscale bitmap showing its shape and relative size. Click a preset to activate it and use its settings. Each preset contains all settings pertinent to the current tool, such as Mode for Paint Deformation brushes. You can see a preset name by hovering the mouse cursor over it; the tooltip that appears shows its name.
To deactivate a preset, click its preset again on the toolbar. Its settings remain active, but changing the settings no longer modify the preset.
By default, the toolbar contains five brush presets, but you can add up to a total of 50. To activate and use a preset, click its button on the toolbar. 3ds Max remembers any changes you make to the brush settings while a preset is active and automatically restores these at the start of the following session.
The button image updates automatically to reflect changes to the size (by default, up to 40.0) and the falloff, which is depicted as a gradient on the button image. Set the falloff with the Painter Options dialog.
Note: Changing a value for a setting the preset has in common with other contexts, such as Size, changes it for all contexts. For example, if you set a preset brush's size to 11.6, the brush will be that size when used with any other tool.