The transform center affects scale and rotation transforms, but has no effect on position transforms.
3ds Max lets you choose from three types of transform center using the Use Center flyout on the main toolbar. When you change the transform center, the junction of the axis tripod icon moves to the location you specify.
By default, 3ds Max sets the transform center to Use Pivot Point center for single objects. When you select multiple objects, the default transform center changes to Use Selection Center, because selection sets have no pivot point. You can change the transform center in either case, and 3ds Max remembers and restores the transform center setting separately for selections of single and multiple objects (during the current session).
 Adjust Pivot controls. Alternatively, you can transform objects using the working pivot.
 For example, you might select a single object and choose Use Transform Coordinate Center, and then select multiple objects and choose Use Pivot Point Center. When you next select a single object, 3ds Max switches back to Use Transform Coordinate Center. Then, when you select multiple objects, the center switches back to Pivot Point.

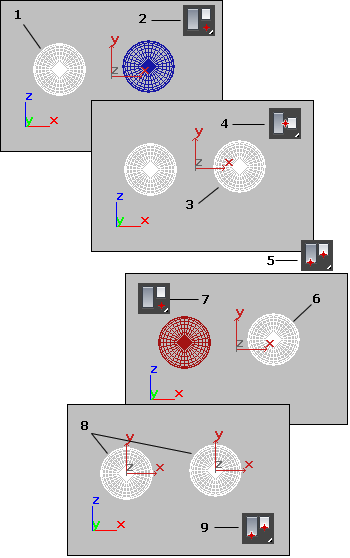
1. User selects single object.
2. User clicks Use Transform Coordinate Center from Use Center flyout on the main toolbar.
3. User adds second object to selection.
4. Transform center changes to Use Selection Center when selection set contains more than one object.
5. User clicks Use Pivot Point Center while multiple objects still selected.
6. User selects single object.
7. Transform center returns to Use Transform Coordinate Center (see step 2).
8. User selects multiple objects.
9. Transform center returns to Use Pivot Point Center (see step 5).
Transforming About Snapped Points
While the transform center choices are often useful at the object level, they are not usually convenient when transforming sub-object selections. You can override the active transform center and perform the current transform about a temporary point by using snaps. When Snaps is active, and your selection is locked, the point you snap to will set the point about which the transform is performed. Using this technique, you can:
- Move relative to two snap points.
- Rotate about a snapped point.
- Scale about a snapped point.
For more details, see Snap Settings.
Animation and the Transform Center
Because of the nature of keyframing, you can animate rotation and scale transforms properly only by using an object’s local pivot point. For example, while modeling, you can rotate an object that’s offset from the world origin around the world center coordinate system. The object sweeps around the origin in a large arc. However, if you attempt to animate this, the object rotates about its local axis and moves in a straight line from one end of the arc to the other.
To avoid this discrepancy, when Auto Key is on and either the Rotate or Scale button is active, the Use Center flyout is unavailable and set to Use Pivot Point. When Auto Key button is off, all transforms use the center settings previously described.
You can override this behavior by turning off Local Center During Animate in the Animation Preferences settings.
Keep in mind that this affects only the center of the transform. The orientation of the selected transform coordinate system is still in effect.
Animating "Off-Center"
You can animate a rotation or scale about an off-center point by linking your object as the child of a dummy helper object, and then rotating or scaling the dummy.
Another technique is to offset the pivot point of your object using the Hierarchy panel.
For information about linking, dummy objects, and the Hierarchy panel, see Hierarchies.