Tape provides an on-screen "tape measure" for determining and setting distances. The tape is composed of two named objects, in the same way targeted lights and cameras are. By default, these are named Tape### and Tape###.Target (the ### is a three-place number). The tape and target icons are connected by a line representing the current distance between them.
-
 Create panel >
  (Helpers) > Standard > Object Type rollout > Tape
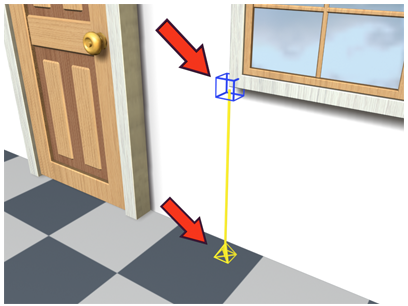
Using a tape helper to measure the distance from floor to window frame.
You can drag a length (the default), or enter a specific length by turning on Specify Length. You can snap or align either end of the tape or link to objects in your scene. Deleting either end deletes the tape.
Selection
You can select a tape-measure object from either end, or from the middle. When you click the connecting line, both ends of the tape object become selected so you can move them as one. Note that the same is true of target cameras and lights.
Procedures
To measure a distance:
- Click Tape and drag from one point to create the tape, and then drag to a second point and release the mouse button to create the target.
The distance between tape and target appears in the Length field. The number in the Length field is gray to indicate that this is a read-only measurement.
Note: To snap the tape ends to object vertices, edges and so on, turn on Snap with the appropriate snap settings activated. -
 Move either end to a new location. The line between stretches to the new distance, shown in the Length field. Note: For accurate results when moving a tape endpoint with Snap, you must turn on Pivot in the Snap Settings panel as well as the types of sub-object you want to snap to; see Snaps. This is because the endpoints are actually pivots.
To set a distance:
- Turn on Specify Length in the Parameters rollout, enter a length, and then create the tape.
The connector line is the length you specified, although you can still set the target to any offset by dragging. You can reorient this line as required.
Note: Clearing Specify Length will adjust the connector line length to meet the target and the new length appears in the Length field.
Interface
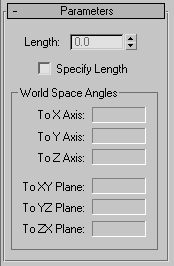
Parameters rollout
- Length
-
Specifies the length of the tape object. You must select the Specify Length checkbox to enable this option.
- Specify Length
-
Activates the Length parameter setting. Otherwise the tape object's length will be specified by clicking and dragging in the viewport.
World Space Angles group
- To X/Y/Z Axis
-
Displays the angle of the tape object relative to each axis in world space.
- To XY/YZ/ZX Plane
-
Displays the angle of the tape object relative to each of these home planes.