The Transform gizmos are viewport icons that let you quickly choose an axis or combination of axes when transforming a selection with the mouse.
A Transform gizmo appears when one or more objects are selected and one of the transform buttons—Select And Move, Select And Rotate, or Select And Scale—is active on the main toolbar. Each transform type uses a different gizmo. By default, each axis is assigned one of three colors: X is red, Y is green, and Z is blue. The inner corners of the Move gizmo contain plane handles whose edges are assigned the two colors of the related axes; for example, the edges of the XZ plane handle are red and blue. And the Scale gizmo has a central area for uniform scaling, which is surrounded by three plane handles.
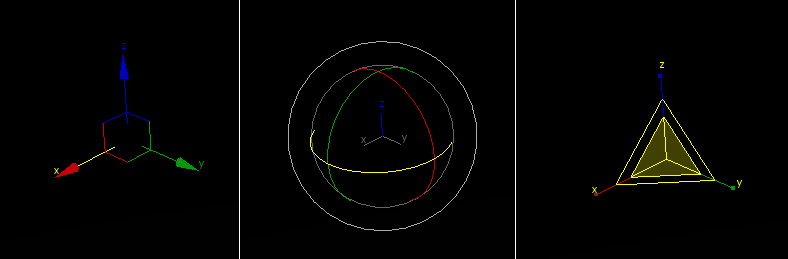
From left to right: Move gizmo, Rotate gizmo, Scale gizmo
You choose an axis by first positioning the mouse over any axis of the icon, then dragging the mouse to transform the selection along that axis. When moving an object, you can use the plane handles to perform transforms along any two axes simultaneously. The central area of the Scale gizmo provides, in addition to plane handles for scaling along two axes simultaneously, a uniform-scaling handle at the center. Using a gizmo avoids the need to first specify a transform axis or axes on the Axis Constraints toolbar, and also lets you switch quickly and easily among different transform axes and planes.
When you position the mouse over any axis, it turns yellow to indicate that it’s active. Similarly, position the mouse over one of the plane handles, and both associated axes turn yellow. You can now drag the selection along the indicated axis or axes. Doing so changes the Axis Constraints toolbar "Restrict to ..." setting. This means that you can then drag anywhere on the object and the axis constraint will remain active. The axis constraint remains active for that transform for all objects, even if you switch to a different transform and then back again.
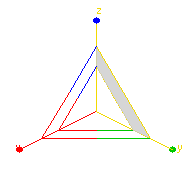
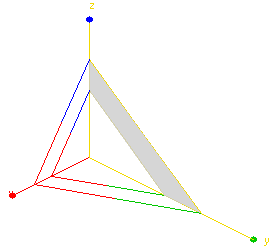
Axis Tripods
When no transform tool is active and you select one or more objects, axis tripods appear in the viewport.
The axis tripod appears when the transform gizmo is inactive.
Each axis tripod consists of three lines, labeled X, Y, and Z, and shows you three things:
- The orientation of the tripod reveals the orientation of the current reference coordinate system.
- The location of the junction of the three axis lines shows where the current transform center is.
- The highlighted red axis lines show the current axis constraints.
Move Gizmo
The Move gizmo includes plane handles, and the option to use a center box handle.
You can select any of the axis handles to constrain movement to that axis. In addition, the plane handles allow you to constrain movement to the XY, YZ, or XZ planes. The selection hotspot is within the square formed by the plane handles. You can change the size and offset of the handles and other settings on the Gizmos Preferences panel of the Preferences dialog.

The Move gizmo with the YZ axes selected.
You can constrain translation to the viewport plane by dragging the center box. To disable this optional control, turn off Move In Screen Space.
Rotate Gizmo
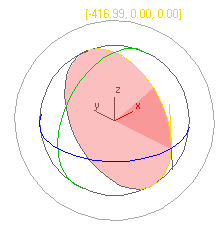
The Rotate gizmo is built around the concept of a virtual trackball. You can rotate an object freely, about the X, Y, or Z axis, or about an axis perpendicular to the viewport.

The axis handles are circles around the trackball. Drag anywhere on one of them to rotate the object about that axis. As you rotate about the X, Y, or Z axis a transparent slice provides a visual representation of the direction and amount of rotation. If you rotate more than 360°, the slice overlaps and the shading becomes increasingly opaque. 3ds Max also displays numerical data to indicate a precise rotational measurement.
In addition to XYZ rotation, you can also use free rotation or the viewport handle to rotate objects.
Drag inside the Rotate gizmo (or the outer edge of the gizmo) to perform free rotation. Rotation should behave as if you were actually spinning the trackball.
The outermost circle around the Rotate gizmo is the Screen handle, which lets you rotate the object on a plane parallel to the viewport.
You can adjust settings for the Rotate gizmo on the Gizmos Preferences panel of the Preferences dialog
Scale Gizmo
The Scale gizmo includes plane handles and scaling feedback through the stretching of the gizmo itself.
The plane handles let you perform uniform and non-uniform scaling without changing your selection on the main toolbar:
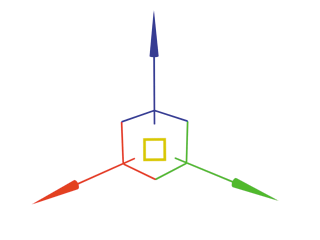
- To perform Uniform scaling, drag in the center of the gizmo.

The Transform gizmo with Uniform scaling selected.
- To perform non-uniform scaling, drag on a single axis or a plane handle.
Top: The Scale gizmo with the YZ plane handle selected
Bottom: Non-uniform scaling on the YZ plane
The Scale gizmo provides feedback by changing its size and shape; in the case of a uniform scale operation, it will grow or shrink as the mouse moves, and during non-uniform scaling, the gizmo will stretch and deform while dragging. However, once the mouse button is released, the gizmo returns to its original size and shape.
You can adjust settings for the Scale gizmo on the Gizmos Preferences panel of the Preferences dialog
Notes
Using a Transform gizmo sets the default axis constraint to the last axis or plane you used.
If Lock Selection Set is on, you can drag anywhere in the viewport to transform the object. Dragging an axis, however, still applies the constraint along that axis.
Procedures
Example: To explore use of the transform gizmo:
- Reset
3ds Max, then create a sphere, and then click
 (Select And Move).
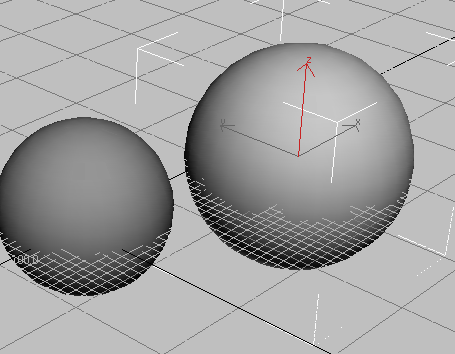
The transform gizmo appears at the center of the sphere. Because the default axis constraint on the Axis Constraints toolbar is XY Plane, the X and Y shafts of the transform gizmo are yellow (active), while the Z shaft is blue.
- Use
 (Orbit) to adjust the Perspective view for a better view of the Transform gizmo. When you’re done, right-click to return to Select And Move.
- Point to any part of the sphere away from the Transform gizmo, and drag to confirm that the sphere is locked to the XY plane.
- Point to the Z-axis shaft, and drag.
The Z shaft turns yellow, the X and Y shafts turn red and green, respectively, and the sphere moves along the Z axis.
- Point to the Y shaft, and drag.
The Y shaft turns yellow, and the sphere moves along only the Y axis.
- Point to the red-and-green corner mark opposite the ends of the X and Y axes, and drag.
The sphere moves along the XY plane.
- Press Ctrl+Shift+N to turn on Selection Lock.
- Drag the mouse anywhere in a viewport away from the selection.
The sphere moves along the XY plane.
- Point to the X shaft, and drag.
The sphere moves along only the X axis.
Experiment with other transformations, such as rotation and scale. Try different reference coordinate systems. Experiment with sub-object transformations.
Interface
- Change default colors
-
Customize menu
 Customize User Interface dialog
Colors panel Gizmos Element Active Transform Gizmo and Transform Gizmo X/Y/Z.
Customize User Interface dialog
Colors panel Gizmos Element Active Transform Gizmo and Transform Gizmo X/Y/Z.
- Enable/disable Transform Gizmo
-
Customize menu
Preferences
Gizmos Preferences On checkbox.
Note: When you turn off the Transform gizmo in Preferences, the standard axis tripod appears instead. To toggle display of either the gizmo or the tripod, use Views menu Show Transform Gizmo. (If using the Alt menu, it's Scene Configure Views Show Transform Gizmo.)
There are additional controls for each gizmo on the Gizmos Preferences panel of the Preferences dialog.