![]()

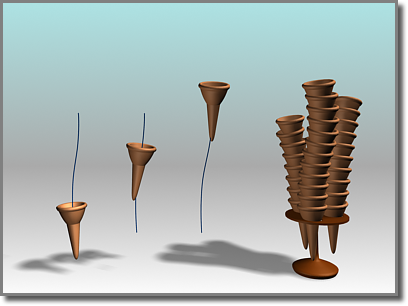
Using an ice-cream cone animated along a path, Snapshot creates a stack of cones.
Snapshot spaces the clones equally in time. Adjustments in Track View let you space the clones equally along the path instead (see the second procedure, below).

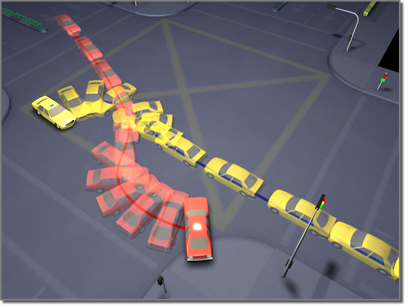
Using car models animated along paths, Snapshot creates an image of a collision.
Like other clone techniques, Snapshot creates copies, instances, or references. You can also choose a mesh option for use with particle systems.
Particle Snapshots
You can clone particle systems as static mesh objects. You can also produce clones of the particles themselves as meshes, when using the Snapshot dialog  Clone Method
  Mesh option. This works with all configurations of particle systems, including those using MetaParticles. Usage is the same as with other types of objects.
Procedures
To clone an object over time:
-
 Select an object with an animation path.
 Snapshot also shows the effect of any other transform animations, such as rotate or scale as well as parametric modifier animation.
You can also select a particle system.
- Do one of the following:
- On the Extras toolbar, click
 (Snapshot), which is on the Array flyout.
 - From the Tools menu, choose Snapshot. If using the Alt menu system, choose Edit menu
 Duplicate
  Snapshot.
3ds Max opens the Snapshot dialog.
- On the Extras toolbar, click
- Set parameters on the dialog, and click OK.
To space clones evenly by distance:
-
 Select an object with an animated position.
 - Open Track View and find the Position track for the original object.
- Click
 Assign Controller and check that the track is using a Bezier Position controller. Do one of the following:
 - If the track is already using a Bezier Position controller, proceed to step 4.
- If the track is not using a Bezier Position controller, change the controller, then proceed to step 4.
- Select all the transform keys and right-click one of the selected keys to display the Key Info dialog.
- Click Advanced to expand the dialog.
- Click Normalize Time.
- Set Constant Velocity on.
- Choose Tools menu
 Snapshot.
 3ds Max opens the Snapshot dialog.
- Set parameters in the dialog, and click OK.
Interface

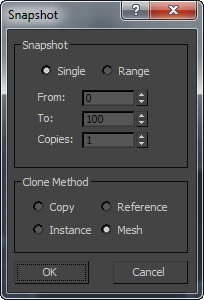
Snapshot group
- Single Makes a clone of the geometry of the object at the current frame.
- Range Makes clones of the geometry of the object along the trajectory over a range of frames. Specify the range with the From/To settings and the number of clones with the Copies setting.
- From/To
-
Specifies the range of frames to place the cloned object along the trajectory.
- Copies
-
Specifies the number of clones to place along the trajectory. They are evenly distributed over the time period, but not necessarily over the spatial distance along the path.
Clone Method group
- Copy Clones copies of the selected object.
- Instance Clones instances of the selected object. Not available with particle systems.
- Reference Clones references of the selected object. Not available with particle systems.
- Mesh Creates mesh geometry out of a particle system. Works with all kinds of particles.