An idle area is a region in a Populate simulation where people congregate. People on idle areas show typical "hanging-out" behaviors such as chatting, gesturing, talking on phones, and so on.
Populate does not support the passage of people between flows and idle areas.
When you first start to draw an idle area, a black X might appear on the surface; this indicates that the area is too small to support people, or the dimensions are wrong. As you continue to draw, symbols appear on the idle area indicating where people begin the simulation. Red icons indicate females and blue icons indicate males, and the lines emanating from the icons show each person's facing direction. Circles show where groups are standing; each group can contain two or three people. Those not in groups are considered "singles."
You can create an idle area on any surface or on the home grid. If a single idle area is selected when you create a new one, the new idle area is drawn at the same height as the selected one. So to start on a different surface, make sure no idle area is already selected.
You can move and scale idle areas using standard transform tools. You can also rotate an idle area, but only about its vertical axis (that is, within the XY plane). Idle areas are always parallel to the home grid.
After creating an idle area, you can modify properties such as the number of people and their behavior with the Idle Area rollout settings.
-
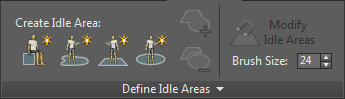
 Create Seat
 - To create a seat, click to turn on Create Seat, then click in a viewport. You can drag the seat to change its position before you release the mouse; Ctrl+drag to orient the seat toward the cursor.
To edit a selected seat's properties, use the
 Modify panel. To change the gender distribution of selected seats, set the Females ratio value on the Define Idle Areas expansion panel (see below), then click Set Selected. A red or blue marker on each seat indicates the gender and facing direction of its sitter.
 -
 Create Free Idle Area
 - Enables creation of an idle area of any shape by drawing freehand in a viewport. After activating Create Free Idle Area, drag out the shape of the area in a viewport.
-
 Create Rectangle Idle Area
 - Enables creation of an rectangular idle area by dragging out the dimensions in a viewport. After activating Rectangle Free Idle Area, drag out the shape of the area in a viewport. Tip: To create a square idle area, first turn on Create Uniform Shapes (see following).
-
 Create Circle Idle Area
 - Enables creation of a circular or oval idle area by drawing freehand in a viewport. After activating Create Circle Idle Area, drag out the shape of the area in a viewport. Tip: To create a perfect circle, first turn on Create Uniform Shapes (see following).
-
 Add to Idle Area
 - Enables increasing the size of an existing idle area. After clicking Add To Idle Area, select an idle area, choose the shape to add (Free, Rectangle, or Circle), then drag out the shape of the new idle area so that it overlaps the selected area. After you finish drawing, the two idle areas are combined into one.
-
 Subtract from Idle Area
 - Enables decreasing the size of an existing idle area. After clicking Subtract From Idle Area, select an idle area, choose the shape to subtract (Free, Rectangle, or Circle), then drag out the shape of the new idle area so that it overlaps the selected area. After you finish drawing, the overlapping portion of the new area is deleted from the existing one.
-
 Modify Idle Areas
 - Enables changing the shape of a single idle area by moving its vertices with a paintbrush-type interface. To use, select an idle area, click Modify Idle Area, adjust the brush size if necessary (see following), and then drag over the idle area to move its vertices. Vertices near the center of the brush circle move the farthest, with the effect falling off toward the edges of the brush.
- Brush Size
- The size of the Modify Idle Areas brush. You can also change the brush size interactively in the viewport by holding Ctrl+Shift and dragging.
Define Idle Areas panel expansion
The following settings appear on the Define Idle Areas panel expansion. Open the expansion by clicking the panel title: Define Idle Areas. To keep the expansion open, click the pushpin icon at the left of the title.
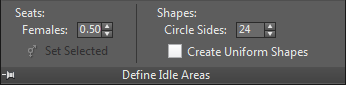
Seats group
- Females [Seat Female Ratio]
- Sets the gender ratio for seated characters. At 0.0, the sitters are all male. At 1.0, the sitters are all female. Values between 0.0 and 1.0 (non-inclusive) result in random gender assignments. Default=0.50.
Affects Create Seat and Set Selected Seat Gender.
-
 Set Selected [Set Selected Seat Gender]
 - Click to change the gender distribution of selected seats based on the Females setting.
To generate the new characters, use
 (Simulate).
Shapes group
- Circle Sides
- The number of sides of the next Circle Idle Area to be created. Using a higher value creates a smoother outline.
- Create Uniform Shapes
- When on, using Create Rectangle Idle Area always creates a square idle area, and Create Circle Idle Area always creates a perfect circle.