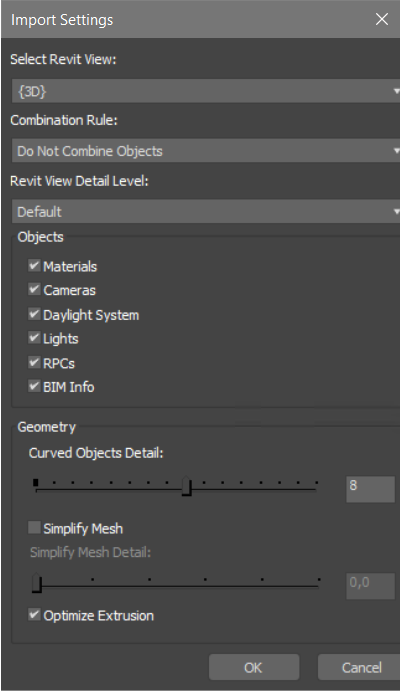
Provides options for Revit file import.

- Select Revit View
- Use the list to choose the Revit camera view to load.
Revit files can contain multiple camera views, but when you import a RVT file, you must choose a single camera view.
- Combination Rule
- Use this drop-down list to choose the way in which Revit objects are combined. Combining objects can reduce the number of objects in your
3ds Max scene, and improve performance.
- Do Not Combine Objects (The default.) Imports each Revit object as a single 3ds Max object.
-
Combine By Revit Category Revit objects in the same category become a single
3ds Max object. The object has the name of the category and is placed on a layer with the same name. The family and category appear in the
3ds Max Scene Explorer.
Multi/Sub-Object material information is retained.
-
Combine By Revit Family Type Revit objects belonging to the same Family Type become a single
3ds Max object. The object has the name of the family type and is placed on a layer with the same name. The family and category appear in the
3ds Max Scene Explorer.
Multi/Sub-Object material information is retained.
-
Combine By Revit Material Revit objects assigned the same material become a single
3ds Max object. The object has the name of the material, and is placed on a layer with the same name. Revit metadata (family and category) does not appear in the
3ds Max Scene Explorer.
Multi/Sub-Object material information is lost.
Note: If the Revit scene does not contain material assignments, the geometry is imported as a single object, and this option becomes comparable to the As One Object option. - Combine by Revit Category and Revit Material Revit objects in the same category with the same material become a single object. The object has the name of the category_material, and is placed on a layer with the same name. Revit metadata (family and category) does not appear in the 3ds Max Scene Explorer.
- Combine by Revit Family Type and Revit Material Revit objects belonging to the same family type with the same material become a single object. The object has the name of the family_material, and is placed on a layer with the same name. Revit metadata (family and category) does not appear in the 3ds Max Scene Explorer.
-
As One Object Imports the entire Revit drawing as a single
3ds Max object, with the name of the camera view. The object is placed on a layer with the same name. Revit metadata (family and category) does not appear in the
3ds Max Scene Explorer.
Revit materials are combined into a single Multi/Sub-Object material.
Tip: This option is useful if you are doing a massing study such as a shadow animation.
- Revit View Detail Level
- Use this drop-down list to choose the level of detail you want to view. Options include:
- default
- coarse
- medium
- fine.
Objects group
Chooses which kind of geometry to import from the RVT file. Objects include:
- materials
- cameras
- daylight system
Note: It is important to note that:
- Importing a daylight system results in the creation of a Sun Positioner light object with a Physical Sun & Sky environment map.
- Exposure controls are imported based on Revit renderer settings as a Physical Camera Exposure Control.
- If the sun is set to Lighting mode in Revit, it will be in Manual mode in 3ds Max (i.e. Azimuth and Altitude).
- The Sun Positioner's Compass Radius and Sun Distance are arbitrary values set for display purposes.
- Exposure Control environment settings default to Physical Camera Exposure Control, with its parameters based on Revit's Rendering Settings>Adjust Exposure.
- lights
- RPCs (Rich Photorealistic Content including people, trees, plants, etc.)
- BIM Info (Building Information Modeling data).
Geometry group
- Curved Objects Detail
- Controls the number of segments (the resolution) of curved objects. Default=8. Higher values result in smoother surfaces.
- Simplify Mesh
- Lowers the polygon count by reducing coplanar triangles. The higher the value, the more the resulting mesh can differ from the original.
- Optimize Extrusion
- Reduces the number of triangles by rebuilding extruded polygons. This creates smoother, editable geometry; as opposed to creating an editable mesh with non-editable, tesselated geometry.