Activate this option to export animation found in the scene and expand this option to access advanced animation options and features.
Extra Options
Expand Extra options to view additional export options.
- Use Scene Name
-
Normally, the 3ds Max FBX plug-in saves the 3ds Max scene animation in the FBX file as Take 001. Activate this option if you want the scene animation to be named after the 3ds Max scene instead.
This option is disabled by default.
- Remove Single Key
-
When you activate this setting, the exporter removes keys from objects on export if the plug-in determines that the animation has only one key. When two or more keys exist in the file, the keys are exported.
Note: Rotation keys are not affected by this setting.Disable this option to export every key to FBX, regardless of how many are found in the animation.
Note: This option is disabled by default.
Bake Animation
This option lets you bake (or Plot) animation at export time.
When you activate this option all unsupported constraints and controllers, including the 3ds Max Biped, are resampled into animation curves. You can then import these curves into another application that does not support these 3ds Max constraints.

The plug-in takes the Start and End values automatically from the “timeline” current settings of the host application. You can modify them by changing the values once you activate this option.
The Step value defines how many keys are created per frame, and has a value of 1 by default. Setting a Step of 2 for example, only bakes and exports a key every other frame.
- Resample All
-
Use the Resample all option to bake even supported animated elements. This is unlike the Bake Animation option which selectively bakes unsupported elements only.
Note: The Resample all option resamples animation using the frame rate of the host application. If you want the Resample all option to use a different frame rate for sampling, you must specify another frame rate setting in 3ds Max.The Resample all option reacts to the state of the Bake animation option. If the Bake Animation option is disabled, the Resample all option is unavailable.
Deformations
Activate the Deformations option to access the Skin and Morph deformation options.
| Option | Description |
|---|---|
| Morphs | Activate this option to export all geometry Morphs used in your scene. |
| Skins | Activate this option to export all Skin deformations used in your scene. |
Activate the Deformations option to access the Skin and Morph deformation options.
Curve Filters
The Curve filters let you apply animation filters to function curves during the export process.
- Constant Key Reducer
-
Activate the Constant Key Reducer filter to remove redundant keys. Redundant keys are keys that have the same value, which are equivalent to flat horizontal interpolations on a curve. Redundant keys are often a result of a resampled curve.
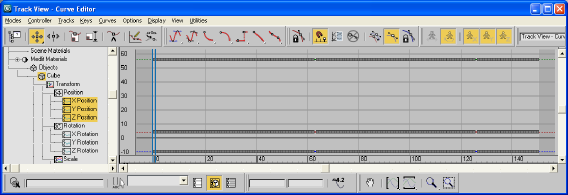
Before:
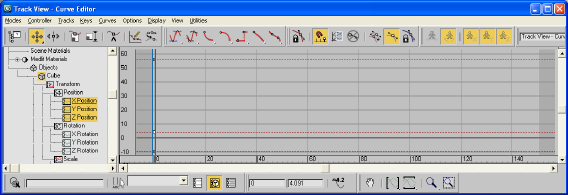
After:
You can set specific thresholds for each type of transform (Transformation, Rotation, Scaling, and Other. Other includes Morph and custom attribute curves, for example).
The default values are:
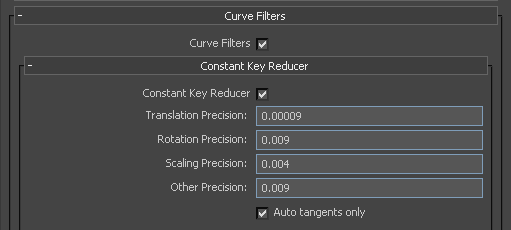
Values represent generic units. This is why you might need to modify threshold values in relation to the world scale of your scene. This is true for very large or small scale scenes.
If keys are numerically identical, use very small values to ensure that no animation is lost.
If you use this filter to eliminate noise, for example, from motion capture data, then you might need to modify values.
Setting Description Translation precision Threshold for translation curves in generic units. Rotation precision Threshold for rotation curves in generic units. Scaling precision Threshold for scaling curves in generic units. Other precision Threshold for other curves in generic units. Auto tangents only This option ensures that only “auto” key types are filtered. Otherwise, keys with interpolation values greater than a certain threshold might be deleted. - Unroll Rotations
-
This filter re-evaluates rotation curves to reduce the number of 180' degree rotation jumps for a specified component. You can modify or displace these rotation jumps and/or Gimbal lock with this filter, and not affect the resulting animation visually.
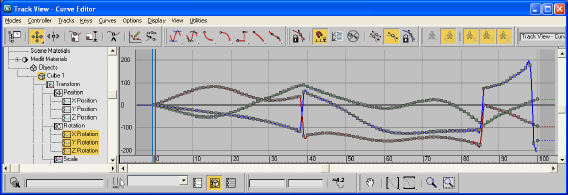
Before:
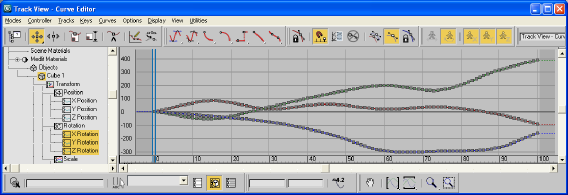
After:
Note: The Unroll Rotations filter must resample the entire vector of a rotation curve (X, Y & Z components). This resampling lets the plug-in find a new path of values that represent the same rotation.Setting Description Filter precision The precision value affects how the plug-in re-evaluates the curve and defines the importance given to the unrolled curve. Activate the Unroll Rotations filter to resample rotation curves and give unroll priority and filter intensity to a specific component, X, Y, or Z.
Follow Y-up Activate this option to give priority to the Y component, normally used for Y-up scenes. - Key Reducer
-
Activate the Key Reducer to reduce the numbers of keys on animation curves on export. The Key Reducer reduces keys by automatically replacing them with tangents, which maintains the prevision of the animation while reducing the number of keys to speed processing.
You also can use this filter to reduce the number of keys on resampled curves, which lets you edit keys, not dense data.
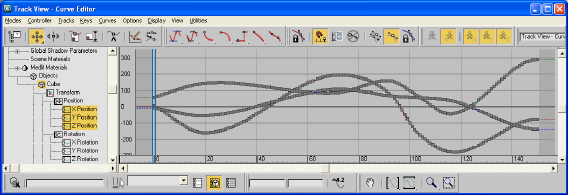
Before:
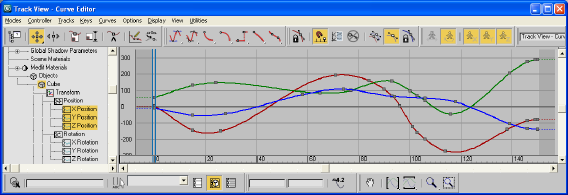
After:
Note: There is always a trade-off between the number of keys needed versus the precision of the animation. The more keys you have, the more precise the animation. The fewer keys you have, the easier it is to edit the keys, but there is less precision.Setting Description Filter intensity Generic value. In most cases, the default value (1) is enough to streamline the number of keys and continue to remain faithful to the original visual result. Note: Increasing filter intensity, for example to 4.0, removes more keys, which speeds processing, but results in much less accurate animation.XYZ Curve Synchronization This option adds keys to the other curves (X,Y, or Z) at every added key so that a key always exists on all three curves (X, Y, and Z) at the same vector for each key over time. Note: This setting increases the number of keys, but is useful if you want to select a key on all curves at the same time. Game engines often require this for real-time animation playback.The default values for the Key Reducer filter are a precision value of 1.0 and the XYZ Curve Synchronization option disabled.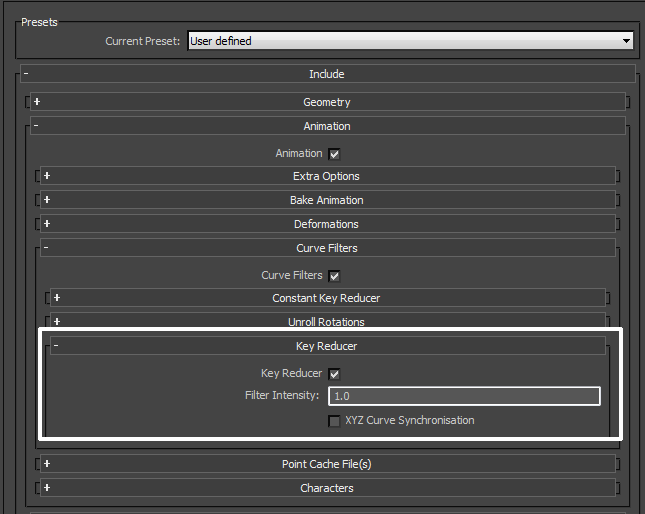
Point Cache File(s)
Activate this option to create a cache file of a chosen selection set so you can retain vertex animation data during export. To use this option, you must first create a selection set of the objects for which you want to retain the vertex animation in 3ds Max. Use the Selection Set menu to select an appropriate set to export the cache file.
The stored vertex animation data is stored in a folder in the same location as the FBX file.
By default, any Point Cache files created are in .MC format. When you activate this option, three files are generated:
- an FBX file
- an XML file
- an MC file
The 3ds Max FBX plug-in stores the XML and MC files in a subfolder named after the FBX file and has the suffix FPC (_fpc).
For example, if you export a scene containing a cube named box01 to the FBX file myTest.fbx, you create the following files and folders:
- myTest.fbx
- myTest_fpc
- box01.xml
- box01.mc
The plug-in keeps any PC2 or MC Point Cache files that are already recorded (within the selection set).
- What is Vertex Animation?
-
Object animation occurs when you move a sphere from one place to another. If you rotate or scale this object, it is still considered object animation; Any TRS animation on the object is considered standard object animation and is what is kept on regular exports.
Vertex animation occurs at the sub-object (vertex) level. For example, if you were to move 4 vertices on a sphere, this animation is lost on export unless you create a Point Cache file for this animation.
- What is a Point Cache?
-
A Point Cache is a local sub-object animation of an object. To export this local sub-object animation from a program like 3ds Max, every vertex position must be evaluated and stored in a file or series of files called Point Cache files. You must make a selection set of the object(s) for which to store Point Cache data because the exporter needs to know for which objects you want the vertex animation evaluated.
In 3ds Max, you create a Point Cache for your object(s) so you can have better playback for complex animating. If, for example, you had a scene with 20 controllers driving the animation of 500 different characters, creating a Point Cache file would let you store all the vertex animation and play it back on all 500 characters, so that 3ds Max does not evaluate the animation controllers for each character. This in turn, creates a more smooth playback.
Characters
The Characters options let you specify how the 3ds Max FBX plug-in treats character and HumanIK data when you export.
- CAT Characters as HIK
-
Activate the CAT Characters as HIK option when you want export your CAT rig as an HIK Skeleton Definition to an FBX file.
If this option is disabled, the CAT rig is exported as a skeleton with standard bones.