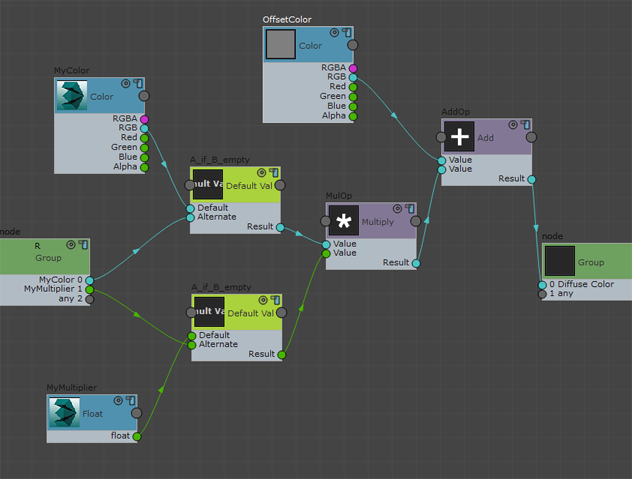
Create a new group:
- Click
 on the group node to enter group view.
 - Choose Hw Shader Nodes
 Math
Math  Add and Hw Shader Nodes
  Value
Value  Color to create an Add node and a Color node, respectively.
 - Connect the nodes as follows:
- Connect the RGB attribute of Color to the first Value attribute of Add.
- Connect the Result attribute of Multiply to the second Value attribute of Add.
- Connect the Result attribute of Add to the Diffuse Color attribute of the group node.
- Select the newly created Color node. On the Properties panel, enter the name OffsetColor and change the UI Order value to 3.

OffsetColor now appears on the Material Editor
 Parameters rollout.
OffsetColor attribute on the Parameters rollout
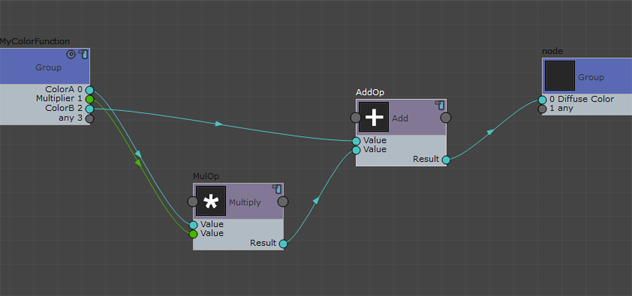
Convert a group into a function:
- Select the Multiply and Add nodes, then choose Group menu
 Create Group.
 - Click
 on the newly created group. In the group view, select the group node, and on the Properties panel change the Name field to MyColorFunction.
 - Also on the Properties panel, turn on Group Is A Function. With this option, the output of these nodes is encapsulated as a function in the shader code.
- Give your group node ports unique names. Currently, all ports are named Value, and thus the shader is invalid. (If you look at the Material Editor, the Parameters rollout displays an error message.)
On the Properties panel, make the following changes:
- Active Socket: 0
Active Socket Label: ColorA
- Active Socket: 1
Active Socket Label: Multiplier
- Active Socket: 2
Active Socket Label: ColorB
 Note: When converting a group into a function, all group node ports must have unique names. Otherwise, the shader becomes invalid.
 - Active Socket: 0
- Exit the group view and choose Tools menu
 Compute Graph.
 Now the shader is valid again.
In the Material Editor, the Parameters rollout for this shader reappears.
Save your shader file and examine the shader code
- Exit the group view.
- Select the Material node. On the Properties panel, enter a filename for your shader file in the HwShader / Filename field, then press Enter.
- Click HwShader / Save To Disk.
The path to which your shader file is saved appears as a tooltip at the bottom of the work area.
Note: ShaderFX saves a group as a file in the folder /users/<username>/my documents/3dsmax/shaderfx/shaders/.If you save the shader as an FX file, you can now load the FX shader as a DirectX shader, without having to use ShaderFX.
You can choose to save a few different shader formats: See Export to HLSL, CgFX, and GLSL.
Examine the shader code and then streamline it:
- Use a text editor to examine your shader file. Search for "MyColorFunction".
MyColorFunction is defined as a function in the shader file. The SHADERDATA struct is listed as an input. This is the default setting.
- To disable this setting for cleaner code, enter the group view of your MyColorFunction group, select the group node, and on the Properties panel turn on Don't Add DATA Struct As Function Input.
Resave your shader file to see that the SHADERDATA struct is no longer listed as an input parameter.