The Area Shadow generator can be applied to any light type to achieve the effect of an area shadow effect. In order to create an area shadow, the user needs to specify the dimensions of a virtual light created to "fake" an area shadow.
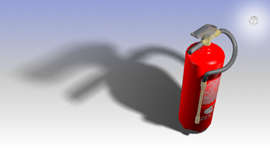
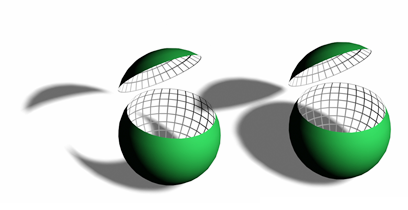
Area shadows create a soft edge that becomes more noticeable as the distance between the object and the shadow increases.
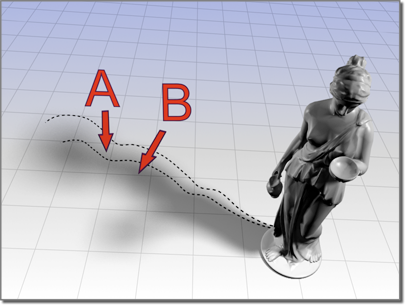
A: Penumbra (soft area)
B: Shadow
Area shadow cast by a point light
Interface
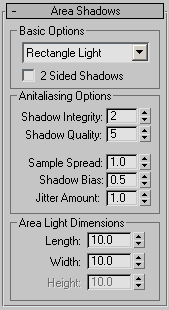
Basic Options group
- [shadow-generation drop-down list]
- Selects the way the area shadows are generated:
- Simple Casts a single ray from the light toward the surface. No antialiasing or area light calculation is performed.
- Rectangle Light Casts rays from the light in a rectangular array.
- Disc Light Casts rays from the light in a circular array.
- Box Light Casts rays from the light as if it were a box.
-
Sphere Light Casts rays from the light as if it were a sphere.
 .
.
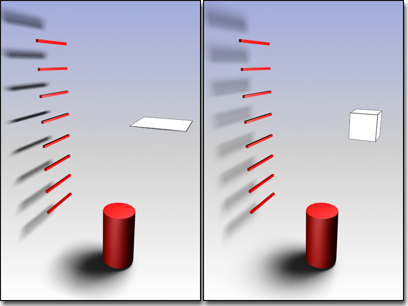
The shape of the area shadow array affects how shadows are cast.
Left: Rectangle
Right: Box
- 2-Sided Shadows
- When on, backfaces are not ignored when calculating shadows. Objects seen from the inside are not lit by lights from the outside. This costs a bit more render time. When off, backfaces are ignored. Rendering is quicker, but outside lights illuminate object interiors.
The faces inside the sliced sphere do not cast shadows if 2-Sided Shadows is off.
Antialiasing Options group
- Shadow Integrity
- Sets the number of rays in the initial bundle of rays cast. These rays are projected from every surface that receives light from the light source.
The number of rays is as follows:
1=4 rays
2=5 rays
3 to N=NxN rays.
For example, setting Shadow Integrity to 5 generates 25 rays.
This is the primary control for “finding” small objects and thin spaces between objects. If the shadows are missing a small object in your scene, try increasing Shadow Integrity one step at a time. Also, if the penumbra (soft area) is blotchy, try increasing this setting.
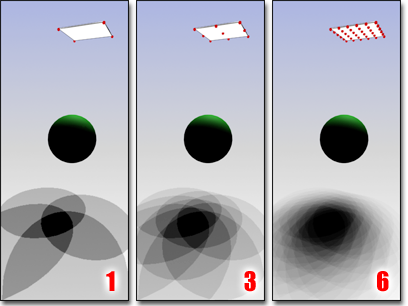
Increasing the Shadow Integrity value creates more accurate shadow contour and detail.
- Shadow Quality
- Sets the total number of rays cast in the penumbra (soft area) region, including the rays fired in the first pass.
These rays are projected from every point that is in the penumbra, or antialiased edge of the shadow, to smooth it out.
The number of rays is as follows:
- 2=5 rays
- 3 to N = NxN
For example, setting Shadow Quality to 5 generates 25 rays.
The Shadow Quality value should always be greater than the Shadow Integrity value. This is because 3ds Max overlays the secondary rays atop the first pass's rays using the same algorithm.
Increase Shadow Quality to fix banding in the penumbra, and eliminate the noise pattern from jittering.
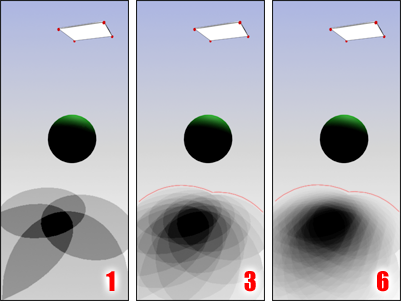
Increasing the Shadow Quality value produces a more accurate penumbra (soft area) within the contour defined by the Shadow Integrity value.
- Sample Spread
- The radius, in pixels, to blur the antialiased edge.
Note: As this value increases, so does the quality of the blur. However, increasing this value also increases the likelihood of missing small objects. To avoid this problem, increase the value of Shadow Integrity.
- Shadow Bias
- Shadow bias is the minimum distance that an object must be from the point being shaded in order to cast a shadow. This prevents blurred shadows from affecting surfaces they shouldn't.
Note: As you increase the blur value, you should also increase the bias.
- Jitter Amount
- Adds randomness to the ray positions. The rays are initially in a very regular pattern, which can show up in the blurry part of the shadow as regular artifacts. Jittering will convert these artifacts to noise, which is generally less noticeable to the eye. Recommended values are 0.25 to 1.0. However, very blurry shadows require more jitter.
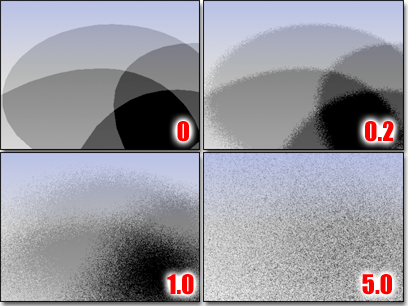
Increasing jitter blends the individual shadow samples.
Area Light Dimensions group
3ds Max uses these dimensions to compute the area shadowing. They do not affect the actual light object.
- Length
- Sets the length of the area shadow.
- Width
- Sets the width of the area shadow.
- Height
- Sets the height of the area shadow.