Use the Paths menu to resolve file-path issues such as missing files.
Tools on this menu include functionality also available in the Bitmap/Photometric Path Editor Utility, but their integration into the Asset Tracking dialog helps speed the workflow of managing scene assets.
- Highlight Editable Assets
-
Highlights all assets whose paths can be affected by the remaining commands on this menu.
For example, if your scene materials use bitmaps from a number of different folders, you could copy all the bitmaps to a common directory within your working folder, use Highlight Editable Assets to highlight all the bitmap assets, and then use Set Path (see following) to designate the common directory.
- Set Path
-
Opens a dialog for editing the scene's record of the highlighted asset's or assets' path and, in the case of a single asset, the file name. Both versions of the dialog include drop-down history lists for reverting to a previous path or file name.
The primary function for this command is to change the path pointed to by 3ds Max for existing assets whose locations have changed. However, for output files such as rendered images and render elements, you can also use Set Path to create and use new output directories. If you change an output path to one that doesn't exist, you're prompted to confirm that you want to create the folder or folders. if you confirm, the output paths are changed in all appropriate locations, such as the Render Setup dialog.
The version of the dialog that appears depends on the number of highlighted assets:
- If a single asset is highlighted, you can change the path and the file name. The following dialog appears.

To change the path, edit the Path field or use the ellipsis [...] button to browse for a new path. This changes the path only.
To revert to a previous path, choose it from the drop-down list.
To change the file name, edit the File field or choose a name from the drop-down history list. Note that this changes only the name of the asset file as pointed to in the scene; it doesn't change the actual asset file name. Use this to update the scene if the asset file name has changed.
- If multiple assets are highlighted, you can change the path but not file names. The following dialog appears.

The dialog shows the portion of the current path that the highlighted assets and lets you specify a new one, either by editing the Specify Path field contents or by clicking the ellipsis [...] button and browsing to a different path.
For example, if two assets are highlighted, and one asset's path is c:\max_files\maps1\ while the other's is c:\max_files\maps2\, the Specify Path field will show c:\max_files\. Changing this changes the complete path for all highlighted assets. Of course, they must all be present there for Asset Tracking to find them.
To revert to a previous path, choose it from the drop-down list.
To change only the portion of the path that all highlighted assets have in common, use Retarget Common Root (see the following).
- If a single asset is highlighted, you can change the path and the file name. The following dialog appears.
- Retarget Common Root
-
Lets you change only the part of the path that all highlighted assets have in common. This command opens a version of the Specify Assets path dialog that shows the common path prefix for the highlighted assets and lets you specify a new one, either by editing the Specify New Common Path Prefix field contents or by clicking the ellipsis [...] button and browsing to a different path. Use Retarget Common Root for repathing multiple files, particularly those in different directories within the common root.
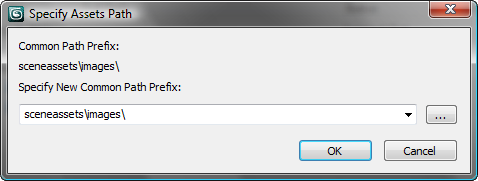
For example, if all maps were originally in various subdirectories within c:\maps\ and the entire subdirectory structure was moved to d:\resources\maps\, you could repath all files simultaneously using Retarget Common Root.
To revert to a previous path, choose it from the drop-down list.
If you change the common root for output files to a path that doesn't exist, you're prompted to confirm that you want to create the folder or folders. if you confirm, the output paths are changed in all appropriate locations, such as the Render Setup dialog.
- Strip Path
-
Strips all path information from the highlighted assets, leaving only the file names.
Stripped path information is saved in the Set Paths dialog drop-down list. To restore stripped paths, highlight the assets, choose Paths menu
 Set Paths, and then choose the desired path to restore from the drop-down list.
- Make Path Absolute
-
Gives the complete path of the found asset file. This is useful when a relative path is displayed and you want to see the entire path.
- Make Path Relative to Project Folder
-
This takes the current path of the found asset file and makes it relative to your project folder.
- Resolve Path to UNC Location
-
Resolves highlighted paths that point to mapped drives to Universal Naming Convention (UNC) format.
- Set Project Folder
-
Equivalent to File menu
Project Set Active Project.
- Configure User Paths
-
Opens the Configure User Paths dialog, which you can use to resolve locations for support files such as bitmaps.
Note: This option makes it simple to share files between different users, even if you are not using the same project folder. If user A loads a file from user B and they do not have the same project folder, this will not be a problem. - Preferences
-
Use this submenu to toggle these options:
-
Convert file paths to UNC When on, paths shown in the Asset Tracking dialog for any added assets present on a mapped drive use Universal Naming Convention (UNC) format. When off, each path starts with the mapped drive letter (for example,
w:\).
This switch is linked to the Convert file paths to UNC switch on the Preferences dialog
Files panel. Toggling either one toggles both.
Note: This switch affects only newly added paths. Toggling it has no effect on existing paths. For example, if you add an asset from a mapped drive with the switch on, turning it off does not change the path to the mapped version. -
Convert local file paths to Relative When on, converts the file paths of all newly added assets in a scene so that they are relative to the project folder. Default=off.
This switch is linked to the Convert Local Paths To Relative switch on the Preferences dialog
Files panel. Toggling either one toggles both.
-
Convert file paths to UNC When on, paths shown in the Asset Tracking dialog for any added assets present on a mapped drive use Universal Naming Convention (UNC) format. When off, each path starts with the mapped drive letter (for example,
w:\).