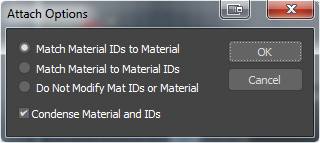
The Attach Options dialog opens when you attach two or more objects to which different materials are assigned. It provides three different methods of combining the sub-materials and the material IDs in the two objects.
Interface

- Match Material IDs to Material
-
The number of material IDs in the attached objects are modified so they are no greater than the number of sub-materials assigned to those objects. For example, if you have a box with only two sub-materials assigned to it, and you attach it to another object, the box will have only two material IDs, instead of the six it was assigned on creation.
- Match Material to Material IDs
-
Maintains the original ID assignment in the attached objects by adjusting the number of sub-materials in the resulting multi/sub-object material. For example, if you attach two boxes, both assigned single materials, but with their default assignment of 6 material IDs, the result would be a multi/sub-object material with 12 sub-materials (six containing instances of one box's material, and six containing instances of the other box's material). Use this option when it's important to maintain the original material ID assignments in your geometry.
Note: To make the instanced sub-materials unique, highlight their tracks in Track View and apply the Make Unique button function. You can also make them unique one at a time with the Make Unique tool in the Compact Material Editor. - Do Not Modify Mat IDs or Material
-
Prevents adjusting the number of sub-materials in the resulting sub-object material. Note that, if the number of material IDs in an object is greater than the number of sub-materials in its multi/sub-object material, then the resulting face-material assignment might be different after the attach operation.
- Condense Materials and IDs
-
Affects the Match Material IDs To Material option. When this is on, duplicate sub-materials or sub-materials that aren't used in the objects are removed from the multi/sub-object material that results from the attach operation. Default=on.
Tips
- In most cases, use the first option (Match Material IDs to Material) and leave Condense Material And IDs on. This maintains the appearance of the objects, and results in the fewest additional sub-materials or IDs.
- Use the second option (Match Material to Material IDs) when you need to maintain the original material ID assignments.
- Avoid using the third option unless you need to repeat a 3ds Max version 1 attachment for compatibility with a previous project.
- Leave Condense Materials And IDs on unless you have an unassigned sub-material that you want to keep for future assignment.
- Perform Edit menu
 Hold before using Attach.
Troubleshooting Problems with Vertex Colors or Mapping
- Add DefaultAttachMappingClear = 1 to the .ini file.
- Run the following call in MaxScript: meshINI.SetAttachDefaultClearMapChannel on/off