The Tube primitive produces a cylinder with a concentric hole. The shape can be round or prismatic.
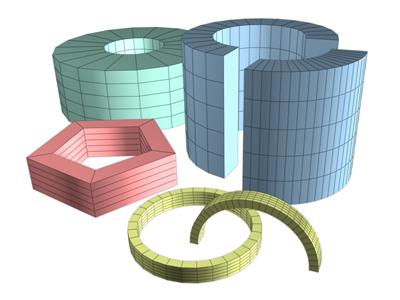
Examples of tubes
Procedures
To create a tube:
- On the Create menu choose Standard Primitives
 Tube.
Tube.
- In any viewport, drag to define the first radius, which can be either the inner or outer radius of the tube. Release to set the first radius.
- Move to define the second radius, then click to set it.
- Move up or down to define a height, either positive or negative.
- Click to set the height and create the tube.
To create a prismatic tube:
- Set the number of sides for the kind of prism you want.
- Turn Smooth off.
- Create a tube.
Interface
Creation Method rollout
- Edge
-
Start the tube by dragging out the diameter.
- Center
-
Start the tube by dragging out the radius.
Parameters rollout
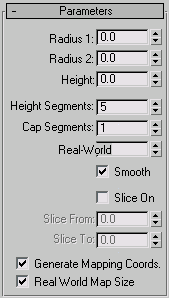
The defaults produce a smooth, round tube of 18 sides with the pivot point at the center of the base. There are five height segments and one cap segment. If you don't plan to modify the cylinder's shape, such as with a Bend modifier, set Height Segments to 1 to reduce scene complexity. If you plan to modify the ends of the cylinder, consider increasing the Cap Segments setting.
- Radius 1, Radius 2
-
The larger setting specifies the outside radius of the tube, while the smaller specifies the inside radius.
- Height
-
The dimension along the central axis. Negative values create the tube below the construction plane.
- Height Segments
-
The number of divisions along the tube's major axis.
- Cap Segments
-
The number of concentric divisions around the center of the tube's top and bottom.
- Sides
-
The number of sides around the tube. Higher numbers shade and render as true circles with Smooth on. Lower numbers create regular polygonal objects with Smooth off.
- Smooth
-
When on (the default), faces of the tube are blended together, creating a smooth appearance in rendered views.
- Slice On
-
Enables removing part of the tube's circumference. Default=off.
When you create a slice and then turn off Slice On, the complete tube reappears. You can therefore use this checkbox to switch between the two topologies.
- Slice From, Slice To
-
The number of degrees around the local Z axis from a zero point at the local X axis.
For both settings, positive values move the end of the slice counterclockwise; negative values move it clockwise. Either setting can be made first. When the ends meet, the whole tube reappears.
- Generate Mapping Coords
-
Generates coordinates for applying mapped materials to the tube. Default=on.
- Real-World Map Size
-
Controls the scaling method used for texture mapped materials that are applied to the object. The scaling values are controlled by the Use Real-World Scale settings found in the applied material's Coordinates rollout. Default=off.