The tools available in the Cut And Slice group let you subdivide edges and faces to create new vertices, edges, and faces. You can slice an editable mesh object at any sub-object level; the Cut tool is available at every sub-object level except Vertex.
-
Select an editable mesh object. >
 Modify panel > Selection rollout > (Optional: Choose a sub-object level.) > Edit Geometry rollout > Cut and Slice group
Procedures
To create a new face using Cut:
- Convert the geometry to an editable mesh.
- On the Modify panel, choose the Vertex, Edge, Face, Polygon, or Element sub-object level. If the edges aren’t visible in the viewport, press F3 to enable Wireframe view or F4 to enable Edged Faces view.
- On the Selection rollout, turn on Ignore Backfacing.
- On the Edit Geometry rollout, in the Cut And Slice group, click the Cut button.
- Click the first edge to subdivide, and then move your cursor toward the second edge. The cursor changes to a plus sign when over an edge, and a dotted line connects the initial point where the edge was clicked with the current cursor location.
- Click the second edge. This edge can be anywhere, cutting across as many faces as you like. A new visible edge appears.
- At this point, a new dotted line is connected to the mouse cursor, originating from the last point you clicked.
- Continue clicking edges to cut. To start from a different point, right-click, and then select the new start point. To finish cutting, right-click twice. Tip: For greater accuracy, use Snaps with Cut. To divide an edge in half, set Snaps to Midpoint. To start or end a cut at a vertex, set Snaps to Vertex or Endpoint.

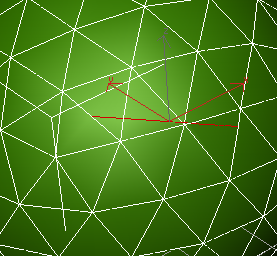
Before and after applying Cut to faces (the new edges are selected)
To create multiple slices:
- Select an editable mesh.
- On the Modify panel, choose the object's Edge (or Face, Polygon, or Element) sub-object level.
-
 When working at the Face, Poly, or Element level, select one or more sub-objects. At these levels, slice affects only selected sub-objects; at the Vertex and Edge levels, it affects the entire mesh.
 - In the Cut And Slice group, click the Slice Plane button.
- Position and rotate the Slice Plane gizmo to where you want the first slice.
- Click the Slice button. The object is sliced.
- If you want, move the Slice Plane to a second position and click the Slice button again.
- Click the Slice Plane button again to turn it off and see the results. Tip: For a better look at the resulting mesh, turn off Edges Only on the Display panel
 DisplayProperties rollout.
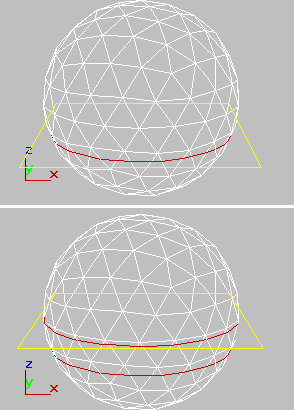
Slice gizmo placed for first slice (top) and second slice (bottom)
Interface
Cut and Slice group
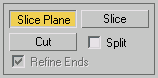
- Slice Plane
-
Creates a gizmo for a slice plane that can be positioned and rotated where you want to slice the edges. Also enables the Slice button.
- Slice
-
Performs the slice operation at the location of the slice plane. The Slice button is available only when the Slice Plane button is highlighted. This tool slices the mesh just like the Slice modifier in “Operate On: Face” mode.
Note: At the Face, Poly, or Element level, Slice works only on a sub-object selection. Make the selection before activating Slice Plane.At the Vertex or Edge level, Slice works on the entire object.
- Cut
-
Lets you subdivide the mesh surface between pairs of edges by clicking, moving the mouse, and then clicking again, creating a new edge or edges between the two edges. You can continue to move and click repeatedly to cut further; to exit this mode, right-click the viewport.
Note: The mouse cursor turns into a crosshairs where it's permissible to click while cutting. This includes visible edges as well as hidden ones. To view hidden edges, turn off Edges Only on the Display Properties rollout.Also, to avoid cutting edges that face away from you, turn on Ignore Backfacing on the Selection rollout.
The first click sets the first vertex. A dashed line tracks the cursor movement until you click a second time. A new vertex is created at each point you click. Alternately, double-clicking an edge simply divides that edge at the point clicked, with invisible edges on either side.
You can use Cut to cut across any number of faces, even across an entire object. Click one edge to start the cut, and a second edge to end the cut.
Use Snaps with Cut for precision. Cut supports Midpoint, Endpoint, and Vertex snaps.
You can also use the keyboard shortcut Alt+C to toggle Cut mode.
Tip: While using Cut (between clicks), you can navigate the viewport interactively as follows:- To pan the viewport, scroll the mouse wheel or drag with the middle mouse button.
- To orbit the viewport, hold down Alt while scrolling the mouse wheel or dragging the middle mouse button.
- To zoom the viewport, scroll the mouse wheel or hold down Alt+Ctrl and drag forward and back with the middle mouse button.
- Split
-
When on, the Slice and Cut operations create double sets of vertices where the edges are divided. This lets you easily delete the new faces to create holes, or animate the new faces as separate elements.
- Refine Ends
-
When on, adjacent faces at the ends of the cut are also divided by additional vertices, so that the surface stays contiguous. When Refine Ends is off, the surface will have a seam where the new vertex meets the adjacent face. For this reason, it’s a good idea to keep Refine Ends on unless you’re sure you don’t want the extra vertices created.
Refine Ends affects only Cut. It does not affect Slice.