This rollout sets parameters for the default scanline renderer.
-
Main toolbar >
 (Render Setup) > Render Setup dialog > Assign Renderer rollout > Choose Default Scanline Renderer as the production renderer. > Renderer panel > Default Scanline Renderer rollout
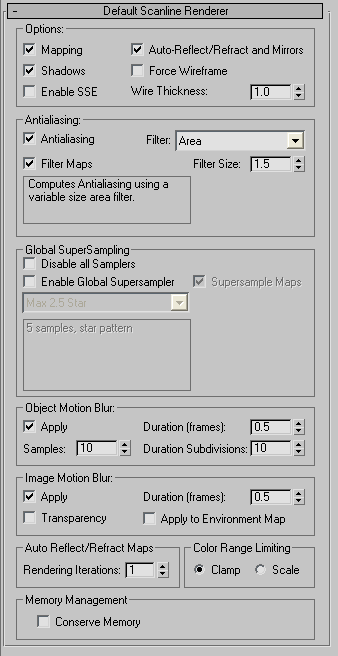
Options group
- Mapping
- Turn off to ignore all mapping information to speed up rendering for tests. Affects automatic reflections and environment maps as well as material mapping. Default=on.
- Auto Reflect/Refract and Mirrors
- Ignores automatic reflection/refraction maps to speed up rendering for tests.
- Shadows
- When off, cast shadows aren't rendered. This can speed up rendering for tests. Default=on.
- Force Wireframe
- Set to render all surfaces in the scene as wireframes. You can choose the thickness of the wireframe in pixels. Default=1.
- Enable SSE
- When on, rendering uses Streaming SIMD Extensions (SSE). (SIMD stands for Single Instruction, Multiple Data.) Depending on the CPU (or CPUs) of your system, SSE can improve render time. Default=off.
Antialiasing group
- Antialiasing
- Antialiasing smoothes the jagged edges that occur along the edges of diagonal and curves lines when rendering. Turn off only when you are rendering test images and speed is more important than image quality.
Turning off Antialiasing disables the Force Wireframe setting (see preceding). Geometry renders according to the assigned material even if Force Wireframe is turned on.
Turning off Antialiasing also disables render elements. If you need to render elements, be sure to leave Antialiasing on.
- Filter drop-down list
- Lets you choose a high-quality table-based filter to apply to your rendering. Filters are the last step in antialiasing. They work at the sub-pixel level and allow you to sharpen or soften your final output, depending on which filter you select. Below the controls in this group, 3ds Max displays a box with a brief description of the filter and how it is applied to your image.
Tip: Render Region and Render Selected give reliable results only when rendered with the Area filter.
The following table describes the available antialiasing filters.
Name Description Area Computes antialiasing using a variable-size area filter. This is the original 3ds Max filter.
Blackman A 25-pixel filter that is sharp, but without edge enhancement. Blend A blend between sharp area and Gaussian soften filters. Catmull-Rom A 25-pixel reconstruction filter with a slight edge-enhancement effect. Cook Variable A general-purpose filter. Values of 1 to 2.5 are sharp; higher values blur the image. Cubic A 25-pixel blurring filter based on a cubic spline. Mitchell-Netravali Two-parameter filter; a trade-off of blurring, ringing, and anisotropy. If the ringing value is set higher than .5 it will impact the alpha channel of the image. Plate Match/MAX R2 Uses the 3ds Max 2 method (no map filtering) to match camera and screen maps or matte/shadow elements to an unfiltered background image.
For details, see the topic “Plate Match Filtering.”
Quadratic A 9-pixel blurring filter based on a quadratic spline. Sharp Quadratic A sharp nine-pixel reconstruction filter from Nelson Max. Soften An adjustable Gaussian softening filter for mild blurring. Video A 25-pixel blurring filter optimized for NTSC and PAL video applications. - Filter Maps
- Turns on or off the filtering of mapped materials. Default=on.
Tip: Leave Filter Maps turned on unless you are making test renderings and want to speed up rendering time and save memory.
- Filter Size
- Allows you to increase or decrease the amount of blur applied to an image. This option is available for only some of the Filter choices.
Setting the Filter Size to 1.0 effectively disables the filter.
Note: Some filters show additional, filter-specific parameters below the Filter Size control.When you render separate elements, you can explicitly enable or disable the active filter, on a per-element basis.
Global SuperSampling group
- Disable all Samplers
- Disables all supersampling. Default=off.
- Enable Global Supersampler
- When on, applies the same supersampler to all materials. When turned off, materials set to use the global settings are controlled by the settings appearing in rendering dialog. All other controls in the Global SuperSampling group of the rendering dialog will become disabled, except for the Disable All Samplers. Default=on.
- Supersample Maps
- Turns on or off supersampling for mapped materials. Default=on.
Tip: Leave Supersample Maps on unless you are making test renderings and want to speed up rendering time and save memory.
- Sampler drop-down list
- Lets you choose which supersampling method to apply. Default=Max 2.5 Star.
The options for a supersampling method are the same as those that appear on the SuperSampling rollout in the Material Editor. Some methods offer expanded options that let you better control the quality of the supersampling and the number of samples taken during rendering.
Object Motion Blur group
You determine which objects have object motion blur applied to them by setting Object in the Motion Blur group of the Properties dialog for that object. Object motion blur blurs the object by creating multiple "time-slice" images of the object for each frame. It takes camera movement into account. Object motion blur is applied during the scanline rendering process.
- Apply
- Turns object motion blur on or off globally for the entire scene. Any objects that have their Object Motion Blur property set are rendered with motion blur.
- Duration
- Determines how long the "virtual shutter" is open. When this is set to 1.0, the virtual shutter is open for the entire duration between one frame and the next. Longer values produce more exaggerated effects.
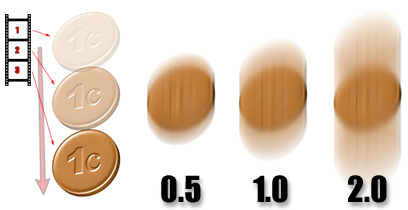
The effect of changing duration.
- Samples
- Determines how many Duration Subdivision copies are sampled. The maximum setting is 32.
When Samples is less than Duration, random sampling within the duration occurs (which is why there might be a slight granular look to the motion blur). For example, if Duration Subdivision=12 and Samples=8, there are eight random samples out of 12 possible copies within each frame.
When Samples=Duration, there is no randomness (and if both numbers are at their maximum value (32), you get a dense result (which costs between 3–4 times the normal rendering time for that specific object).
If you want to obtain a smooth blur effect, use the maximum settings of 32/32. If you want to cut down rendering time, values of 12/12 will give you much smoother results than 16/12.
Because sampling happens within the duration, the Duration value always has to be less than or equal to Samples.
- Duration Subdivisions
- Determines how many copies of each object are rendered within the Duration.

Left: Same value for Samples and Subdivisions.
Right: Samples value is less than Subdivisions.
Image Motion Blur group
You determine which objects have image motion blur applied to them by setting Image in the Motion Blur group of the Properties dialog for that object. Image motion blur blurs the object by creating a smearing effect rather than multiple images. It takes camera movement into account. Image motion blur is applied after scanline rendering is complete.
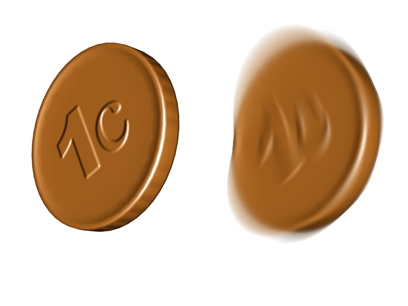
The coin on the right has Image Motion Blur applied
You can’t put image motion blur on objects that change their topology.
- Anything with an Optimize.
- Any primitive with animated segments.
- MeshSmooth of any type with a "Smoothness" value (under iterations) other than 1.
- MeshSmooth on polygons with Keep Faces Convex on.
- Anything with Displacement Material.
In general, if you have objects with changing topology, use scene or object motion blur rather than image motion blur.
- Apply
- Turns image motion blur on or off globally for the entire scene. Any objects that have their Image Motion Blur property set are rendered with motion blur.
- Duration
- Specifies how long the "virtual shutter" is open. When this is set to 1.0, the virtual shutter is open for the entire duration between one frame and the next. The higher the value, the greater the motion blur effect.
- Apply to Environment Map
- When set, image motion blur is applied to the environment map as well as to the objects in the scene. The effect is noticeable when the camera orbits.
The environment map should use Environment mapping: Spherical, Cylindrical, or Shrink-Wrap. The image motion blur effect doesn't work with Screen-mapped environments.
- Transparency
- When on, image motion blur works correctly with transparent objects that overlap. Applying image motion blur to transparent objects can increase rendering time. Default=off.
Auto Reflect/Refract Maps group
- Rendering Iterations
- Sets the number of inter-object reflections in non-flat automatic reflection maps. Although increasing this value can sometimes enhance image quality, it also increases rendering time for reflections.
Color Range Limiting group
Color Range Limiting allows you handle over-brightness by toggling between either Clamping or Scaling color components (RGB) that are out of range (0 to 1). Typically, specular highlights can cause color components to rise above range while using filters with negative lobes can cause color components to be below range. You choose one of two options to control how the renderer handles out of range color components:
- Clamp To keep all color components in range Clamp will change any color with a value greater than 1 down to 1 while any color below 0 will be clamped at 0. Any value between 0 and 1 will not change. Very bright colors tend to render as white when using Clamp since hue information can be lost in the process.
- Scale To keep all color components in range Scale will preserve the hue of very bright colors by scaling all three color components so that the maximum component has a value of 1. Be aware that this will change the look of highlights.
Memory Management group
- Conserve Memory
- When on, rendering uses less memory at a slight cost of memory time. Memory saved is in the range of 15 to 25 percent. The time cost is about four percent. Default=off.