MassFX simulation has a specific requirement for the initial placement of particles, namely that their shapes should not intersect each other. The standard Particle Flow position operators generate particle locations at random, disregarding the possibility whether particle shapes overlap. To address this requirement, the Birth Grid operator controls both the generation of the particles and their placement: two qualities that are tightly interconnected in the case of volume packing.
The operator has a box-shaped 3D icon that determines where the particles are born. The particle positions are calculated relative to this icon. Thus, once the particle placement is calculated, you can transform the operator icon without the need for recalculation.
To use Birth Grid, add it to an event or replace an existing birth operator in the particle system. When you add the Birth Grid operator, it creates a Birth Grid helper object at the world origin (0,0,0). Position this icon where you want the particles to be born.
For best results, if the birth event contains a Position-type operator, delete it.
Important Birth Grid Points
Birth Grid is the most complex birth-type operator available for Particle Flow, so it's important to be aware of how the various settings combine to create the particle array. As you work with Birth Grid, keep these considerations in mind:
- For best and predictable results, do not scale the Birth Grid icon, but instead adjust the Icon Size settings. If you do scale the icon, be aware that the number of particles remains the same, but their placement changes.
- Conversely, changing the Birth Grid icon size by adjusting the Icon Size settings does change the number of particles. Given the same density (Grid Size setting), a larger or smaller icon produces more or fewer particles, respectively.
- If, based on the Grid Size, Upper Limit, and Icon Size settings, there aren't enough particles available to fill the grid, the array is truncated. In that case, increase the Upper Limit setting (and be prepared for potential slowdown due to the increased number of particles)
- The Grid Size and Non-Uniform Grid settings affect particle density but not volume (given sufficient available particles), while Icon Size affects volume but not density.
- The Grid Size value is inversely proportional to the number of particles; the smaller the Grid Size value, the more particles are generated. If the particles don't fit with the specified volume without overlapping, whether that volume is determined by the Icon Size settings or a mesh volume, the particles will exceed that volume when the MassFX World operator is on. If you see this happen, increase Grid Size to reduce the number of particles.
- Birth Grid fills the icon in a particular order (typically from the bottom up), so if you see that the grid is not full (say, because of reducing the Non-Uniform Grid dimensions), the particles will typically be missing from the same part of the volume, and you need to increase the Upper Limit setting to fill it.
- Because the fill order is from bottom up (in the positive Height direction), you can take advantage of that if you have operators that use particle Birth index. Knowing the order, you can rotate the Birth Icon in space to have the correct order orientation. For an example of this, see the included sample file WallToWall.max.
Procedure
For best results with Birth Grid, certain conditions should be met. For a recommended method, follow this example procedure:
To use Birth Grid:
- Open Particle View and add a Standard Flow.
- Click the PF Source event, and then on the Emission rollout, set Quantity Multiplier
 Viewport % to
100.0.
Viewport % to
100.0.
This is important because the default Particle Flow system has a 50% viewport-visibility multiplier. As a result, the grid knots seem not to be populated properly; only half of the particles appear. To see all particles in their proper places, adjust the Viewport Multiplier to 100%.
- Click the Display 01 operator and set Type to Geometry.
- In Event 01, turn off or delete the Position Icon and Rotation operators.
It's important not to use a position operator in the birth event because Birth Grid uses its icon for placing particles. It's not quite as important not to use a rotation operator, but in general you'll probably want the particles (especially non-spherical ones) to be aligned with one another.
-
Set the particle shape and size as you like, using an appropriate operator.
- Replace the Birth operator in Event 01 with the Birth Grid operator and click the Birth Grid operator so its rollout shows on the right side of Particle View.
This places the Birth Grid icon, populated with the particle grid, at the world center (0,0,0); move it to the desired birth location.
Typically the grid is solidly packed. To resolve this, decrease the particle size, increase the Grid Size value (to increase the spacing between grid knots), or both.
To avoid particle collision at the start of a MassFX simulation, there should be visible spaces between the particles.
- Play the animation.
The particles drop from their starting positions in the grid (because of the default Speed operator).
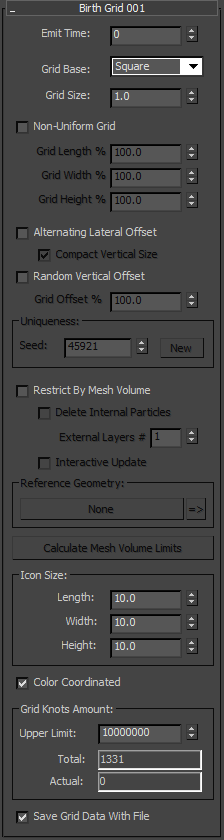
Interface
Birth Grid positions the particles it creates within a 3D, box-shaped grid. By default, the particles are evenly spaced; the overall spacing is determined by the Grid Size setting. The higher this value, the greater the spacing between particles, and vice-versa. To produce uneven spacing, turn on Non-Uniform Grid and use its three numeric settings to adjust spacing on individual axes as percentages of the overall spacing. Both Grid Size and, optionally, the Grid Length/Width/Height % settings specify particle density within the grid.
Conversely, the volume of the 3D grid is determined by the Icon Size settings (Length/Width/Height); these do not affect density. To achieve a grid shape other than a box, use Restrict By Mesh Volume with a mesh object. You can thus create a grid of any shape, filled or hollow (you can specify the shell thickness with the External Layers setting). By nesting objects in the Mesh Volume object, you can specify arbitrary layers of particles within the volume.
- Emit Time
- The frame number at which the operator emits all particles. Default=0.
Birth Grid generates all particles simultaneously at the frame defined by the Emit Time setting. To make the particles appear gradually, generate the particles in a birth event without a shape operator, then direct the particles in any fashion you like to another event containing a shape operator.
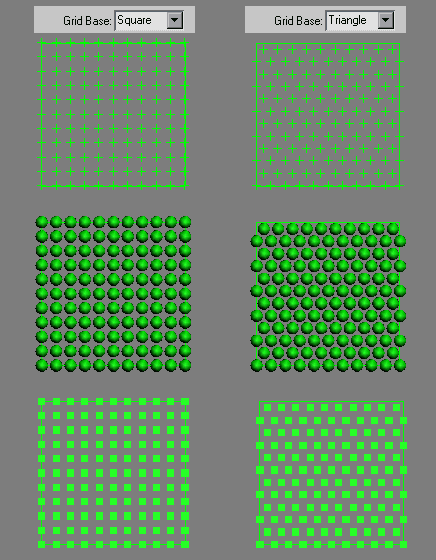
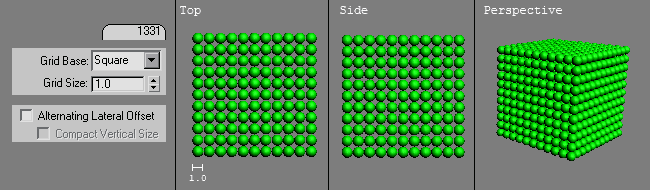
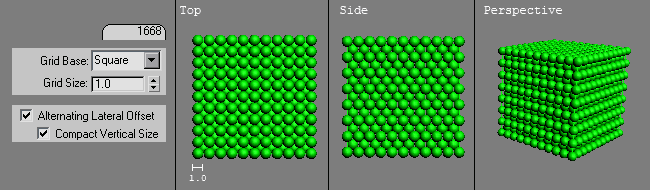
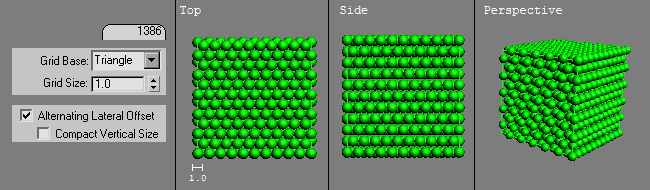
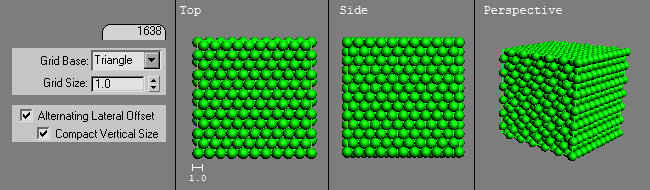
- Grid Base
- Choose how to pack the particles on a single grid layer: in a square or triangular layout. The two choices are depicted as viewed from the top in the following illustrations:
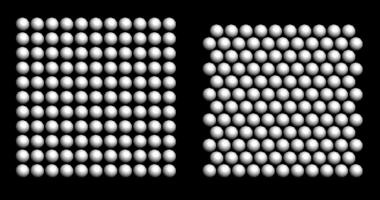
Square Triangle
- Grid Size
- The distance between grid knots; each particle is born at a knot. When you use this parameter with Non-Uniform Grid off (see following), all knots are equidistant from one another.
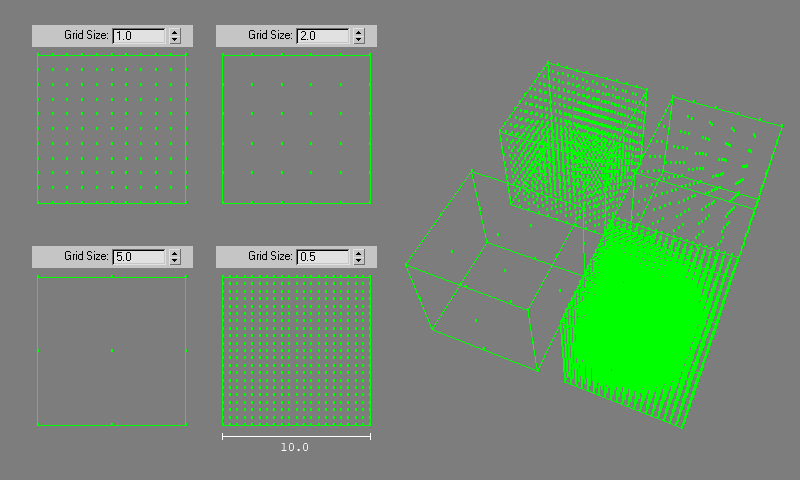
Comparison of different Grid Size values
- Non-Uniform Grid
- When on, you can specify knot spacing separately for each of the three axes, expressed as a percentage of the basic spacing specified by Grid Size. Use the Grid Length/Width/Height % settings for this purpose.
For a video showing the effects of the Non-Uniform Grid option, see Non-Uniform Grid.
- Alternating Lateral Offset
- Places particles in more compact manner, similar to the way fruit is stacked at a produce stand. When on, makes Compact Vertical Size available.
- Compact Vertical Size
- Controls whether the vertical grid size is adjusted in order to make particles to stay more compact where grid size is not the distance between the layers but the distance between the particles of the layers.
For examples of using Alternating Lateral Offset and Compact Vertical Size with the different Grid Base options, see the following illustrations.


- Random Vertical Offset
- Randomizes particle placement by moving vertical columns of particles, only to the extent that particles do not interpenetrate.
- Grid Offset %
- The extent of the random vertical offset.
Uniqueness group
- Seed
- Changes the random vertical offsets of the particle columns.
- New
- Calculates a new seed using a randomization formula.
- Restrict By Mesh Volume
- When on, and you've specified the reference geometry (see following), Birth Grid generates particles only at grid-knot locations inside the reference object. This means, of course, that the reference object must be at least partially inside the operator icon.
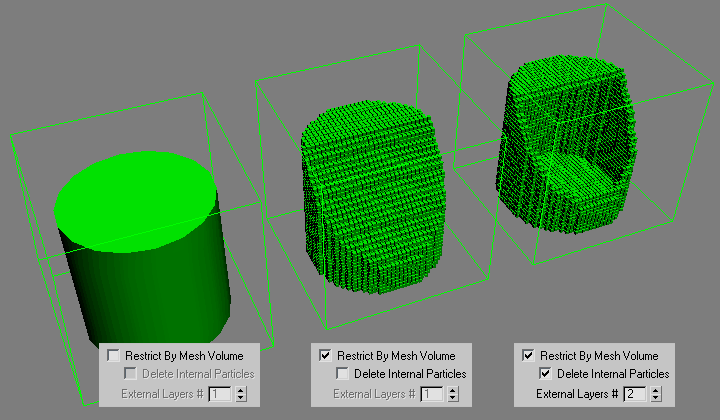 Tip: Use this feature to create a particle array with the shape of a mesh object. With the Delete Internal Particles option (see following), the particle array can take the form of a shell that defines the object shape, such as in the following illustration:
You can also use nested mesh objects, combined into a single object with Attach, for layered shells. The way this works is that, when using Restrict By Mesh Volume, the operator places particles only inside each pair of concentric surfaces, so you can get hollowed-out sections without using Delete Internal Particles.
For the following illustration, we nested (from the inside out) two cylinders, a box, and a sphere. To get the open top and bottom, we reduced the Birth Grid icon height and positioned it so its top and bottom were inside the nested shapes' bounds.

Note: The process of determining which grid knots are inside of the reference geometry can be lengthy, depending on the number of grid knots and complexity of the mesh topology. During the calculations a running progress bar appears in the status line of the interface (near the bottom). To interrupt the calculations, click the Cancel button.Tip: If you change any parameters of the Birth Grid operator while the Restrict By Mesh Volume is enabled, you must click Calculate Mesh Volume Limits to see the effect.When Restrict By Mesh Volume is on, the following controls become available:
- Delete Internal Particles
- When on, generates only the outer layer of particles within the mesh volume.
- External Layers #
- the thickness, in particle layers, of the shell defined by the mesh volume.
- Interactive Update
- When on, changing a Birth Grid setting such as Grid Size updates the grid immediately. When off, to see the results of changing a parameter, click Calculate Mesh Volume Limits.
Tip: When dealing with a large number of particles, you can work faster by turning off Interactive Update and recalculating the grid only when necessary.Note: Turning on Interactive Update forces an immediate update.
- Reference Geometry
- Click the button to specify an object whose mesh defines the volume for restriction of particle generation.
- =>
- To select the reference object assigned in Birth Grid, click this button. This selects the object in the scene and makes it easy to transform the object or access its parameters.
- Calculate Mesh Volume Limits
- Click the button to specify an object whose mesh defines the volume for restriction.
The first time you specify a reference object, Birth Grid automatically adjusts the operator to create particles only at knots inside the object. If you later transform or modify the object or specify a different reference object, use Calculate Mesh Volume Limits to register the change and update the grid.
- Icon Size
- Set the size of the helper icon in world units. This affects the volume of the icon but not the density of particles. Keep in mind that, even when using the Restrict By Mesh Volume option, Birth Grid creates particles only inside the icon volume.
For the most predictable results when using the density settings (Grid Size and Non-Uniform Grid), do not scale the icon directly; instead, use the Icon Size settings.
- Color Coordinated
- When on, the Birth Grid icon uses the same color as the Display operator in the event.
Grid Knots Amount group
- Upper Limit
- Use to specify the maximum number of grid knots for Birth Grid to use.
- Total
- The number of grid knots in the operator's icon, without taking into consideration the restrictions imposed by a reference geometry mesh.
- Actual
- When using Restrict By Mesh Volume with a reference geometry mesh, shows the number of particles after the mesh-volume restriction.
- Save Grid Data With File
- Because it can take a long time to calculate the grid knots, you can save the result of the calculation with the MAX scene file by turning on Save Grid Data With File. Otherwise the grid knots placement is recalculated each time you open the scene file. The potential drawback is that this creates larger files.