Lens Effects create real-life effects commonly associated with a camera. Lens effects include Glow, Ring, Ray, Auto Secondary, Manual Secondary, Star, and Streak.
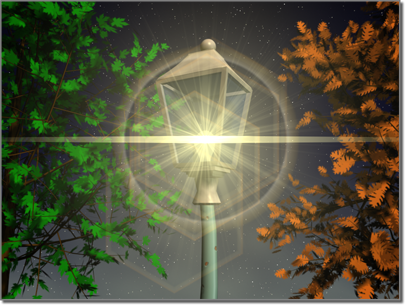
Lens flares added as lens effects
Procedures
To add an effect:
- Select the desired effect from the list on the left side of the Lens Effects Parameters rollout.
- Click the (>) arrow button to move it into the column on the right.
To delete an applied effect:
- Select the effect from the list on the right side of the Lens Effects Parameters rollout.
- Click the (<) arrow button to remove it from the list.
Interface
Lens Effects Parameters rollout

The Lens Effects system allows you to apply effects to your rendered image by choosing a particular effect from the list on the left and adding it to the list on the right. Each effect has its own rollout of parameters, but all effects share two panels of global parameters.
Lens Effects Globals rollout, Parameters panel
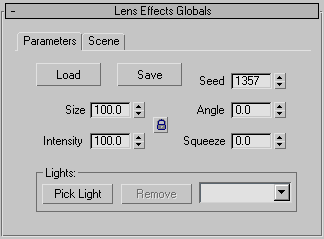
- Load
- Displays the Load Lens Effects file dialog that enables you to open an LZV file. The LZV file format contains information saved from a previous configuration of Lens Effects. This allows you to load and use Lens Effects that have been saved from previous sessions of 3ds Max.
- Save
- Displays the Save Lens Effects file dialog that enables you to save an LZV file. The LZV file format contains information saved from a previous configuration of Lens Effects. This allows you to save several types of Lens Effects and use them in multiple 3ds Max scenes. Note: Saving an effect as an LZV file will only save the attributes of the effect on the frame that it is saved at. The LZV file format doesn’t save the animation keys of an animated parameter.
- Size
- Affects the size of the overall Lens Effect. This value is a percentage of the size of the rendered frame.
- Intensity
- Controls the overall brightness and opacity of the Lens Effect. Higher values produce a bright, more opaque effect, and lower values produces a dim, transparent effect.
- Seed
- Gives the random number generator in Lens Effects a different starting point, which creates a slightly different Lens Effect without changing any settings. Using Seed guarantees a different Lens Effect, even if the differences are very small. For example, if you set up a Ray effect, you will get slightly different rays in the lens flare if you adjust the seed value.
- Angle
- Affects the amount that the Lens Effect rotates from its default position, as the position of the effect changes relative to the camera.
- Squeeze
- Squeezes the size of the overall Lens Effect, either horizontally or vertically to compensate for different frame aspect ratios. Positive values stretch the effect horizontally, and negative values stretch it vertically. The value is a percentage of the size of the flare. Range=100 to -100.
Lights group
Allows you to choose lights to apply Lens Effects to.
- Pick Light
- Enables you to select a light directly through the viewports. You can also select a light by pressing H to open the Pick Object dialog.
- Remove Light
- Removes a selected light.
- [drop-down list]
- Provides quick access to lights that you have added to the Lens Effect.
Lens Effects Globals rollout, Scene panel
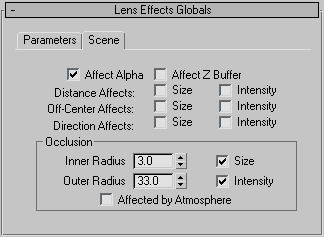
- Affect Alpha
- Specifies whether or not the Lens Effect affects the alpha channel of an image when the image is rendered in a 32-bit file format. The alpha channel is an extra 8 bits of color (256 colors) that indicate transparency in an image. Alpha channels are used to composite one image seamlessly over the top of another. If you want to composite a Lens Effect, or an image that contains a Lens Effect, over the top of another image, enable this option. If you are not rendering to a 32-bit file, do not enable this option.
- Affect Z Buffer
- Stores an object's distance from the camera. The Z-Buffer is useful for optical effects. When this option is enabled, the linear distance of the Lens Effect is recorded, and can be used in special effects that make use of the Z-Buffer.
- Distance Affects
- Allows distance from the camera or viewport to affect the size and/or the intensity of the effect.
The Auto Secondary, Manual Secondary, and Star effects do not support Distance Affects
 Size, and the Auto Secondary effect does not support Distance Affects Intensity, either.
 - Off-Center Affects
- Allows an effect that is off-center from the camera or viewport to affect the size and/or the intensity of the effect.
- Direction Affects
- Allows direction of spot lights with respect to the camera or viewport to affect the size and/or the intensity of the effect.
The size and intensity of the effect are at a maximum when the light is pointed at the camera (or viewport).
Occlusion group
Occlusion is used to determine when a Lens Effect will be affected by an object that comes between the effect and the camera. By using two spinners to determine occlusion you can have scene objects realistically affect the look of your effect. The outer radius will determine when another scene object will begin to occlude and the inner radius will determine when the scene object will cause the effect to reach maximum occlusion.
- Inner Radius
- Sets the inner radius around the effect that another scene object must intersect in order to completely occlude the effect.
- Outer Radius
- Sets the outer radius around the effect that another scene object must intersect in order to begin to occlude the effect.
- Size
- Decreases the size of the effect when being occluded.
- Intensity
- Decreases the intensity of the effect when being occluded.
- Affected by Atmosphere
- Allows Atmospheric Effects to occlude Lens Effects.