Create a spiral tube or other helical shape
Create a spiral tube (coil) method 1
Create a surface in the shape of a spiral tube (helix) in order to model objects such as appliance cords or springs.
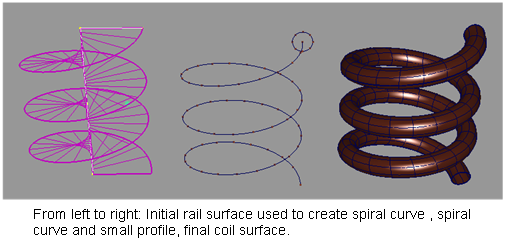
First you need to model a spiral curve to act as a rail. You then place a small circle or other closed curve at the beginning of the spiral to act as the profile. Finally, you use Swept surface tools such as Extrude or Rail Surface to produce the coil.
Create the spiral curve
-
Draw a straight line that has the height of the spiral.
-
From one end of this line, create another straight line, perpendicular to it. The length of this second line should equal the radius of the spiral.
-
In the Surfaces tool palette, select the Swept Surfaces > Rail Surface tool
 , then the
  icon.
icon. -
In the control window, do the following:
- Set Generation Curves and Rail Curves to 1.
- Set Rotate Xform to an angle of 360 or more. 360 degrees produces one coil, 720 degrees produces two coils, and so on.
-
Select the second curve as the Generation Curve and the first curve as the Rail Curve to create a spiral surface.
-
In the Curve Edit tool palette, select the Create > Duplicate Curve tool
 and select the outside edge of the surface.
 -
Delete (or hide) the surface and keep only the curve.
Create the coil surface
-
Place a small closed curve (such as a circle) centered at the beginning of the spiral, and perpendicular to it.
-
In the Surfaces tool palette, do one of the following:
- Select the Swept Surfaces > Extrude tool
 , and then set Style to Tube.
 - Select the Swept Surfaces > Rail Surface tool
 , and then set Generation Curves to 1 and Rail Curves to 1.
- Select the Swept Surfaces > Extrude tool
-
Select the small closed curve first, then the spiral curve.

Create a spiral tube (coil) method 2
This method uses the Revolve tool.
-
Place a small closed curve (such as a circle) centered at the beginning of the spiral, and perpendicular to it.
-
In the Surfaces tool palette, select the Revolve
 tool, then the
  icon.
icon. -
In the control window:
- Set the Surface Type to Freeform.
- Set the Sweep Angle to 360.
- Set the Segments to the number of coils you want in the spiral.
- Set the Pitch value (for example, 200). The larger the pitch number, the greater the distance between the coils. Negative values create a coil in the opposite direction.
- Set the revolve Axis to Manip.
- Select Per Segment.
-
Select the closed curve you created in step 1.
-
Change the radius of the helix by dragging the circular dot on the manipulator.

Create a helical shape
-
Create a generation curve and a rail curve. The distance between the generation curve and rail curve is the radius of the helix.
-
In the Surfaces tool palette, select the Swept Surfaces > Rail Surface tool
 , then the
  icon.
icon. -
In the Rail Surface Control window:
- Set Generation Curves to 1.
- Set Rail Curves to 1.
- Set Sweep Mode to View.
- Set the Sweep Projection to the plane to which the generation curve is parallel.
- Set the Sweep Pivot to Off Curve.
- Select Auto Update.
-
Click the generation curve.
-
A 3D locator appears and you are prompted for the generation curve pivot. Use magnet snapping to move it to the starting point of the rail curve. Then click Go.
-
Click the rail curve.
-
A curve locator appears for the rail curve pivot. Move the locator to the starting point of the rail curve, then click Go.
The generation curve’s pivot point moves along the rail curve. Since the pivot is offset from the actual generation curve, the generation curve sweeps the new surface at an offset from the rail curve.
-
In the Rotate Xform field, enter the degrees of rotation you want as the generation curve travels around the rail curve.
For example, if you enter 360, the generation curve makes one full revolution as it travels the length of the rail curve.
helix curves helix curves active
