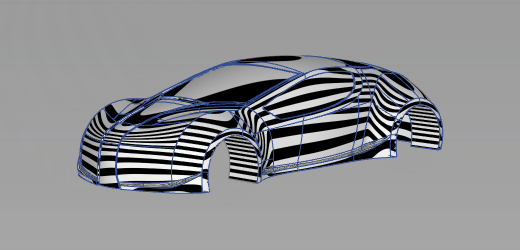
Horizontal/Vertical (Zebra) diagnostic shader
Displays horizontal or vertical highlights on the surface. Useful for identifying surfaces that do not meet smoothly (surfaces have mismatched tangents).

This mode shows horizontal or vertical highlights on the surface.

Horizontal/Vertical highlighting helps you find surface flaws. A common use for this is the identification of adjacent surfaces with mismatched tangents—in other words, surfaces that do not meet smoothly. You can also use Surface Continuity for this purpose, but Horizontal/Vertical highlighting gives you a clearer view of the surfaces.
This mode lets you sweep multiple black and white highlights across a surface. You can see where the highlights do not move smoothly. A jump in the highlight flow indicates flaws in either the surface or its boundary with a second surface.
Horizontal/vertical zebra stripe options
This mode shows horizontal or vertical highlights on the surface.
Highlighting helps you find surface flaws by using a color texture to simulate natural highlights. It maps a color pattern onto a surface based on the angle (from 90 to -90 degrees) at which a viewing ray hits the surface.
A common use for highlighting is to identify adjacent surfaces with mismatched tangents. (You can also use Surface continuity for this, but highlighting gives you a clearer view of the surfaces.) Also note that not all Alias packages include the highlighting features.
Vert., Horz.
Sets the highlights to be vertical or horizontal.
Lock Texture
Normally the highlights are projected from the camera, so the projection changes as you move around the surface. (This is the unlocked mode.) You can turn this option on so that the texture remains locked relative to the surface.
Repeats
Sets the rate at which the texture repeats. Increasing this number will increase the number of highlight lines on the surfaces.
Transparency
Sets the transparency of the shaded surfaces, from 0.0 (totally opaque) to 1.0 (totally transparent).
Thickness
Controls the thickness of the bands inside the texture.
Ambient Light
Slide to set the level of ambient light, an illumination that comes from all directions and lights all objects uniformly. The slider ranges from 0.0 (no illumination) to 1.0 (maximum illumination).
Diffuse Light
Slide to set the ability of objects to reflect light in all directions. The slider ranges from 0.0 (no light is reflected) to 1.0 (all light is reflected).
Link Light to Camera
When this option is checked on (default) the light source for the shading comes from the camera (like a headlight), so that the highlights move over the model as you tumble around it.
Checking off this option un-links the light source from the camera and locks it to its current position, so the highlights remain stationary as you tumble. It also displays two sliders and a manipulator that let you rotate the light around the model.
Light Azimuth
Azimuth values range from -180 degrees to 180 degrees and rotate the light horizontally.
Light Elevation
Elevation values range from -90 to 90 degrees and rotate the light vertically.