Surface Evaluation diagnostic shader
Displays the model using draft Angle, Deviation Map, or Contact Analysis shading.

Surface Evaluation
Choose between Draft Angle, Deviation Map, or Contact Analysis shading types.
Draft Angle Evaluation
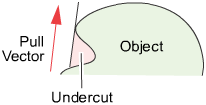
Some manufacturing processes, like injection molding, need you to design molds. A section of a mold only moves in a certain direction during removal. This direction is the pull vector.

- The mold parts are pulled away from the object in a straight line, the pull vector.
- If the sides of the mold are too steep, the object cannot leave the mold. As well, the object cannot leave the mold if the mold undercuts itself.
- The minimum allowable angle between the sides of the mold and the pull vector is the draft angle.
- If part of a surface has an angle less than the draft angle, it is said to be out-of-draft.
- Draft lines are the boundaries between in-draft and out-of-draft regions.
- The parting line sits at a draft angle of zero degrees, and corresponds to the location where the mold separates.
Angle-to-pull is the angle between the surface tangent plane at a surface point and the pull vector. When the angle-to-pull is 0 degrees, the pull vector is parallel to the surface tangent plane at that point. When the angle-to-pull is 90 degrees, the pull vector lies normal to the surface.
Most manufacturing processes require that the angle-to-pull for a molded surface be greater than some angle, for example 1 degree, or else the molded part will not separate from the mold. This angle is the draft angle.
When the angle-to-pull is less than the draft angle, the surface point is out-of-draft. When the angle-to-pull is more than the draft angle, the surface point is in-draft.
The Draft Angle shading mode offers the ability to evaluate in-draft and out-of-draft regions along both directions of the pull vector, since a mold often separates in both directions. Positive and negative in-draft and out-of-draft regions of the surface, as well as tolerance regions are shaded different colors. Tolerance regions are "grain wash" zones that forms part of the out-of-draft regions.

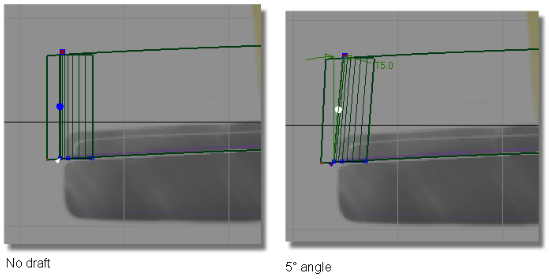
In the pictures above, the draft surface is angled in to the pull direction by 5 degrees. This angle allows the model to be withdrawn from the injection mold.
The Draft Angle evaluation works best when all selected surfaces are oriented the same way, either facing inwards, or outwards.
Draft Angle options
These shading options display which parts of a surface are in-draft or out-of-draft for one or both directions of a specified pull vector, and associated draft angle(s). These options appear when you set Type to Draft Angle.
Draft Ramp
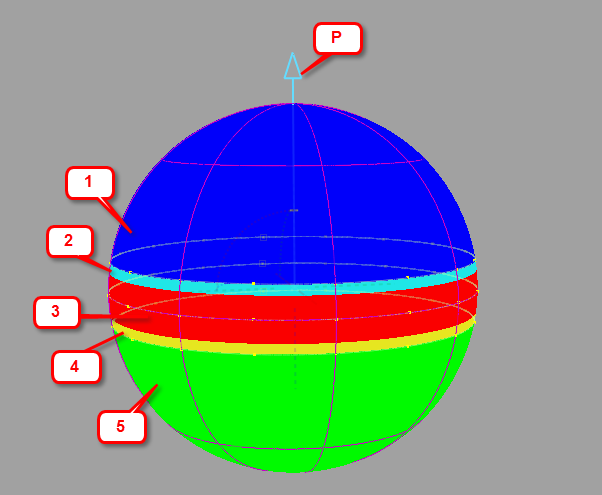
In-draft points are shaded blue or green, while out-of-draft points are shaded red. You can also display tolerance regions in cyan and yellow through the Pos Tolerance and Neg Tolerance number fields.
 Output from Draft Angle diagnostic shading showing the different shaded regions. P = Pull direction. |
|
Positive Draft
Check on this option if you want to see the in-draft and out-of-draft regions for a given draft angle (Pos Draft Angle) with respect to the given pull vector.
Pos Draft Angle
If the angle between a surface point and the pull vector is less than this value, the surface point is out-of-draft, and is colored red.
If the angle between a surface point and the pull vector is more than this value, the surface point is in-draft, and is colored blue.
Pos Tolerance
Displays a cyan tolerance region between the positive in-draft and out-of-draft regions. The tolerance value represents an angle measured in degrees. If the tolerance value is 0, no tolerance region is displayed.
Negative Draft
Check on this option if you want to see the in-draft and out-of-draft regions for a given draft angle (Neg Draft Angle) with respect to the negative (opposite) direction of the pull vector.
Neg Draft Angle
If the angle between a surface point and the direction opposite to the pull vector is less than this value, the surface point is out-of-draft, and is colored red.
If the angle between a surface point and the direction opposite to the pull vector is more than this value, the surface point is in-draft, and is colored green.
Neg Tolerance
Displays a yellow tolerance region between the negative in-draft and out-of-draft regions. The tolerance value represents an angle measured in degrees. If the tolerance value is 0, no tolerance region is displayed.
Transparency
Sets the transparency of the shaded surfaces, from 0.0 (totally opaque) to 1.0 (totally transparent).
Vector Control
Show pull direction as
Rotation – Displays values for the X, Y, and Z rotation of a vector that defines the pull direction.
Vector – Displays values for the X, Y, and Z coordinates of a vector that defines the pull direction.
In the three entry fields following Show pull direction as, enter 3D coordinates to define a direction in which the object would be removed from its mold. For example, if you want the pull vector to run along the Z axis, enter 0, 0, 1.
X, Y, and Z
Alignz the pull vector with the X, Y and Z axes.
Update From Selection
Click this button to set the pull direction to be that of an already selected (picked) vector or plane. In the case of a plane, the direction perpendicular to the plane is used.
The X, Y, Z fields are automatically set to the coordinates of the picked vector.
Show Manip
This option is selected automatically when you update the pull direction by manually modifying the manipulator in the view.
Curve Control
Visual
Creates fast polylines. These lines are mainly for display purposes. Although you can pick them (to delete them, for example), you cannot use them to create geometry.
Creates curves-on-surface. These curves are real geometry that can be edited and used to build further geometry.
CoS
Creates curves-on-surface. These curves are real geometry that can be edited and used to build further geometry.
Zero Degree
Check on this option to create a curve on the surface for a draft angle of 0 degree. This corresponds to the location where the mold separates.
Show Curves Only
This option is only available if Create Curves is checked on.
Disables the shading and shows the draft lines as curves only.
Subdivision
The quality of the curve-on-surface projection, from 1 to 6. The higher the value, the more precise the result. Use low values for draft quality, use higher values for final results.
Tolerance
When Visual is selected, this value defines the quality of the visual curves independently of the tessellation tolerance. This lets you set the visual tolerance to a smaller value to get better quality visual curves, without reducing the tessellation tolerance used for shading.
Create
Create draft curves.
Delete
Delete draft curves.
Deviation Map Evaluation
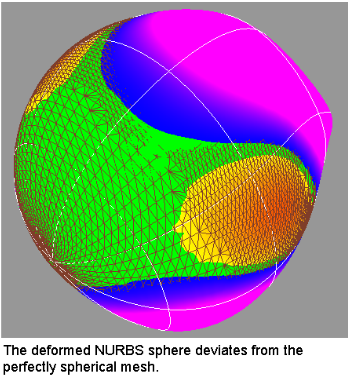
If you have scanned an object, and are trying to match the scan data with your NURBS surfaces, the Deviation Map mode lets you know where the two objects deviate. It calculates the distance between a set of meshes and a set of NURBS surfaces, and displays it as a color-coded map, for a quick assessment of the gap’s severity.
Deviation Map can also show the deviation between two sets of surfaces, or two sets of meshes.
This mode acts as a toggle. It only displays the shading once it has been calculated once through the use of Evaluate > Deviation Map  .
.

Deviation Map options
These options appear when you select Deviation Map through the drop-down menu for the Type button.
Transparency
Sets the transparency of the shaded surfaces or meshes, from 0.0 (totally opaque) to 1.0 (totally transparent).
Contact Analysis Evaluation
This type of surface evaluation provides you with an ability to analyse the safety of a model. It is especially useful with car interior surface design work.
Equally capable of working with meshes and NURBS surfaces, this shading mode enables you to examine a collection of surfaces for potential impact points with a head (represented by a sphere).
The tool internally creates a sphere, to judge where the head could contact the surface model. For example, some spaces, like between the steering wheel and the dash board, are too small for the head to fit into. Only the areas where a head can actually fit in the case of an accident are examined for sharpness and safety issues.
Before analyzing the model, ensure that normals are unified. If they point in different directions, results will be unreliable.
This mode acts as a toggle. It only displays the shading once it has been calculated once through the use of Evaluate > Contact Analysis  .
.