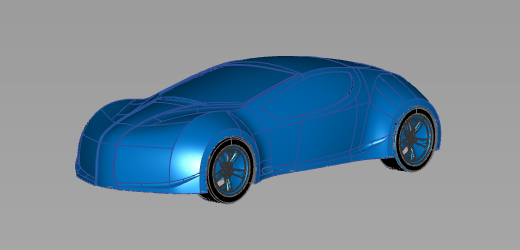
Multi Color diagnostic shader
Shades all the picked surfaces with a single color. Useful for detecting bumps, dents, or other surface irregularities.

The Multi Color icon shades all the picked surfaces with a single color that you can choose. Use this shading mode to see how your model looks as a finished product, and detect any bumps, dents or other surface irregularities.

You can control the shading qualities with the Light options.
Multi Color options
By default, Diagnostic Shading uses a point light located at the eye position of the camera. You cannot see or pick this light as an object, but you can change its parameters through the following options.
Show Orientation
When this option is checked, components of surfaces or meshes that have reversed normals are shaded in yellow.
Color
Click the color swatch to set the color, or drag the slider to change the color’s brightness. This option only appears with Multi Color icon selected.
Specularity
Change the size and intensity of highlights on the surface.
Transparency
Set the transparency of the shaded surfaces, from 0.0 (totally opaque) to 1.0 (totally transparent).
Light Intensity
Set the brightness of the light source.
Highlights
When set to Fast, the highlights are calculated more quickly and less accurately. When set to Accurate, the highlights are calculated more accurately, but more slowly.
This option is only available in Multi Color mode.
Link Light to Camera
When this option is checked on (default) the light source for the shading comes from the camera (like a headlight), so that the highlights move over the model as you tumble around it.
Checking off this option un-links the light source from the camera and locks it to its current position, so the highlights remain stationary as you tumble. It also displays two sliders and a manipulator that let you rotate the light around the model.
Light Azimuth
Azimuth values range from -180 degrees to 180 degrees and rotate the light horizontally.
Light Elevation
Elevation values range from -90 to 90 degrees and rotate the light vertically.
The following options apply to Multi Color mode only.
Reflections
If this is checked, the following Reflections options are displayed.
Scene
Choose a reflection map by clicking Scene for a drop-down menu. The choices are Showroom, Hall, Evaluation, Diffuse, and Abstract.
Scene imagery by CGI Backgrounds: http://www.cgibackgrounds.com/.
Sky environments images copyright © 2004 Dosch Design GmbH. For more textures, 3D models and HDRIs, please visit http://www.doschdesign.com.
Reflectivity
Use this slider to control how much your model reflects the scene.